Thursday, October 30, 2014

Tour our booth!

If your Facebook feed for the last few days has been filled with mentions of Quilt Market* and so-and-so's booth, and you're wishing that you could have attended the show, we can help! We've just returned from Houston and we're ready to share!

Your tour today: A look at our Fall Quilt Market booth in Houston, as well as the fabric lines and quilts/projects showcased in it.

A view of one side of the booth:

And the other:

And now the close-ups!
Left: "Indigo Stars" quilt designed by Tammy Silvers of Tamarinis using Bella Casa (download the free pattern here)
Right: "Bella Rosa" quilt designed by Terry Albers of Hedgehog Quilts using Bella by Ro Gregg (pattern available for purchase on Hedgehog Quilts website)
On the table in front, left: "Circles and Squares" quilt designed by Airborne Heirlooms using Cosmopolitan (download the free pattern here)
On the table in front, right: "Fabulous Frames" quilt designed by Airborne Heirlooms using the Elemental Lines collection (download the free pattern here)


"A Walk in the Park" quilt designed by Pine Tree Country Quilts using Ro Gregg's A Walk in the Park collection (download the free pattern here)


"Mesmerize" quilt embroidery design by Jayme Crow of Bella Nona using Fabri-Quilt batiks and Magnifico threads by Superior Threads (quilted by Marlene Oddie of KISSed Quilts


"Flags Forever" quilt designed by Airborne Heirlooms using the Bella Casa snack pack (download the free quilt pattern here). 
(Notice the jersey displayed by this quilt--displaying some hometown baseball pride as our Kansas City Royals played in the World Series during Quilt Market!)


"Bella Garden Stroll" quilt by Mara Quilt Designs using Ro Gregg's Bella collection (download the free quilt pattern here)


"Romance in Flight" designed by Larene Smith of the Quilted Button using the Who's Who collection by Ro Gregg (Check our website soon to download this free pattern!) 


"Windsor Woods Block of the Month" quilt designed by Pine Tree Country Quilts using Ro Gregg's Windsor Woods collection (ask for it at your local quilt shop)


"Monkey Wrenches" quilt designed by Airborne Heirlooms using the Shadows snack pack (download the free quilt pattern here)


"Asian Fans" quilt designed by Terry Albers of Hedgehog Quilts using Ro Gregg's Asian Fanfare collection (download the free quilt pattern here)


"Stonewall" designed by Donna Lynn Thomas using Marblehead by Ro Gregg (pattern available for purchase on Donna Lynn Thomas' website)


 A booth sample quilt made by our own Sue Linam using our Cuddle Prints Flannel, chenille style!


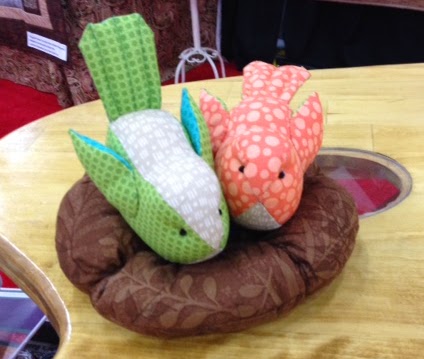
Birds in a nest! (Download the patterns here)


Meet our Magic Trees!
We wanted to create an organic, softly whimsical, magical garden feeling with these trees, so we had tiny birds and lights adorning the branches. We even had one nest with eggs in one of the trees. The idea continued through the booth with hanging birdhouses and stuffed birds in nests on the table (see below). The tree bases are wrapped with tubes covered in ruffles, and then we used ruffles on the thicker branches of the trees as well, and wrapped thinner branches with strips of fabric. 


And there's our booth! Thanks for coming along on the tour; keep an eye on the blog for more information about our new fabrics and patterns that debuted at Quilt Market!

*If you're wondering what Market is, twice a year Quilts Inc. holds industry-only shows for all things quilt related, and quilt shop owners see what's new and make purchases for their stores. The show floor is full of peeks at new fabric lines, quilting tools and machines, patterns, samples, and more...and don't forget a gallery section of show-stopping quilts on display!

Tuesday, October 28, 2014

12 Days of Christmas blog hop winners!

Christmas is only 57 days away! 


We hope you enjoyed our 12 Days of Christmas and found some great ideas and fabric lines to use as you sew for the upcoming holiday! We're done showing off Christmas fabrics and tutorials (for now, at least!), but it's time to announce the winners of the five giveaways!

Day 5 winner
(FQ bundle of Tis the Season prints)
Joan K.

Day 6 winner
(FQ bundle of Season's Greetings prints)
Karen A.

Day 7 winner
(FQ bundle of Christmas Basics prints)
EllenB

Day 9 winner
(3 yards of a favorite Christmas flannel print)
Crickett

Day 11 winner 
(FQ bundle of Season's Greetings prints)
Joyce C
Congratulations!

**Winners:**
If you haven't received an email asking for your mailing address, please email it to us at fabriquiltblog (at) gmail.com so that we can get your fabric prize shipped out.

Thanks to everyone for participating! Here's to some inspired holiday sewing!

And if you missed any of the 12 Days of Christmas, use the links below:

The 12 Days of Christmas:


Monday, October 27, 2014

10 Reasons Fabric is Better than Candy


We originally posted this last October, but with Halloween coming up on Friday, we wanted to share it again!

10 reasons fabric is better than candy:


Wednesday, October 22, 2014

12 Days of Christmas: Day 12


Christmas is only 63 days away!


We've reached the twelfth day of our 12 Days of Christmas celebration! We hope you've enjoyed all of the fabrics and tutorials that we've shared. Today we're featuring a round-up of additional holiday tutorials that have been featured here on our blog. Wherever your holiday sewing takes you, we hope you enjoy it!

On the 12th day of Christmas, we have:
Holiday garland, fabric gift bags, place mats, and stockings!

Find the tutorial for the Holiday Garland here.


Find the tutorial for the fabric gift bag and wine bag here.


Find the tutorial for the Christmas star place mats here.


Find the tutorial for all three Christmas stockings here.


The 12 Days of Christmas:


Tuesday, October 21, 2014

12 Days of Christmas: Day 11


Christmas is only 64 days away!

It's the second-last day of our 12 Days of Christmas feature, providing you with plenty of holiday inspiration through our fabric collections and free patterns, as well as tutorials by some of our favorite blogging designers! Today Rebecca from Our Busy Little Bunch is sharing a quick and easy table topper design using our Season's Greetings collection. Make sure to check out all 12 days of fun and watch for opportunities to win a fat quarter bundle of some of our Christmas fabrics!

On the eleventh day of Christmas, we have:
A hexagon table topper made by Rebecca from Our Busy Little Bunch using the Season's Greetings collection (Did you know you can turn a rectangle into a hexagon with only one cut? Rebecca will show you how!)


For this project you will need:
  • 1/4 yard cut of three prints: center, border, binding/sashing
  • 3/4 yard cut for backing (or make it reversible for a year-round table topper)


Cut:
center print - 14" x 12.5" rectangle
sashing - three strips 1" x 8" and three strips 1" x 9" (save extra fabric for binding)
border - three strips 6" x 9" and three strips 6" x 22"

Making the table topper:
Start by taking your center print, press it half, and then in half again so it is now in quarters. Place the 60 degree line on your ruler along the long folded edge of the fabric (you may have to flip your ruler like I did if your degree marks are not on both ends), with the short folded edge towards the bottom. Cut across this line. 


Open up your piece of fabric and press - it should now be a hexagon.


Take your three 8" pieces of sashing, center and stitch on every second edge. Press. Now take your ruler and trim the edges so that they extend the straight edge of the remaining three edges. 


Take your remaining three pieces of sashing, center and stitch on remaining edges. Press and trim with ruler.
Now repeat these steps to attach the borders. But when trimming off the excess, make sure to line up your ruler with the center hexagon to ensure straight edges.


And there you have it - your hexagon table topper just needs quilting and binding and it's done! The shape of this topper would look great on a round table, or a side coffee table. And if you'd like to see how I made mine reversible, and enter to win a fat quarter bundle of the Season's Greetings prints from Fabri-Quilt, just hop over to my blog Our Busy Little Bunch.


Monday, October 20, 2014

12 Days of Christmas: Day 10

Christmas is only 65 days away!

Welcome back! It's day 10 of our 12 Days of Christmas fun here on the blog, and we've got some show and tell featuring Judy Hansen's Nutcracker Christmas collection--a downloadable tutorial, plus two quilts made featuring the fabric! Be sure to check out the other holiday decor-themed tutorials and fabric lines we're featuring, and don't miss the giveaways--win some of our favorite holiday fabrics to get your own project started!

On the tenth day of Christmas, we have:
A tissue box featuring Nutcracker Christmas (+ two quilt designs!)
Download the tutorial for this easy project here!


Looking to make a quilt using the Nutcracker Christmas collection?
Judy designed the "Nutcracker Christmas Sampler," a 40" x 40" wall sampler.
 You can order it on her website (as well as sign up for her newsletter or find the link to follow her on Facebook).

Here's a close-up of the center appliqued blocks:


Or try this Nutcracker Christmas table runner, "Center Attraction," designed by Diane Tomlinson for the Nov-Dec 2014 issue of Fons & Porter's Love of Quilting magazine.

Find the magazine and kit for this project here.


The 12 Days of Christmas:

Friday, October 17, 2014

12 Days of Christmas: Day 9

Christmas is only 68 days away!


It's day 9 of our 12 Days of Christmas celebration, and we've got a tutorial for making everyone's favorite winter wearable: flannel pants! Be sure to check out the other holiday decor-themed tutorials and fabric lines we're featuring, and don't miss the giveaways--win some of our favorite holiday fabrics to get your own project started!

On the ninth day of Christmas, we have:
Flannel pants featuring the Christmas Flannel collection


This pattern works for any size because you use a pair of existing pants as your template! Then we use the pillowcase burrito method to add a contrasting cuff--no exposed seams! Just flannel coziness for your legs for those chilly winter days!

Here are the flannels we used, making three different sizes of kids' pants (but these don't have to be just for kids--we tell you how to calculate your fabric needs for adult pants below):


Materials:
Main fabric:
Yardage needed varies based on pants size.* You'll need to fold the fabric over and fit a pair of folded pants on it (see photo below under Step 1). In general, a folded pair of pants that measures 19-20" wide or less will fit on half the fabric width between the selvedges, folded in half (you'll need to cut two), and your required fabric will be the length of your pants plus 4". If your folded pants are wider than 19-20", you'll need double the length of your pants plus 4".

Contrasting fabric: 
1/4 yard for kids' pants;  1/2 yard for adults

1/2" or 3/4" wide elastic: enough to fit your waist

*As a frame of reference, the pants featured in the photo below are boys' size 5/6. You can see how they fit on fabric--they are narrow enough to fit on half the width from selvedge to selvedge, folded in half.


Step 1: Fold the pants in half so the outer seams match up as shown. Fold the fabric in half, noting fabric pattern directionality if that's an issue. Your doubled fabric should be at least 2" wider than your folded pants. 

Step 2: Cut out around the pants. Leave an extra 2" above the waistband. Leave an extra 1" along the folded pant edge and the inner leg seam. Using a ruler, trim the bottom fabric edge 1" shorter than bottom of pants (this trim not pictured below). Cut 2.

This is what your unfolded pant leg will look like.

Step 3: Cut a strip of contrasting fabric for the cuff. The cuff will be folded in half, so choose your width with that in mind. The cut width on the size 5/6 pants is 7". Do not cut a width less than 5", as it makes the burrito method tricky. Note: For kids' pants, you can get both cuffs out of one WOF strip. Depending on width of pant legs, adult pants may require two strips (one for each cuff). 
Step 4: Trim a cuff strip so it's just slightly wider than the pant leg. Lay the strip right side up and pant leg on top, right side down. 

Step 5: Roll the pant leg tightly as shown.

Step 6: Fold the bottom edge of the red strip over the rolled fabric, matching raw edges of top of strip and the aligned pant leg edge. Pin in place. Make sure the fabric roll is clear of your pinned edges.

Step 7: Sew along the long pinned edge. Turn right side out, pulling rolled fabric out of the tube. Press the tube to create the finished edge cuff. Trim excess cuff even with the pant edges. Repeat with remaining strip on opposite pant leg.

Step 8: Align the two pant pieces right sides together and pin along the curved edges as shown. Stitch between the arrows, backstitching at beginning and end.

Step 9: Adjust the pants so the seams sewn in Step 8 align. Pin the raw edges together to create the pants' two legs as shown. 

Step 10: Stitch along the inseam to finish the pant legs. 
Step 11: Square up the top of the pants as close to the raw edges as possible. With the pants still wrong side out, fold the top edge down 1". (You can just eyeball it--we did!). Fold over 1" again and pin in place. 

Step 12: Sew along the bottom folded edge to create a casing along the waist of the pants. Leave a 2" opening for inserting the elastic (see arrow).

Step 13: Attach a safety pin to one end of the elastic piece. Feed through the casing and pin the ends together. Turn the pants right side out and try them on. Find the right elastic length for a comfortable fit, trim ends, and sew together to secure. Stitch the opening in the casing closed.

Pants in action!

Which fabric do you like best for flannel pants?


Want to win a 3-yard cut of one of our Christmas flannels to make your own pants? Leave a comment below letting us know that you follow our blog via a blog reader or email (both options in the right hand sidebar) and/or that you follow us on Facebook. In the comment, also let us know which print you like best of the three flannels we used for these pants. This giveaway will remain open through Tuesday, October 21st at 11:59 pm EST.


The 12 Days of Christmas: