Tuesday, January 30, 2018

Freeform 2: All Angles Pillow tutorial

We made a third pillow using the Freeform 2 prints. The All Angles pillow uses freeform (ha!) piecing--you make four angled strips and sew them together. Fun and easy! 


Making the Fire & Ice Pillow:
You'll Need:
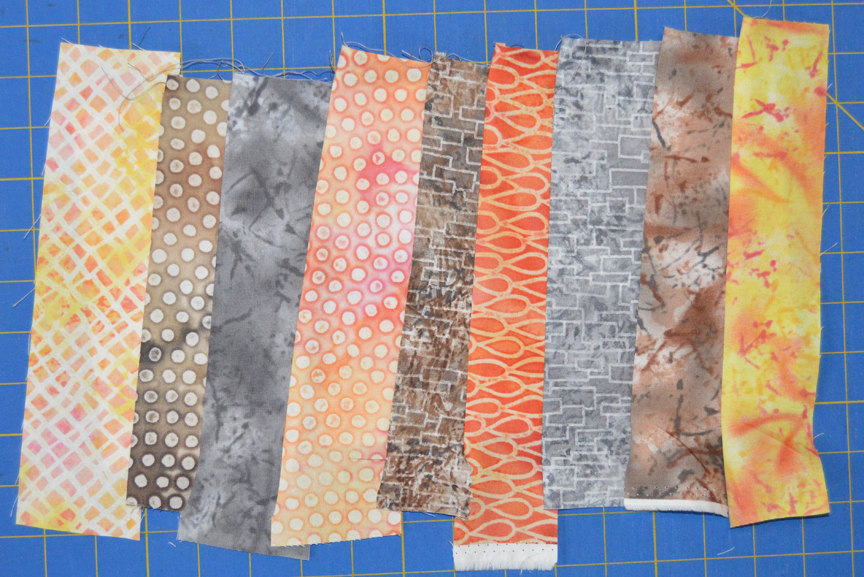
Fat quarter or 1/8 yard cut each of 10-12 assorted gray, orange and brown prints
1/2 yard muslin

1/2 yard of backing fabric
12" x 22" pillow form


Cutting:
From each of the fat quarters or 1/8 yard cuts:
(1) strip varying in width from 2" to 3"

From the muslin:
(4) 7" x 14" pieces

From the backing fabric:
(2) 14" x 18" pieces


Making the Pillow:
Note: You can trim strips to just longer than the muslin strip (14") as you position them for sewing. This is easier than sewing with a long tail! 
Step 1: Lay a strip right side up on one end of a muslin piece, making sure it covers the left end of the muslin. Note the left leaning angle. position a second strip on top, right sides together, aligning long raw edges. 

Step 2: Sew the strips to the muslin using a 1/4" seam allowance and press the second strip open as shown. 

Step 3: In the same way, position and add a third strip. You can vary the angle slightly as you add strips for interest, but make sure they all lean to the left. 

Step 4: Continue adding and pressing trips until the entire muslin piece is covered. Vary fabric strip width and color, and try to maximize contrast between your strip choices. Make a second left-leaning pieced strip. 

Step 5: Make a right leaning pieced strip in the same way, positioning the strips leaning in the opposite direction (toward the right at the top). 

Step 6: Make (2) right-leaning pieced strips. 

Step 7: Trim each pieced strip even with the muslin backing, so each measures 7" x 14". 

Step 8: Trim each pieced strip to measure 6" x 13". Position your pieced strip right side up and choose where to trim based on what looks best--you may choose to cut off more of one strip at one end then the other, for example. 
Step 9: Lay out the (4) trimmed strips into a row, alternating the angles as shown. 

Step 10: Sew the strips into a row and press the seams open to accommodate bulk. 

Step 11: Fold and press a short end of (1) 14" x 18" backing piece under 1/4". Fold and press under another 1/4" to created a finished edge and topstitch. Make a second backing piece. Lay pillow top right side up and position the backing pieces on top with right sides facing, matching raw edges and overlapping the hemmed edges. 

Step 12: Stitch around the outer edge using a 1/4" seam allowance. Turn pillow right side out and insert the pillow form. 


Make all 3 of our Freeform 2 pillows! 
Find the owl pillow here.
Find the Fire & Ice pillow here
Find the All Angles pillow here.

See the entire Freeform 2 collection here and ask for it at your local quilt shop. 

Friday, January 26, 2018

Feels like flannel season...

It's January...the month when many people are looking for warm and cozy projects. That means it's flannel season! 

Looking for flannel? Our Fluffy Flannels come in so many prints. Polka dots, zebras, construction equipment, bugs, dogs, hearts, and more... ask for them at your local quilt shop!


See our entire Fluffy Flannel collection here and ask for it at your local quilt shop.
Visit our Flannel! Pinterest board for a collection of tutorials to make with flannels. 

Tuesday, January 23, 2018

Freeform 2: Fire & Ice Pillow Tutorial

Today we've pulled just the orange and gray fabrics from our Freeform 2 fabrics. This cool prints look like batiks, but they're not. They are, however, perfect for the simple yet graphic Fire & Ice Pillow, and we're sharing the tutorial below. 


We used the six orange prints and six gray prints from the collection to make the pillow. We paired the fabrics and then made a block with the gray in the center and the orange on the outside, and an opposite block with the orange in the center and the gray on the outside. The pillow requires 20 blocks, so you'll need to make two blocks using a few of the fabrics.  

Making the Fire & Ice Pillow:
You'll Need:
Fat quarter each of 6 gray prints and 6 orange prints
1/2 yard of backing fabric
20" square pillow form

Preparation and Cutting:
Pair each orange print with a gray print; you'll use these combinations to make a block and a block in reverse. 

From each pair of gray and orange prints:
(2) 2" x 5-1/2" pieces
(2) 2" x 2-1/2" pieces
(1) 2-1/2" square

From each of the remaining fabric of two gray prints:
(2) 2" x 5-1/2" pieces
(2) 2" x 2-1/2" pieces
(1) 2-1/2" square

From each of the remaining fabric of two orange prints:
(2) 2" x 5-1/2" pieces
(2) 2" x 2-1/2" pieces
(1) 2-1/2" square

Making the Blocks:
Step 1: Lay out (1) 2-1/2" gray square, (2) 2" x 2-1/2" orange pieces, and (2) 2" x 5-1/2" orange pieces as shown to make a block. In the same way, lay out (1) 2-1/2" orange square, (2) 2" x 2-1/2" gray pieces, and (2) 2" x 5-1/2" gray pieces to make a block. 

Step 2: Sew the 2" x 2-1/2" pieces to opposite sides of the 2-1/2" square. Sew the 2" x 5-1/2" pieces to the remaining sides to make a 5-1/2" square block. 

Step 3: Make a total of (20) 5-1/2" square blocks: 10 with orange centers and 10 with gray centers. 

Step 4: Lay out the blocks into (4) rows of (4) blocks each, alternating colors. Rotate the orange blocks 90 degrees so the seam allowances of the blocks don't overlap and create bulk as you join the blocks. 

Step 5: Sew the blocks into rows and join the rows to complete the pillow top. 

Step 6: Fold the long edge of each 16-1/2" x 20-1/2" background piece over 1/2" and then 1/2" again. Stitch along the length to secure, creating a hemmed edge.  Make 2. 
Step 7: Lay the pillow top right side up and position the two hemmed pieces on top, right sides facing the top. Match raw edges, overlapping the hemmed edges in the center. Stitch around the entire pillow. 

Step 8: Turn pillow right side out and stuff with the pillow form. 


Make all 3 of our Freeform 2 pillows! 
Find the owl pillow here.
Find the Fire & Ice pillow here
Find the All Angles pillow here.

See the entire Freeform 2 collection here and ask for it at your local quilt shop. 


Friday, January 19, 2018

Simple Solids

When is the last time you made a two-color project? When you eliminate color variety and prints from a project, it's all about the design. 

Inspired by Corey Yoder's Stitch and Switch Pillow done in prints and featured in the Spring 2018 issue of Quilts & More, quilt tester Jan Ragaller created this version using our Painter's Palette Solids. A two-color star block--simple, yet graphic impact. We love it! 

Barn Star Pillow by Jan Ragaller.
A color option variation for Corey Yoder's Stitch and Switch Pillow,
featured in Quilts & More's Spring 2018 issue. 

Find the pattern to make the Barn Star Pillow here.
See all 168 colors of our Painter's Palette Solids here and ask for them at your local quilt shop.
Find Quilts & More here.


Tuesday, January 16, 2018

Freeform 2 Is a Hoot!

We're glad that you love the new Freeform 2 prints as much as we do! We've been having fun playing with these cool oranges, grays and browns. Our first thought? The colors and textures are perfect for an owl. 


We used this tutorial from The Objects of Design to piece an owl, and then transformed him into a throw pillow. Hoot hoot! We're in love!


Make all 3 of our Freeform 2 pillows! 
Find the owl pillow here.
Find the Fire & Ice pillow here

Find the All Angles pillow here.

See the entire Freeform 2 collection here and ask for it at your local quilt shop. 

Thursday, January 11, 2018

Introducing Freeform 2

If you loved our Freeform collection a while back, wait until you see this fantastic new color combination! A range of cool grays, warm oranges, and rich browns. These prints have the appearance of batiks, but they aren't. Each print is better than the next, and they work beautifully together.

Which print would fit well in your stash? 
Raindrops

Small Dots

Crosshatch

Bricks

Mottled


Pine Tree Country Quilts used the orange and gray prints (plus two Painter's Palette Solids!) to make the Freeform II quilt--all half-square triangles and four-patches.
This pattern is a free download on our website.
Download the free quilt pattern here.


See the entire collection here and ask for it at your local quilt shop.

Tuesday, January 9, 2018

Warm Up Winter with a New Quilt Project!

January...it's the perfect time to start a new quilt project! We're sharing some of our favorite free quilt patterns from our website below; use the links to download and print the pattern, and then head to your local quilt shop (or online) to purchase the fabrics.


"A Flutter of Color" 
Designed by Linda Frost; Pattern by Reeze L. Hanson 
Featuring the Painter's Palette Solids collection
Download the free quilt pattern here.


"Lost World" 
Designed by Pine Tree Country Quilts
featuring the Lost World collection
Download the free quilt pattern here.


"Pretty Foxy"
designed by Pine Tree Country Quilts
featuring the Pretty Foxy collection by Ro Gregg
Download the free quilt pattern here.


"Thoroughly Modern Zig Zag" 
Designed by Virginia Robertson
featuring Thoroughly Modern by Virginia Robinson
Download the free quilt pattern here.


"Mountain View" designed by Pine Tree Country Quilts
featuring the Mountain View collection by Ro Gregg
Download the free quilt pattern here.


"Walkabout II" designed by Hedgehog Quilts
featuring the Walkabout II collection
Download the free quilt pattern here.

See a range of free quilt patterns here.


Friday, January 5, 2018

Grandma's Spools

Do you have fond sewing memories of your grandma? Barb Eikmeier turned her memories into a quilt, Grandma's Spools, using her Waddington Road fabric collection. The quilt was recently featured in Quiltmaker magazine. Keep reading to learn more about Barb's design. 
"Grandma's Spools" designed by Barbara J. Eikmeier and quilted by Theresa Ward;
featured in Quiltmaker magazine Jan-Feb 2018

Q. How did you come up with the spool theme for this quilt?
BE: My Waddington Road collection is named after the road my grandmother, Mary Martin, lived on. She was a professional dressmaker, and she sewed on a treadle sewing machine. I chose the spool motif to honor my grandmother. The four-spool block is actually called Secret Drawers, which was perfect because my grandma kept her thread in the drawers of her treadle machine cabinet.

Q. Tell us more about that block.
BE: I came across it in the EQ library. In its traditional coloration, it doesn’t look like spools, but when I changed the color placement, it did. I liked that it had triangles in the corner because those tend to make great secondary designs. I added them to the large hourglass block as well. After playing around a bit, I realized that if I reversed the colors of the corner triangles, I would get hourglasses in the block corners.


Q. Tell us about your fabric choices.
BE: I decided on the tan button print first. I wanted that to be a main part of the quilt. I used Painter’s Palette Solids in Rice Paper as the light to add contrast. I really like how the Rice Paper makes the tan look sharper and more crisp. Then I chose all of the greens, golds, reds and blues in collection for the actual spools. I chose the red print for the border because of the buttons.


Q. How was this quilt machine quilted?
BE: Theresa Ward did the quilting. We chose  an overall swirly design. After she finished, we both commented on how the quilting almost looked like thread spiraling off the pieced spools.


Q. What is your favorite part of this quilt?

BE: I like the emotional connection it gives me to my grandmother.

See the entire Waddington Road collection here.
Purchase a digital version of Barb's pattern here.
Find Quiltmaker magazine here.

Thursday, January 4, 2018

Pssst...Take a Peek at Our New Website!

You might have noticed a change on our blog recently. 
(hint...look to the left to see our new logo!)

The new logo was the first step toward an exciting visual update we've been working on: 
a new website

We invite you to pop over to pbsfabrics.com and browse around. The website still has all of the information you're looking for--fabric swatches, SKUs, links to free downloadable quilt patterns. The difference? The packaging! It's clean, bright, with plenty of appealing eye candy. 

Here are a few screenshots to get you started:


Painter's Palette Solids:

Visit the site to see more and make sure to bookmark it!