Showing posts with label table runner. Show all posts

Monday, November 21, 2016

Harvest Tones Leaf Runner

Remember our #PSLwithPBS game
We're getting into the Thanksgiving mood this week by sharing three quick projects made using those fun fall palettes from our Painter's Palette Solids collection.

Today is the Harvest Tones Leaf Runner:


We used these Painter's Palette Solids:


Just three blocks--it goes together pretty quickly, and you can sew the whole runner (including binding) from six fat quarters. The runner (or door hanging!) measures 14" x 42"

Let's get started!

You’ll Need:
Six fat quarters: Bronze, Bordeaux, Gold, Old Green, Wasabi, and Burnt Sienna
½ yard backing fabric
18" x 45" piece of batting
Printer paper or foundation paper
fabric marking pen

Cutting
From each of the background colors (Bronze, Gold, Wasabi):
One 3-1/2” x 10-1/2” strip
One 3-1/2” x 13-1/2” strip
One 1-1/2” x 13-1/2” strip
One 1-1/2” x 14-1/2” strip
One 4-1/2” square
One 4-1/4” square
(2) 2-1/2” x 4-1/2” pieces
(6) 2-1/2” squares
(2) 2-1/2” x 5-1/2” pieces (for paper piecing)

From each of the leaf colors (Bordeaux, Old Green, Burnt Sienna)
(2) 2-1/4” x 21” strips for binding (you may need one extra strip total, depending on how you add your binding)
(5) 2-1/2” x 4-1/2” pieces
(2) 4-1/2” squares
(1) 2-1/2” x 6-1/2” piece
(1) 5-1/2” square (for paper piecing)

Click here to download the paper piecing pattern. You’ll need to print three copies.

Make the Blocks
Note: Sample block made using Bronze and Bordeaux.
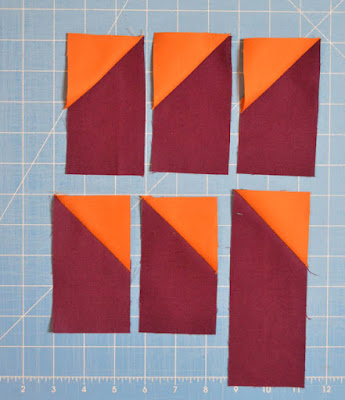
Step 1: Draw a diagonal line on the wrong side of each 2-1/2” Bronze square. Noting orientation in the photo below, lay the marked squares on the five 2-1/2” x 4-1/2” Bordeaux pieces and the one 2-1/2” x 6-1/2” Bordeaux piece. Note: Direction of the diagonal line DOES matter! 


Step 2: Stitch on the drawn lines, trim seam allowance to ¼” and press open.


Step 3: Use the (1) 5-1/2” Bordeaux square and the (2) 2-1/2” x 5-1/2” Bronze pieces with the paper piecing pattern to create the paper pieced star tip unit. Trim unit ¼” past the solid line and remove paper. Tip: Don’t forget to set your stitch length shorter when you paper piece!


Step 4: To make the stem unit, draw diagonal lines on the wrong side of both 4-1/2” Bordeaux squares. Lay the first marked square on the 4-1/4” Gold square as shown, noting where the extra size of the Bordeaux square is positioned. Stitch on the drawn line, trim the excess, and press open.


Step 5: Repeat with the remaining marked square on the opposite side of the Gold square. Square up unit to measure 4-1/2” if needed. 


Step 6: Lay out the units from Step 2, the star tip unit, and stem unit, and the two 2-1/2” x 4-1/2” Gold pieces as shown to create the block. Sew the units together as shown to make three separate sections. Join the bottom two sections and then add the top section to complete the block.


Step 7: Repeat Steps 1-6 to make two additional blocks.


Making the Runner
Step 1: Lay out the one 3-1/2” x 10-1/2” Gold strip, one 3-1/2” x 13-1/2” Gold strip, one 1-1/2” x 13-1/2” Gold strip, and one 1-1/2” x 14-1/2” Gold strip around the Gold/Bordeaux block as shown. Sew each piece on, beginning with the 3-1/2” x 10-1/2” piece and working your way around the block. Repeat for the remaining two blocks.


Step 2: Lay out the three bordered blocks as shown. Sew the blocks together in a row.


Step 3: Layer the runner top with backing and batting and quilt as desired.

Step 4: Use the (6) 2-1/4” x 21” binding strips to bind the runner.


Monday, December 14, 2015

Day 5: Home for the Holidays Blog Hop

Welcome to the fifth day of our Home for the Holidays blog hop! 
This week we'll be featuring a variety of small sewing projects to add holiday cheer to your house. These are fast and easy--you can still make them for this year, or bookmark the tutorial until after the holidays! We hope you enjoy these tutorials--and don't miss a chance to win a bundle of the fabrics featured each day!


Today Connie from Freemotion by the River is here sharing a patchwork table runner made using Ro Gregg's Peace on Earth collection. Two coordinates help the large focal print to shine, and a tonal outer border adds the perfect frame. 


Here's Connie!
I'm glad to be taking part in the Home for the Holidays Blog Hop!
Peace on Earth table runner tutorial by Connie Kresin Campbell


The beautiful Christmas collection I'm working with is called Peace on Earth by Ro Gregg. The dark green border I used is from the Leather collection. The size of the table runner is 19" x 43".


Peace on Earth fabric collection by Ro Gregg for Fabri-Quilt Inc.

Materials:

1/3 yard Christmas print
1/3 yard cream print
1/3 yard light green print
1/2 yard dark green
2/3 yard backing

Cutting:

Cream print:
cut one - 5 1/2" WOF (width of fabric) strip
     sub-cut - three - 5 1/2" x 5 1/2" squares
cut two - 2 1/4" WOF (width of fabric) strips
     sub-cut - 24 - 2 1/4" x 2 1/4" squares

Light green print:
 cut two - 2 1/4" WOF (width of fabric) strips
     sub-cut - 24 - 2 1/4" x 2 1/4" squares
cut three - 1 1/2" WOF (width of fabric) strips for first border
     sub-cut - 2 - 1 1/2" x 12 1/2" pieces
     sub-cut - 2 - 1 1/2" x 38 1/2" pieces

Christmas print:
cut two - 5 1/2" WOF (width of fabric) strips
     sub-cut 12 - 4" x 5 1/2" rectangles

Dark Green Border:
cut three - 3" - WOF (width of fabric) strips
     sub-cut 2 - 3" x 19 1/2" pieces
     sub-cut 2 - 3" x 38 1/2" pieces

Dark Green Binding:
cut three - 2 1/2" WOF (width of fabric) strips

Make the Table Runner:

Use a 1/4" seam allowance for the entire project and press to the darkest fabric.

Sew the 2 1/4" squares together as shown below. Make 12 groups.
Tutorial for piecing a christmas table runner

 Follow the diagram below to put your blocks together.
Tutorial and graphic for piecing a the blocks for the table runner

 Sew the rows together.
Tutorial for piecing the blocks for the table runner

 You will make three blocks for the table runner.  They are 12 1/2" square unfinished.
Finishing one 12 inch block for the table runner tutorial

Join the three blocks together.
Joining three blocks for the table runner tutorial

Add the first border. Sew the sides first and then the top and bottom.
adding the first border for the table runner tutorial

For the final border add the 3" x 38 1/2" pieces to the top and bottom. (this ensures your fabric will be wide enough for the border)

Then add the 3" x 19" pieces to the sides.
adding the final border for the table runner tutorial
Add your batting and backing and quilt as desired. Use the 2 1/2" strips of dark green for the binding.

Enjoy your new table runner for the holidays!
Peace on Earth table runner tutorial by Connie Kresin Campbell l Freemotion by the River

Thanks Connie!
Head over to Connie's blog to find out how you can win a bundle of Peace on Earth fabrics. 
This contest is now closed.

See the entire Peace on Earth collection by Ro Gregg here.


Check out each day of our Home for the Holidays Hop!
Day 1: The Ho Ho Ho Pillow
Day 2: The Present Pillow
Day 3: Snowflake Pillow
Day 4: O Christmas Tree Pillow
Day 6: Snowflake Table Topper
Day 7Let It Snow Applique Quilt
Day 8: Cinnamon Scented Coasters

Thursday, October 15, 2015

Vintage Shirtings in Action

While you're considering the Vintage Sampler BOM, here are a few more ideas for using Barbara J. Eikmeier's Vintage Shirting & Dress Prints collection:


Vintage Stars by Barbara J. Eikmeier; made using a Vintage Shirtings Snack Pack
Find the free pattern here.

The Vintage Shirting Snack Pack: 42 pre-cut strips, ready to be sewn into the Vintage Stars quilt or your favorite pre-cut strip pattern


Barb Eikmeier also designed the bonus projects below to accompany the Vintage Sampler BOM quilt. These patterns will be available from shops participating in the BOM program.

American Flag (44" x 31")


Featherweight Sewing Cover


Table runner (12" x 58")

If you missed the Vintage Sampler BOM quilt, click here to find the post and giveaway.
See the entire Vintage Shirting & Dress Prints collection here.

Wednesday, August 26, 2015

Tute-Happy Summer: Stair Stepper Runner

We're completing our Tute-Happy Summer series today with a tutorial for a jewel-toned Stair Stepper Runner by Connie from from Freemotion by the River. Connie used the bold prints from the Ro Gregg's Marblehead Gemstones, Jewels and Quartz collection. Enjoy the tutorial and then find the details at the bottom of this post for a chance to win a bundle of Gemstones, Jewels and Quartz prints to play with!

Tute Happy Summer

Hi, I'm Connie from Freemotion by the River and I have another easy table runner tutorial to share with you.
Tute-Happy tablerunner tutorial

I used the fat quarter bundle of Marblehead Gemstones, Jewels and Quartz by Ro Gregg for Fabri-Quilt.
Gemstones Jewels and Quartz fat quarters
The size of this table runner is 14" x 27".

I picked six fabrics from the fat quarter bundle and also used muslin for the neutral squares.
  • From each of the 6 fabrics cut 2 - 2'' strips by the longest side of the fat quarter (22 inches) then sub-cut into 2'' x 3 1/2'' rectangles. You will need 45.
  • Cut the muslin into  3 1/2'' strips the width of the fabric, then sub-cut to 18 - 3 1/2'' x 3 1/2'' squares. You will need 18.
  • Sew with a 1/4" seam allowance. Join pieces together as shown below.
6 different fat quarters

Cutting the fabrics
cutting the fabrics

Follow the diagrams below to make your block.
  • Sew one 2'' x 3 1/2'' rectangle to a 3 1/2'' square
  • Sew two 2'' x 3 1/2'' rectangles together on the 2'' side
  • Sew two 2'' x 3 1/2'' rectangles to a 3 1/2' square on the 3 1/2'' sides
the pieces for block laid out

Sew the sections together.
piecing the block

Make 9 of the blocks.
piecing the block

Arrange the 9 blocks into 3 rows. I rotated the center blocks 180 degrees.
piecing the block

Finish sewing the rows together, add you backing and batting and quilt as desired.
piecing the block

For the binding I just cut 2 1/2'' strips of the fabrics and pieced them together.
Jewel tablerunner tutorial

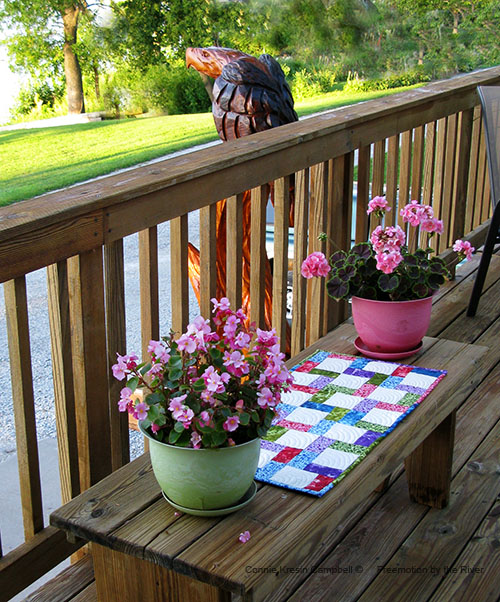
I had to take a photo of the table runner outside next to our wood carved eagle.
Jewel runner with Iggy in the background

I hope you enjoyed this tutorial and stop by my website for more tutorials and patterns.

Thanks Connie!
Head over to Connie's blog to find out how you can win a bundle of Marblehead Gemstones, Jewels and Quartz.


Check out each week of our Summer of Tutes!
Week 1: Sunglasses case featuring Graphix 3
Week 2: The overnight bag featuring Who's Who

Week 3: Tablet case featuring Jungle Party 
Week 4: Patriotic pennants featuring Tone on Tone 
Week 6: Zig zag lunchbag featuring Graphix 3
Week 9: Elegant clutch featuring Jungle Party 
Week 10: Modern table topper featuring Prairie Cloth Solids
Week 12: Nautical mini featuring Prairie Cloth Solids

*********************************************************************************
Announcing our Nautical Mini Prairie Cloth Solids bundle winner!
Jasmine

Congratulations! We've sent you an email.