Showing posts with label PSLwithPBS. Show all posts

Wednesday, November 23, 2016

Autumn Leaves Feathered Friend

We're putting our #PSLwithPBS game bundles to work this week! 
We're letting our Thanksgiving spirit shine by sharing three quick projects made using those fun fall palettes from our Painter's Palette Solids collection. 
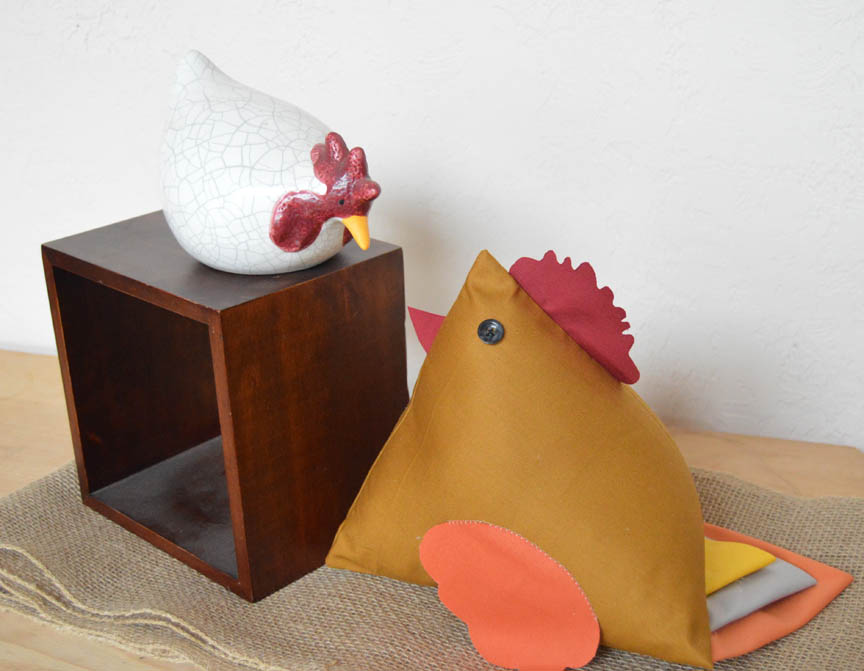
(See Monday's Harvest Tones Leaf Runner here and Tuesday's Modern Fall Give Thanks Banner here.)

It's the day before Thanksgiving! You might not be plucking a turkey today, but you can make its stitched cousin with a lot less work! Chicken may not be the most popular bird at Thanksgiving, but this stuffed cutie can hang out all fall without worrying about that big day in November! 


We used these Painter's Palette Solids:

This chicken, which can serve as decor or be stuffed with pellets to work as a door stopper (or even a large pincushion!) was designed by Diane Arganbright, who graciously agreed to let us share it here. 

Let's get started!

You'll Need:
Six fat quarters (Paprike, Ash, Claret, Old Gold, Jack O'Lantern, Pencil Yellow) 
Fusible web
Fiberfill
Two buttons for eyes

Cutting:
From the Old Gold:
Two 10" squares (for body)

From the Paprika:
Two 4" x 11" strips

From the Claret: 
Two 4" x 5" pieces

From the Jack O'Lantern:
One 9-1/2" square

From the Ash:
One 7-1/4" square

From the Pencil Yellow:
One 5" square

From the fusible web:
One 4" x 11" piece
One 4" x 5" piece

Download the template pieces here. Print one copy. 

Making the Chicken:
Step 1: Adhere the 4" x 11" fusible web strip between the two 4" x 11" Paprika strips. Fuse the 4" fusible web square between the two 4" Claret squares. Cut out the template shapes. Trace two wings onto the Paprika and one comb and one beak onto the Claret using a fabric marking pen. 

Step 2: Cut out the shapes. 

Step 3: Find the center of each 10" Old Gold Square. Pin a wing near the center point of each.

Step 4: Use a buttonhole stitch to secure the top curved edge of the wing to the Old Gold Square. 
Step 5: Position the beak 2" from the left corner as shown. Position the comb 1" from the top left corner as shown. Baste both in place. 

Step 6: Layer the second Old Gold square with wing on top, right sides together. Stitch along the left side (securing beak) and the top edge. On the bottom edge, stitch 2" in from each corner. 

Step 7: Fold the 9-1/2" Jack O'Lantern square in half diagonally and then in half diagonally again to create a triangle with two folded edges. 

Step 8: Repeat with the 7-1/4" Ash square and the 5" Pencil Yellow square. 

Step 9: Stack the triangles, matching raw edges, and baste. 

Step 10: Pull the chicken so the seams align, with the comb on top. Tuck the tail triangles inside, also facing up. Align the center of tail long edge with the two seams. Pin in place. 

Step 11: After the tail is pinned in place, pin the bottom body edge as well. Sew along this edge, securing the tail between the two body sections. 

Step 12: Turn right side out through the remaining opening. 

Step 13: Stuff with fiber fill to desired firmness. Whipstitch the opening closed. Add black buttons for eyes. 

Enjoy!

Our chicken was romancing this ceramic chicken. :) 


We hope you enjoyed our Thanksgiving Day themed tutorials this week using our Painter's Palette Solids!
Wishing you and your family a wonderful and relaxing Thanksgiving! 

Tuesday, November 22, 2016

Modern Fall Banner Tutorial

We're putting our #PSLwithPBS game bundles to work this week! 
We're letting our Thanksgiving spirit shine by sharing three quick projects made using those fun fall palettes from our Painter's Palette Solids collection. 
(See yesterday's Harvest Tones Leaf Runner here.)

Today's project, using the Modern Fall palette, is quick, easy and practically no-sew! 


We used these Painter's Palette Solids:

Like yesterday's project, you can make this with six fat quarters. Each letter block measures approximately 4" x 5". 

Let's get started!

You'll Need:
Six fat Quarters (Mahogany, Cumin, Wheat, Maroon, Mocha and Teal)
Batting
Approximately 7' of jute
Fusible web
Pinking shears or rotary cutter with pinking blade
Ten miniature clothespins

Click here to download the letter templates. Print one of each page. 

Cutting: 

From the Mahogany: 
Adhere fusible web and then cut ten 3" x 4" pieces

From each of the Wheat and Teal:
Six 5" x 6" pieces

From each of the Maroon and Mocha: 
Four 5" x 6" pieces

From the Cumin:
Print out the letter template pages. Trace onto the paper side of fusible web. Adhere the fusible web to the fabric and cut out one of each letter on the traced lines. Remove paper backing from the letters. 


From the batting: 
Ten 5" x 6" pieces


Make the Banner:
Step 1: Layer a batting piece between two teal pieces. Spray baste or pin if desired; these pieces are small enough (and we'll be trimming the outside edge later), so you don't need to secure the layers unless you want to. 

Step 2: Fuse a 3" x 4" Mahogany piece centered on the teal piece. Again, you can measure, or you can simply eyeball it, as we'll be trimming later. 

Step 3: Stitch 1/4" from the outer edge of the Mahogany piece. Stitch 1/4" past the outer edge of the Mahogany piece. 

Step 4: Using a pinking shears or rotary cutter with a pinking blade, trim all sides approximately 1/4" past the outer stitching line. You can measure and mark if you like, or just eyeball it. (We told you this was easy!)

Step 5: Repeat steps 1-4 to create ten quilted sandwiches; three each of Teal and Wheat and two each of Maroon and Mocha. Lay out the quilted sandwiches in the order you prefer and position the letters in place. 

Step 6: Fuse the appropriate letter to each quilted sandwich. 

Step 7: Use miniature clothespins to attach letters to the length of jute. Hang and enjoy!


Monday, November 21, 2016

Harvest Tones Leaf Runner

Remember our #PSLwithPBS game
We're getting into the Thanksgiving mood this week by sharing three quick projects made using those fun fall palettes from our Painter's Palette Solids collection.

Today is the Harvest Tones Leaf Runner:


We used these Painter's Palette Solids:


Just three blocks--it goes together pretty quickly, and you can sew the whole runner (including binding) from six fat quarters. The runner (or door hanging!) measures 14" x 42"

Let's get started!

You’ll Need:
Six fat quarters: Bronze, Bordeaux, Gold, Old Green, Wasabi, and Burnt Sienna
½ yard backing fabric
18" x 45" piece of batting
Printer paper or foundation paper
fabric marking pen

Cutting
From each of the background colors (Bronze, Gold, Wasabi):
One 3-1/2” x 10-1/2” strip
One 3-1/2” x 13-1/2” strip
One 1-1/2” x 13-1/2” strip
One 1-1/2” x 14-1/2” strip
One 4-1/2” square
One 4-1/4” square
(2) 2-1/2” x 4-1/2” pieces
(6) 2-1/2” squares
(2) 2-1/2” x 5-1/2” pieces (for paper piecing)

From each of the leaf colors (Bordeaux, Old Green, Burnt Sienna)
(2) 2-1/4” x 21” strips for binding (you may need one extra strip total, depending on how you add your binding)
(5) 2-1/2” x 4-1/2” pieces
(2) 4-1/2” squares
(1) 2-1/2” x 6-1/2” piece
(1) 5-1/2” square (for paper piecing)

Click here to download the paper piecing pattern. You’ll need to print three copies.

Make the Blocks
Note: Sample block made using Bronze and Bordeaux.
Step 1: Draw a diagonal line on the wrong side of each 2-1/2” Bronze square. Noting orientation in the photo below, lay the marked squares on the five 2-1/2” x 4-1/2” Bordeaux pieces and the one 2-1/2” x 6-1/2” Bordeaux piece. Note: Direction of the diagonal line DOES matter! 


Step 2: Stitch on the drawn lines, trim seam allowance to ¼” and press open.


Step 3: Use the (1) 5-1/2” Bordeaux square and the (2) 2-1/2” x 5-1/2” Bronze pieces with the paper piecing pattern to create the paper pieced star tip unit. Trim unit ¼” past the solid line and remove paper. Tip: Don’t forget to set your stitch length shorter when you paper piece!


Step 4: To make the stem unit, draw diagonal lines on the wrong side of both 4-1/2” Bordeaux squares. Lay the first marked square on the 4-1/4” Gold square as shown, noting where the extra size of the Bordeaux square is positioned. Stitch on the drawn line, trim the excess, and press open.


Step 5: Repeat with the remaining marked square on the opposite side of the Gold square. Square up unit to measure 4-1/2” if needed. 


Step 6: Lay out the units from Step 2, the star tip unit, and stem unit, and the two 2-1/2” x 4-1/2” Gold pieces as shown to create the block. Sew the units together as shown to make three separate sections. Join the bottom two sections and then add the top section to complete the block.


Step 7: Repeat Steps 1-6 to make two additional blocks.


Making the Runner
Step 1: Lay out the one 3-1/2” x 10-1/2” Gold strip, one 3-1/2” x 13-1/2” Gold strip, one 1-1/2” x 13-1/2” Gold strip, and one 1-1/2” x 14-1/2” Gold strip around the Gold/Bordeaux block as shown. Sew each piece on, beginning with the 3-1/2” x 10-1/2” piece and working your way around the block. Repeat for the remaining two blocks.


Step 2: Lay out the three bordered blocks as shown. Sew the blocks together in a row.


Step 3: Layer the runner top with backing and batting and quilt as desired.

Step 4: Use the (6) 2-1/4” x 21” binding strips to bind the runner.


Wednesday, October 26, 2016

Autumn Abundance: Day 3 (+ PSLwithPBS winners!)


This week we're sponsoring the Autumn Abundance blog hop! Each day we'll give you a sneak peek from the day's participating blogger and provide you with the link to check out the entire project. The blog hop is offering several giveaways, including a bundle of our Into the Woods fabric line. 


Today Mari from The Academic Quilter is sharing a quilt top she made using the Into the Woods collection paired with a few Painter's Palette Solids, including a warm Curry background fabric. (Curry is one of our newer solids!) Her quilt looks like falling leaves on the brightest day of fall! 

Here's a sneak peek, showing her 84 HSTs. 
Isn't Curry such a cheery, welcoming background color? 


Head over to Mari's blog to see her entire quilt! She also shares the cutting sizes for all the pieces if you'd like to try this quilt yourself. And don't forget to enter the giveaways...

______________________________________________________________

Speaking of giveaways, it's time to announce the winners of our #PSLwithPBS giveaway! Thanks to everyone who voted for one of our three fall-themed Painter's Palette Solids bundles, either here on the blog, on Facebook, or on Instagram. 


Our randomly chosen winners are:
Bundle #1:Allison Church Bird
Bundle #2: Beth @blue_dragonfly5
Bundle #3: Susan (Quilt Fabrication)

Congratulations! We will contact you for your mailing address.