Welcome to the sixth day of our Home for the Holidays blog hop!
This week we'll be featuring a variety of small sewing projects to add holiday cheer to your house. These are fast and easy--you can still make them for this year, or bookmark the tutorial until after the holidays! We hope you enjoy these tutorials--and don't miss a chance to win a bundle of the fabrics featured each day!
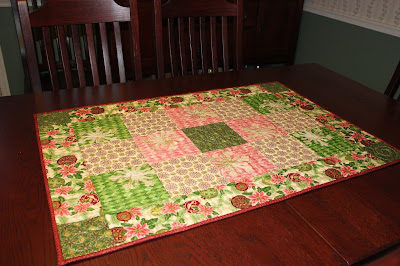
Today Dawn from Spring Water Designs is here sharing a snowflake table topper made using Ro Gregg's Peace on Earth collection. We love the large off-center fused snowflakes showcased on the beautiful coordinates in Ro's collection.
Here's Dawn:
This week I got to play with these luscious fabrics from Ro Gregg's Peace on Earth fabric line to make something for the Inspired by Fabric's Blog Hop :)
I decided to make a Holiday Table Topper for my dining room table.
To make it, you'll need:
1/2 yard of the Large Holiday print for the borders, cut:
(2) 4-1/2" x 30-1/2" strips
(2) 4-1/2" x 18-1/2" strips
1/4 yard of the Green Diamond print, cut:
(4) 6-1/2" squares
1/4 yard of the Pink Diamond print, cut:
(4) 6-1/2" squares
1/4 yard of the Dark Green print, cut:
(1) 6-1/2" square
(4) 4-1/2" squares
1/2 yard Cream with round snowflakes for setting squares, cut:
(6) 6-1/2" squares
3/8 yard Red print for binding, cut:
(4) 2-1/2" WOF strips
1/2 yard of Cream Textured print for applique snowflakes
After applying fusible web to the back side of some of the light textured fabric, I cut 8 snowflake shapes using my AccuQuilt GO! and the Holiday Medley Die #55043. If you don't have a GO! Cutter, you can use any snowflake shape that you want and scale it 4 - 5" in size. You can click Here for a link to a blog post from Inspired by Fabrics Home for the Holidays series last week that has some snow flake shapes you can download.
I laid out the snowflakes on the pink and green squares ~ and to give it the look of snowflakes softly falling, I did not center them on the squares, but off-set them on each square. Play here to find an arrangement that's pleasing to you...and if you like them centered on the squares, that's ok too ~ again, do what you like and have fun :)
Tip: You might want to pin the snowflakes in place once you choose the position of each one on the square, so they don't get shifted around when you are taking them to your pressing station. Snapping a photo of your overall arrangement is helpful too in case you get things turned around between pressing and sewing.
Then using a pressing cloth underneath to protect your ironing surface, fuse the snowflake in the position that you chose on each square. If you chose to off-set them, let them hang over the edges in some places like the one shown above.
Then once fused, trim off the extra snowflake parts that hang over the edge of the square.
I like the effect that occurs of the snowflakes "peeking" through the squares when they are placed on the edges like this.
Next I top stitched on the snowflake from tip to tip across each snowflake. If you prefer, this step can be done at the quilting stage to stitch through all layers of the quilt on the snowflakes.
Next sew the rows together, pressing each seam allowance toward the setting square. This helps to nest the seams together in the next step when you sen the rows together.
Then, add the long border strips to the sides, pressing the seams towards the border strips.
Finally, after adding the 4-1/2" green corner stone squares to the ends of the shorter border strips (again press those seams towards the border strip), sew these units to the ends of your table runner.
To complete your table topper, layer with batting, and backing fabric and quilt. I did a quick allover, swirly free motion design going around the snowflakes. Bind using the red strips you cut for binding.
Finally, add a few Holiday decorations, and...
Merry Christmas!
Thanks Dawn!
Head over to Dawn's blog to find out how you can win a bundle of the Peace on Earth fabrics. This contest is now closed.
See the entire Peace on Earth collection by Ro Gregg here.
Check out each day of our Home for the Holidays Hop!
Thanks Dawn!
See the entire Peace on Earth collection by Ro Gregg here.
Check out each day of our Home for the Holidays Hop!
Day 1: The Ho Ho Ho Pillow
Day 2: The Present Pillow
Day 3: Snowflake Pillow
Day 4: O Christmas Tree Pillow


I love the addition of the snowflakes!
ReplyDeletelove these fabrics.
ReplyDeleteThank you for the tutorial, love the snow flakes!
ReplyDeleteTHANKS FOR SHARING!
ReplyDeleteMERRY CHRISTMAS!
msstitcher1214@gmail.com
Many thanks for the great tutorial.
ReplyDeleteI love the snowflakes!
ReplyDeleteThanks!
So beautiful and the snowflakes caught my eye.Great job!!
ReplyDeleteLove the snowflakes; looks like I may need to get a die cutting machine! Thanks!
ReplyDeleteThanks for the tutorial......pretty fabric!
ReplyDeleteVery nice. Very pretty fabric. I hope to get into the shop this week, but it is a pretty hectic time right now ... and not for the holidays, either.
ReplyDeleteThat looks like a simple enough project ... especially if you skip the snowflakes. lol
ReplyDeleteI really like the addition of the snowflakes. Thanks for the tutorial.
ReplyDeleteFun tablerunner, love the snowflakes in the corners!
ReplyDeleteThe table runner is lovely. I think the snowflakes are a great!
ReplyDeletenikilsend(at)outlook(dot)com
Very cute tutorial
ReplyDeleteCute Fabric.
ReplyDeleteGreat tutorial and a perfect gift idea!! Thanks!!
ReplyDeletenice tutorial. i follow by email.
ReplyDeleteSo cute!
ReplyDeleteI really like the fabric Peace on Earth. I follow via email . Merry Christmas .
ReplyDeleteWEBISTE1
ReplyDeleteWEBISTE2
WEBISTE3
HOMEPAGE5
HOMEPAGE6