


I used a bundle of 2-1/2" pre-cut strips plus some additional yardage of Marblehead Pleasing Pastels by Ro Gregg.

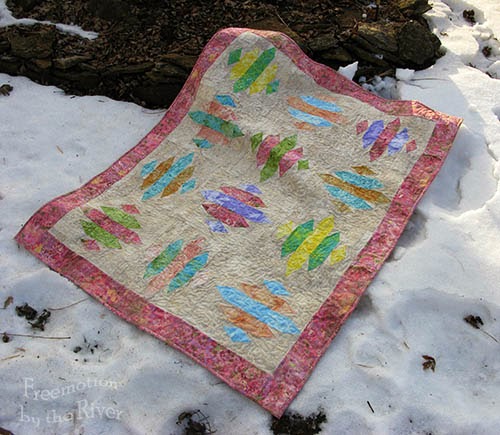
Fabric requirements for this 42" x 54" quilt:
Each block is 12-1/2" square unfinished
Quilt uses 12 blocks
- 1 jelly roll of Marblehead Pleasing Pastels
- 1-5/8 yd of #120-42924 Creme
- 1-1/4 yd of #120-42921 Pink
- 1-3/4 yd Backing piece, I used muslin
- Batting, I used Warm & Natural
You will use two 2-1/2" strips in colors of your choice to make your block. You can get 2 blocks out of these 2 strips if you use the cutting info below for one and then switch the colors for the next.
For example this block shows a pink center, cut all the pieces and then cut another, reversing the colors to a teal center. If you want more variety there are enough strips to make blocks by just choosing 2 colors.

- Pink - one 2-1/2" x 8-1/2" and 6 - triangles
- Teal - two 2-1/2" x 4-1/2" and 4 - triangles
- Creme - four 2-1/2" squares, four 2-1/2" x 4-1/2", two 1-1/2" x 12-1/2" and 20 side triangles

If you use the Tri-Rec be sure and cut the little corner piece, it will help you match your pieces.


I used the pink for a 3" border and the binding, which I cut 2-1/2" wide.
You can really see on this diagram where I reversed the order of the color of fabrics....for example see the green/yellow block? One has the yellow in the center and the other has the green in the center.

I hope you enjoyed the tutorial! Now, how about a giveaway?!?
One lucky person will receive this beautiful strip set of Marblehead Pleasing Pastels by Ro Gregg that Fabri-Quilt is giving away. Head over to Connie's blog to help her name her quilt and see how you can enter to win the bundle!

Lovely - the texture of the fabric makes it look like jewels!
ReplyDeleteConnie makes such beautiful things! Thanks for a great tutorial.
ReplyDeleteI love this. I'll have to add it to my ever growing list of 'to-do'. :D
ReplyDeleteWhat an inspiring way to use a strip set!!
ReplyDeleteGreat tutorial!
ReplyDeletePretty! Thanks for the tutorial.
ReplyDeleteWhat a great tutorial. Very well explained and easy to follow. Thank you!
ReplyDeleteFun design! Great tutorial, too.
ReplyDeleteBeautiful quilt! Great tutorial! :)
ReplyDeleteThanks for the tutorial! Always looking for a new baby quilt pattern.
ReplyDeleteLooks like horizons to me. Beautiful!
ReplyDeleteHow about "Gliding Along"? The second and fourth elongated rectangles look like pontoons--on a catamaran? on a pontoon landing air craft? on a Hawaiian outrigger? Great tutorial.
ReplyDeleteI love this fabric! Your quilt is lovely - kind of "Southwest in Pastel!"
ReplyDeletewow another fabulous quilt.. I love the stained glass effect. Thanks for this great tutorial.
ReplyDeleteName " Indian Madian"
Thanks for this great tutorial!!
ReplyDeleteLove the lighting in the picture of your quilt top in the window!
ReplyDeleteWonderful tutorial! Connie always makes it look so easy too.
ReplyDeleteGreat quilt Connie!
ReplyDeleteThanks for the tutorial!
Thanks for the great tutorial. I like the detailed pics - very helpful.
ReplyDeleteThanks for the tutorial, you've made something that looks quite complicated seem do-able. Lovely pattern too.
ReplyDeleteThis pattern and colors really speak to me. Thank you for the tutorial...keeping this one. crystalbluern at onlineok dot com
ReplyDeletereally love that little quilt
ReplyDeleteFabuloous quilt and tutorial!!
ReplyDeleteWow, not that I see it closely it looks like a stained glass window. Very pretty.
ReplyDeleteNow, I'm going to have to go upstairs and find what I think I labelled my Tri-Recs quilt. I bought a quilt kit years ago and the ruler for it and never made the quilt or used the ruler. Now, I have a really, really good reason to find that box and get the ruler out. I don't think anyone has been generous enough to donate a Tri-Recs ruler to our ruler library at guild. This is a fabulous tutorial. Thank you very much. I love the fabrics and the quilt.
ReplyDeleteAnother pretty quilt by Connie…thanks for sharing :)
ReplyDeleteConnie's quilt is beautiful! missysaprons@gmail.com
ReplyDeleteAwesome quilt and tutorial!
ReplyDeleteLove the quilt and the fabric is perfect for it!
ReplyDeleteWonderful quilt! I love the design and fabric.
ReplyDeletewhat a very cute quilt. Thanks for the tutorial
ReplyDeleteThanks for the detailed tutorial, so easy to follow.
ReplyDeleteGreat tutorial and wonderful quilt.
ReplyDeleteFantastic tutorial with great photos. Maybe the quilt could be called "Pastel Prisms"?
ReplyDeleteExcellent tutorial for a project that is so pleasing to the eye!
ReplyDeleteLove the Tute Connie!
ReplyDeleteBeautiful fabrics and beautiful quilt, Connie! Thanks for the tutorial.
ReplyDeleteWhat a great pattern Connie, just love it. The tri Rec ruler is awesome, one of my favorites.
ReplyDeleteThis s beautiful!! How about "Jewel Stained Glass Squares" for the name of your quilt? I would LOVE to win this bundle!
ReplyDeleteI'd call it Chinese New Year since it reminds me of an Asian paper lantern and it is about the time of the celebrations! Love it & the new fabric line.
ReplyDeleteIt does look like stained glass! Thanks so much for the tutorial. The quilt is beautiful!
ReplyDeleteAwesome tutorial Connie, I especially love the picture of the flimsy in front if the window - really shows show beautiful the fabric is. Thanks for a great design.
ReplyDeleteI would call this "Indian Nation".
ReplyDeleteWhen I first saw this on Connie's blog, I thought "that looks difficult." Now I see that it is really an easy to make pattern. Thanks for the tutorial
ReplyDeleteOh how I LOVE the flimsy on the window! I might be tempted to keep it that way! GORGEOUS!
ReplyDeleteConnie - great pattern and tutorial. You rock! I'd call this Gem Delight because they look like faceted gemstones to me.
ReplyDeleteI really like the pattern and tutorial. I definitely will be making this one.
ReplyDeleteI like Barb's suggestion- Gem Delight. Love this quilt.
ReplyDeleteGorgeous quilt, perfect tutorial! Thank you :) I'd call it Precious Gems!
ReplyDeleteGreat tutorial and beautiful fabrics. Arrowhead is what I would call it.
ReplyDeleteExcellent tutorial---I know this will be in my bucket list! I would call it Crystal Lights
ReplyDeleteGreat tutorial and a great quilt! Thanks.
ReplyDeleteGreat tutorial thanks for taking the time to do it.
ReplyDeleteConnie is such a talented person. I've been following her for some time now. Great tutorial.
ReplyDeleteI have never made a quilt with just blenders, but love it! I would call it Moonlit Ice
ReplyDeleteAwesome tutorial.
ReplyDeleteBeautiful quilt and great tutorial. Thanks,
ReplyDeletePeggy
peggy_verdongibbs@att.net
I love your tutorial and quilt. I am following on b and blogloving.
ReplyDeleteI like the stained glass look of your quilt. Thanks for the tutorial and for providing the templates.
ReplyDeleteGreat Job Connie. I love the stained glass look.
ReplyDeleteWhat a fabulous quilt! Thanks for the great tutorial! :)
ReplyDeleteThanks for the tutorial. Well laid out.
ReplyDeleteThis is beautiful! I love Marblehead fabrics. Thanks for the great tutorial ... :) Pat
ReplyDeleteGreat tutorial!! Lovely quilt too! Thanks so much!
ReplyDeleteDawn
array-dawn at cox dot net
It does look like stained glass! The fabric and quilt design really suit each other. Thanks for the tutorial.
ReplyDeleteBeautiful fabrics, I am sending this to a friend of mine who was looking for a jelly roll friendly quilt.
ReplyDelete