Showing posts with label Marblehead Pleasing Pastels. Show all posts

Thursday, July 23, 2015

Tute-Happy Summer: Table Topper

We're continuing our Tute-Happy Summer series today with a tutorial for a simple, cheery table topper by Connie from from Freemotion by the River. Connie used the soft prints from the Ro Gregg's Marblehead Pleasing Pastels collection. Enjoy the tutorial and then find the details at the bottom of this post for a chance to win a bundle of Pleasing Pastel prints to play with!


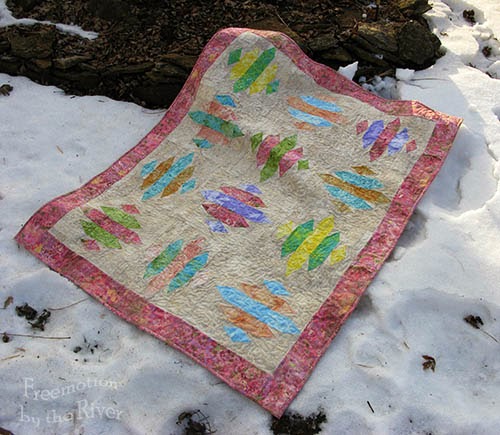
Hi, I'm Connie from Freemotion by the River and I have another quick and easy pattern to share with you. Last week I made placemats with the Marblehead Pleasing Pastels fat quarter bundle and today I have a table topper that will look perfect with them!
Pastel Table Topper


Marblehead Pleasing Pastels used in topper Marblehead Pleasing Pastels used in topper

The size of this table topper is 24" x 24".
From the fat quarter bundle I choose 5 colors and a cream. If you make this, you will actually need 2 fat quarters of the cream to get all of the pieces.

 Cut the following:
  • 20 - Pink - 2 1/2 inch x 2 1/2 inch squares
  • 20 - Teal - 2 1/2 inch x 2 1/2 inch squares
  • 32 - Cream - 2 1/2 inch x 2 1/2 inch squares
  •   8 - Green - 2 1/2 inch x 2 1/2 inch squares
  •   8 - Pink - 4 1/2 inch x 4 1/2 inch squares
  •   4 - Purple - 2 1/2 inch x 4 1/2 inch rectangles
  •   4 - Peach - 2 1/2 inch x 4 1/2 inch rectangles
Sew all seams with a 1/4" seam allowance.

This is a simple pattern that combines two different blocks.

Block One:

Make 4 Pink and 4 Teal 9 patch blocks. Each 9 patch will use 5 of the pink or teal and 4 of the cream.
Diagram for block one

 Block Two:

Make 8 of these. Use the following diagram for placement for block two.
Diagram for block 2

You will make:

4 - Teal/cream 9 patch blocks
4 - Pink/cream 9 patch blocks
8 - Purple/Peach/Green/Cream blocks

Lay your blocks out as shown below.
second block

Sew the 4 blocks together. Make 4.
piecing the blocks

Sew the 4 large blocks together to make your table topper.
4 large blocks to make the table topper

Quilt as desired.
Cut 2 1/2" strips from the leftover fat quarters to make the binding.

I hope you enjoyed this tutorial and stop by my blog for more pictures of this table topper.
Table topper on the deck


For a chance to win a bundle of Marblehead Pleasing Pastels prints, head over to Connie's blogThis giveaway is now closed, but be sure to check out our other tutorials, as we'll be sharing a tutorial and hosting a giveaway each week!

Check out each week of our Summer of Tutes!
Week 1: Sunglasses case  featuring Graphix 3
Week 2: The overnight bag featuring Who's Who

Week 3: Tablet case featuring Jungle Party 
Week 4: Patriotic pennants featuring Tone on Tone 
Week 6: Zig zag lunchbag featuring Graphix 3
Week 9: Elegant clutch featuring Jungle Party 
Week 10: Modern table runner featuring Prairie Cloth Solids 

************************************************************************
Announcing our Summer placemats Marblehead Pleasing Pastels winner:
Happy Cottage Quilter
Congratulations!

Wednesday, July 15, 2015

Tute-Happy Summer: Placemats

We're continuing our Tute-Happy Summer series today with a tutorial for simple, summery placemats by Connie from from Freemotion by the River. Connie used the soft prints from the Ro Gregg's Marblehead Pleasing Pastels collection. Enjoy the tutorial and then find the details at the bottom of this post for a chance to win a bundle of Pleasing Pastel prints to play with!


Hi, I'm Connie from Freemotion by the River and I have a quick and easy pattern to share with you. I don't know about you, but we always use placemats on our table and these are perfect for summer.

I used a fat quarter bundle of Marblehead Pleasing Pastels by Ro Gregg for Fabri-Quilt for my summer project. I'll be sharing another tutorial next week using more of these neat fabrics.

I picked six different fat quarters to use to make 4 placemats.
6 fabrics used in placemats

Cutting:

I cut the fat quarters into 2 1/2" strips. For each placemat you will cut:
  • 24 - 2 1/2 inch x 2 1/2 inch squares
  • 12 - 2 1/2 inch x 4 1/2 inch rectangles
cutting sizes for placemats

Sewing:
  • Use a 1/4 inch seam allowance.
  • Sew 2 of the squares and 1 rectangle together.
  • Make 12 blocks for each placemat.
make twelve of this block

Arrange the blocks in a pleasing design. Hopefully you won't have two of the same color touching. After I took this photo I started piecing and realized the bottom left block needed to be turned again.
Arranging the blocks for placemat

Sew 4 rows of 3 blocks.
sewing the blocks together

 Then sew the rows together.

Quilt as desired and bind with the leftover 2 1/2 inch strips.
Quilted placemat

They look great out on the table on our deck.

They also look great in the kitchen. The size of each one is approximately 12" x 16".

I had 4 placemats cut out but only finished 2 of them. Since the pieces are sitting by my sewing machine.....I will make sure and finish them soon. I hope you enjoyed this easy tutorial and make a set for yourself.
Placemats on table

For a chance to win a bundle of Marblehead Pleasing Pastels prints, head over to Connie's blog.This giveaway is now closed, but be sure to check out our other tutorials, as we'll be sharing a tutorial and hosting a giveaway each week!

Check out each week of our Summer of Tutes!
Week 1: Sunglasses case  featuring Graphix 3
Week 2: The overnight bag featuring Who's Who

Week 3: Tablet case featuring Jungle Party 
Week 4: Patriotic pennants featuring Tone on Tone 
Week 6: Zig zag lunchbag featuring Graphix 3
Week 9: Elegant clutch featuring Jungle Party 
Week 10: Modern table runner featuring Prairie Cloth Solids 

************************************************************************
Announcing our Zigzag Lunchbag Graphix 3 bundle winner:
Danette S.

Congratulations! We'll be emailing you for your mailing address.

Monday, March 23, 2015

Marblehead Madness: Games 5 & 6

Are you ready to vote? We've selected 16 Marblehead prints for our Marblehead Madness bracket! Over the next few weeks, these fabrics will be "competing" against each other for the title of "Favorite Marblehead Fabric."

Meet today's contestants:


 Ruby Red
One of the brand-new Gemstones, Jewels & Quartz Marbleheads,
"Ruby Red" is peppy and extroverted--not afraid to make her presence known! 

Sky Blue
The sky's the limit with "Sky Blue" from Ro Gregg's Pleasing Pastels Marbleheads.
In fact, this fabric would make the perfect sky in a landscape quilt!

Her Royal Highness 
From Ro Gregg's original Marblehead collection,
we're calling this multi-colored beauty "Her Royal Highness" (HRH).
Deep indigo and blue accented with pink and yellow--so gorgeous as a quilt border!


Citron
Another of Ro's Global Brights Marbleheads,
"Citron" is spring green at its best--ripe with the promise of a new season! 


In the comments section, please vote once for each of the competitions:


"Ruby Red" vs. "Sky Blue" (choose your favorite)


"Her Royal Highness" vs. "Citron" (choose your favorite)

Vote for these two competitions through Tuesday 3/24 @ 9 am. 

This competition is now closed. You can find games 7 & 8 here.
See the full bracket here.

Tuesday, March 17, 2015

Marblehead Madness 2015

In previous years, our nod to the basketball tournament craze better known as March Madness has been to create a fabric version of the 64 teams using Marblehead prints for the team colors. 

This year we decided to step it up a notch. We've put together a Sweet Sixteen bracket, featuring 16 popular Marblehead swatches from the original Marblehead, Global Brights, Pleasing Pastels, and the new, soon-to-be-in-stores Gemstones, Jewels & Quartz, all by the talented Ro Gregg.


The basketball games may be decided by last-second fouls, free throws, or desperate half-court heaves, but our winners will be decided by you, our blog followers. Each day, the different Marblehead prints featured will be competing against each other in one-on-one votes to move onto the next round. Visit the blog and leave a comment with your vote in each day's competition to help your favorite fabrics move on. Voting starts on Wednesday, March 18th.

Which Marblehead will be the winner? 
If you'd like, leave a comment below with your guess today. If you're right, you'll win bragging rights after the votes have been tallied and the winner declared.

Wednesday, February 11, 2015

Red-apalooza!


With Valentine's Day around the corner, we've created a virtual gallery of our favorite reds, pinks, mauves, fuchsia, maroon and even purple prints. We hope it inspired you to do a little valentine sewing! Look for these fabrics at your local quilt shop.


See the Batiks here.


See the Eggcellent Adventures by Heidi Pridemore collection here.


See the Changing Seasons collection by Ro Gregg here
(Available April 2015: Coming soon to a quilt shop near you!)


See the Classique collection here.


See the Graphix 3 collection here.


See the Marblehead Gemstones, Jewels and Quartz collection by Ro Gregg here.
(Available April 2015: Coming soon to a quilt shop near you!)


See the Shadows collection here.


See the Vera Cruz collection here.


See the Marblehead Global Brights and Marblehead Pleasing Pastels collections by Ro Gregg here and here.

Friday, April 18, 2014

It's Dye Time!

With Easter fast approaching, hard-boiled eggs everywhere are turning beautiful hues. We thought we'd have fun with some of our fabric lines and "dye" the eggs with fabric. 
We hope you like our creations! Enjoy!


Marblehead Venetian Glass

Batiks

Under the Sea

Marblehead Global Brights
Calypso Goldfish

Hannah

Lagoon
Block Party

Marblehead Pleasing Pastels

Monday, February 3, 2014

2-1/2" Strip Tutorial!

Hello! My name is Connie Kresin Campbell and I blog at Freemotion by the River. I'm excited to share  a tutorial here at Inspired by Fabric using these beautiful Marblehead Pleasing Pastel fabrics.

I always enjoy taking my quilts outside if the weather and wind cooperate. I live right along the Mississippi River in Iowa and haven't lost a quilt yet.

I put the quilt up on a window before I quilted it and it looks like stained glass.
The block has quite a few pieces but is very easy to put together. I used my Tri Rec rulers, if you don't have them the AccuQuilt die Triangles in Square 2" will work, or you can download my templates here.

I used a bundle of 2-1/2" pre-cut strips plus some additional yardage of Marblehead Pleasing Pastels by Ro Gregg.
Marblehead Pleasing Pastels from Fabri-Quilt 
Fabric requirements for this 42" x 54" quilt:
Each block is 12-1/2" square unfinished
Quilt uses 12 blocks
  • 1 jelly roll of Marblehead Pleasing Pastels
  • 1-5/8 yd of #120-42924 Creme
  • 1-1/4 yd of #120-42921 Pink
  • 1-3/4 yd Backing piece, I used muslin
  • Batting, I used Warm & Natural

You will use two 2-1/2" strips in colors of your choice to make your block. You can get 2 blocks out of these 2 strips if you use the cutting info below for one and then switch the colors for the next.
For example this block shows a pink center, cut all the pieces and then cut another, reversing the colors to a teal center. If you want more variety there are enough strips to make blocks by just choosing 2 colors.


For each block cut the following: I am going to use pink and teal as an example.
  •  Pink - one 2-1/2" x 8-1/2"  and 6 - triangles
  • Teal - two 2-1/2" x 4-1/2" and 4 - triangles
  • Creme - four 2-1/2" squares, four 2-1/2" x 4-1/2", two 1-1/2" x 12-1/2" and 20 side triangles
Cut your triangles with the Tri-Rec tools at the 2 1/2 inch line or use my templates.
cutting the triangles
When you cut the side triangles, be sure and keep the strip doubled with wrong sides together so you will get mirrored images....one for each side of the pink triangle. Use the 2-1/2" line on the template.

If you use the Tri-Rec be sure and cut the little corner piece, it will help you match your pieces.
cut corner when using the Tri Rec tools

Here is a photo to show you how to line up the side triangle pieces.
lining up your pieces

I like to make all the pieces using the triangles and side triangles first. I used a 1/4" seam allowance while making the entire quilt.
Making the triangle pieces

Here are all the triangle pieces for one block.
Triangles all pieced

Start sewing your sections of the block together.
Sewing the block together
sewing block

Add a 1-1/2" x 12" strip to 2 sides of the block as shown.
block strips

Here is a diagram showing the sizes of the pieces in each section.
sewing diagram

Here is your block all pieced! Now just make 11 more for your quilt.
Block all pieced

Here are my blocks all pieced together.
Quilt layout

Follow the diagram below to put your blocks in rows.
I used the pink for a 3" border and the binding, which I cut 2-1/2" wide.

You can really see on this diagram where I reversed the order of the color of fabrics....for example see the green/yellow block? One has the yellow in the center and the other has the green in the center.
diagram of setting the blocks at Freemotion by the River
I hope you enjoyed the tutorial! Now, how about a giveaway?!?

One lucky person will receive this beautiful strip set of Marblehead Pleasing Pastels by Ro Gregg that Fabri-Quilt is giving away. Head over to Connie's blog to help her name her quilt and see how you can enter to win the bundle!


Marblehead by Ro Gregg giveaway