Wednesday, December 9, 2015

Day 2: Home for the Holidays Blog Hop

Welcome to the second day of our Home for the Holidays blog hop! 
This week, our focus will be on throw pillows--a fun and often overlooked way to add some holiday joy to your home! Next week we'll have a variety of small sewing decor projects, so be sure to stop by each day!

We think you'll enjoy the tutorials this week--including possibly new-to-you techniques. One of the great things about pillows is that by creating envelope-style or zipper pillows (we'll show you both methods), you can switch them out with your regular throw pillow covers for a quick and easy holiday decoration (and they don't require much storage space the rest of the year!).


The Present Pillow is exactly what the name says--a pillow that looks like a present. A fabric "ribbon" creates the 3-D bow on the front. We chose a wrapping paper-style red and gold snowflake print for the "present" and a metallic gold scroll for ribbon, both from the  Season's Greetings collection--a touch of elegance for your holiday decor. This pillow measures 17-1/2" square.


Materials
2/3 yard red/gold snowflake print
2/3 yard gold print
16" red zipper
18" square pillow form
Turning stick

Cutting
Red/gold snowflake:
One 18-1/2" square
Two 8" x 18-1/2" strips

Gold print:
Two 6-1/2" x 42" strips
One 3-1/2" x 18-1/2" strip

Make the Pillow
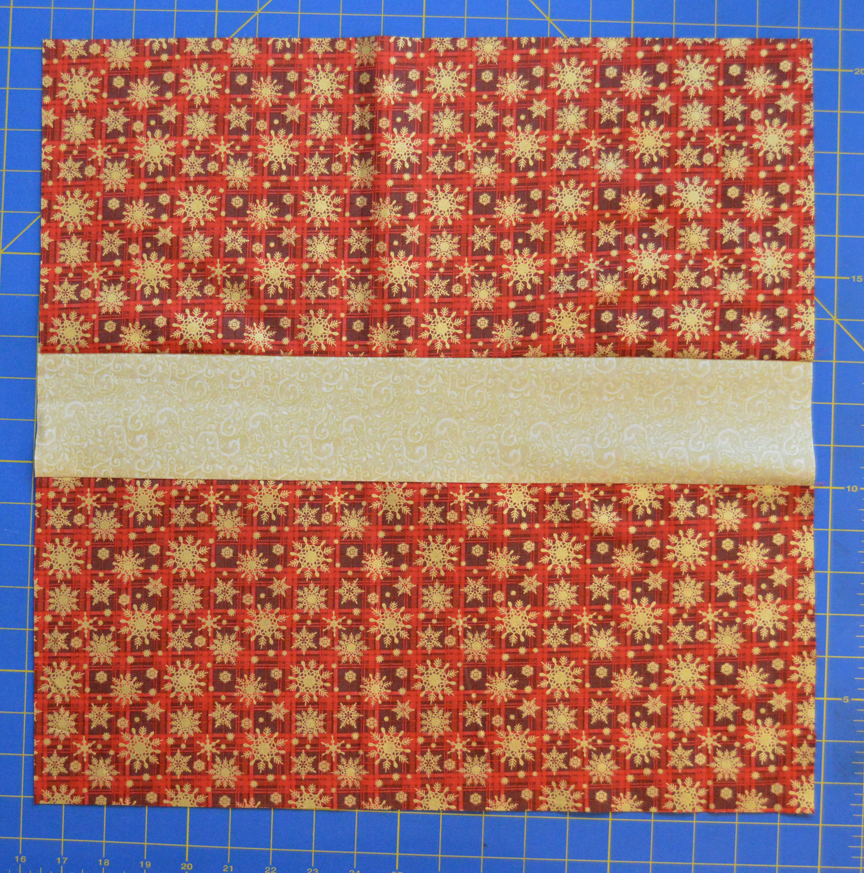
Step 1: Sew an 8" x 18-1/2" red/gold snowflake strip to opposite sides of a 3-1/2" x 18-1/2" gold print strip. Topstitch on the gold strip 1/4" from each seam line.

Step 2: Press a 6-1/2" x 42" gold print strip lengthwise in half wrong sides together to create a fold line. (This will make it easier to press later.) Refold lengthwise in half right sides together and stitch down the long edge.

Step 3: On one end, use the 45 degree line on a ruler to create a diagonal line as shown. 


Step 4: Stitch on the drawn line and trim 1/4" past the seam.

Step 5: Turn the strip right side out and use a turning stick to push the point out. Press this ribbon strip. Topstitch 1/4" from the outer edge of the strip.
Step 6: Repeat steps 3-5 to make a second ribbon strip.
Step 7: Position the pieced square and 18-1/2" red/gold snowflake square right sides together with a pieced edge oriented up. Lay the zipper near the pieced edge of the square as shown. Mark the ends of the zipper with pins. Sew along this edge of the pillow using a 1/2" seam allowance. Sew with a regular length stitch outside the pins, backstitching at the pins. Sew with a large basting stitch between the pins. 


Step 8: Press the seam between the square and pieced square open and position the zipper on it, face down. Pin the zipper in place and use a zipper foot to stitch from edge to edge on each side of the zipper to secure it in place. 

Step 9: Pick the basting stitch open to expose the zipper. Open the zipper at least halfway. 

Step 10: Find and mark the center point on the left and right sides of the pieced square. Pin the raw ends of the ribbon strips at these center points. Tie a test bow; you may prefer to shorten the ribbon strips before sewing in place. Tip: Shortening one of the strips by 3-4" will help to create a bow with more equal ends, but try it yourself in case your tying technique is different.
Step 11: Baste the ribbon strips in place.

Step 12: Position pillow halves right sides together and pin. Double check that the zipper is at least halfway open! Make sure (and double check!) that the ribbon strips are tucked inside so you don't accidentally sew them in the seam.

Step 13: Sew around the outer three edges of the pillow using a 1/2" seam allowance. Turn right side out through the zipper opening. 

Step 14: Insert the pillow form into the pillow. Tie a bow with the ribbon strips.


Voila...the pillow present!


For a chance to win a bundle of Season's Greetings prints, leave a comment letting us know that you follow the blog (if you don't already, sign up in the sidebar at right using the email or blog reader option). In your comment, also let us know: gift wrapping--an opportunity for creativity or a labor of love? In other words, love it or hate it? Giveaway is open through Thursday, December 17th at 11:59 pm EST. This contest is now closed.

See the entire Season's Greetings collection here.

Check out each day of our Home for the Holidays Hop!
Day 1: The Ho Ho Ho Pillow
Day 3: Snowflake Pillow
Day 4: O Christmas Tree Pillow
Day 5: Peace on Earth Table Runner
Day 6: Snowflake Table Topper
Day 7: Let It Snow Applique Quilt
Day 8: Cinnamon Scented Coasters

Tuesday, December 8, 2015

Day 1: Home for the Holidays Blog Hop

Welcome to the first day of our Home for the Holidays blog hop! 
This week, our focus will be on throw pillows--a fun and often overlooked way to add some holiday joy to your home! Next week we'll have a variety of small sewing decor projects, so be sure to stop by each day!

We think you'll enjoy the tutorials this week--including possibly new-to-you techniques. One of the great things about pillows is that by creating envelope-style or zipper pillows (we'll show you both methods), you can switch them out with your regular throw pillow covers for a quick and easy holiday decoration (and they don't require much storage space the rest of the year!).


Celebrate Santa's arrival with a Ho Ho Ho Pillow! The red and green stripe prints from the Season's Greetings collection add whimsy to a simple pillow created with appliqued letters and a wide flange. This pillow measures approximately 24-1/2" x 11-1/2".


Materials

1/4 yard or fat quarter of white solid
1/4 yard or fat quarter of green stripe
2/3 yard of red stripe
1/4 yard or fat quarter of muslin
20" x 8" piece of interfacing
25" x 12" piece of fusible fleece 
Fusible web
Fiber fill

Cutting

White solid:
One 20" x 8" piece

Red stripe:

Two 3" x 20" strips
Two 3" x 12" strips
One 12" x 14" piece (for backing)
One 12" x 16" piece (for backing)

Make the Pillow

Download the template here. 
Step 1: Trace the H and O three times each onto the paper side of fusible web. (Note: Since both H and O are symmetrical, you don't have to worry about if the letter is reversed--it doesn't matter!)


Step 2: Cut out each letter 1/4" past the drawn line. Fuse two H and two O onto the wrong side of the green stripe. Fuse the remaining H and O onto the wrong side of the red stripe. Angle the letters on the stripe if you'd like a diagonal look like ours.
Step 3: Following manufacturer's directions, fuse the three Ho sets onto the 20" x 8" white piece, measuring up approximately 2-1/2" from the bottom and aligning letters on that line. 

Step 4: Attach stabilizer to the back of the white piece. Use your favorite decorative stitch and matching thread to stitch letters to background. Trim piece to measure 20" x 7".

Step 5: Sew 3" x 20" red stripe strips to top and bottom of white piece. Sew 3" x 12" red stripe strips to opposite short sides. Fuse the 25" x 12" fusible batting piece to the wrong side. (Note: In addition to giving the flange a nice, firm feel, this also eliminates the potential to see through the white background fabric and gives the pillow a smoother appearance.)


Step 6: Fold one short end of the 12" x 16" red stripe piece over 1/4", wrong sides together. Press. Fold over another 1/4" and press again. Stitch to create a hemmed edge for pillow back. Repeat on a short end of a 12" x 14" red stripe piece. 

Step 7: Lay the pillow front right side up. Layer the two backing pieces right sides down, aligning raw edges. (Hemmed edges will overlap in the middle.) Pin in place. 
Half the backing pinned in place


The entire backing pinned in place
Step 8: Stitch around the entire outer edge of pillow. Turn right sides out, clip corners, and press. 

Step 9: To create the flange, stitch around pillow 1/2" from the center white edge. Stitch around pillow 1/4" from outer pillow edge. 

Step 10: Sew the 7-1/2" x 20-1/2" muslin pieces around three sides, leaving a short side open. Turn right side out and stuff with fiberfill, testing as you go to make sure your pillow insert won't bulge when tucked into the outer pillow. Stuff it less than you'd think--if you stuff it firmly, your pillow will end up shaped like a tootsie roll! When you're happy with the fit, sew a 1/4" seam across the open end. 

Step 11: Stuff the pillow insert inside the pillow and enjoy!


For a chance to win a bundle of Season's Greetings prints, leave a comment letting us know that you follow the blog (if you don't already, sign up in the sidebar at right using the email or blog reader option). In your comment, also let us know: what is your favorite piece of holiday decor? Giveaway is open through Thursday, December 17th at 11:59 pm EST. 
This contest is now closed.

See the entire Season's Greetings collection here.


Check out each day of our Home for the Holidays Hop!
Day 2: The Present Pillow
Day 3: Snowflake Pillow
Day 4: O Christmas Tree Pillow
Day 5: Peace on Earth Table Runner
Day 6: Snowflake Table Topper
Day 7: Let It Snow Applique Quilt
Day 8: Cinnamon Scented Coasters

Monday, December 7, 2015

Home for the Holidays Blog Hop

We're excited to be sharing holiday-themed tutorials with you over the next two weeks, all using our seasonal fabrics! 

Pour yourself a mug of hot cocoa and turn on the carols to get yourself in the mood...maybe even use that snow spray on your windows?! Then, sit back, relax and get inspired with some fantastic (and quick!) holiday projects.
We'll post the first tutorial on Tuesday, so be sure to stop back then.

p.s. If you missed our holiday fabric showcase, see the collections here:

Friday, December 4, 2015

Home for the Holidays: Ro Gregg's Peace on Earth fabrics

The Christmas carols have been playing on the radio 24-7 since the day after Thanksgiving...it's officially the holiday season! This week we've been showcasing our holiday collections, and then starting next week we'll be sharing some quick and easy decor tutorials.

Here is Ro Gregg's holiday collection, Peace on Earth:


And the coordinating panel:

The collection also includes an apron panel:


We asked Ro to tell us about the inspiration behind her beautiful Peace on Earth collection.


Q. Tell us about the panel. Why did you choose to feature a reindeer? 
Ro: Reindeers are Santa's helpers too.  They pull the sleigh and deliver the gifts all over the world. Deer are one of my favorite animals; as a child we nursed a baby fawn that lost its Mother.  I designed the deer to be festive with metallic scroll antlers, and I think the filigree in the borders emulates that feeling.

Q. Can you tell us about some of the prints? 
Ro: Festive Christmas balls and Rosewood poinsettias are showcased on a background of Harlequin damask.

Symbols of peace is a signature piece. The doves contain designs from Marblehead prints and other coordinates. 

Miniature metallic reindeer with festive medallions—such a perfect symbol of Santa's helpers. This is my favorite print from the collection. The doves and reindeer are flying around the night sky with the full moon and medallion-like planets. It just feels like Christmas Eve. 


Q. How would you describe the style of this collection? 
Ro: Traditional decorative christmas with an ornamental flair.

Q. Why do you like adding the metallic gold to the holiday collections?
Ro: I think metallic gold goes well with holiday celebrating.  It makes the patterns festive with its shimmer.

Q. How did the collection get its name?
Ro: I first came up with the theme "Peace On Earth" as a reflection of what we all wish for around the globe and how it is affecting all of humanity. Christmas is a peaceful, joyous season. The dove fabric actually has the word "peace" and musical notes inside some of the doves.


Q. What else makes the Peace of Earth collection special?
Ro: It works beautifully with the Glistening Christmas prints, many of which are included here, such as the winter wonderland of metallic trees and the North star shining bright. The colors work flawlessly together for holiday projects.


"Celebrate" by Mara Quilt Designs, the free quilt pattern available on our website, surrounds the panel with pieced ornaments and stars.
Download the free pattern here.

See the entire Peace on Earth collection by Ro Gregg here.

Thursday, December 3, 2015

Home for the Holidays: Season's Greetings fabrics

The Christmas carols have been playing on the radio 24-7 since the day after Thanksgiving...it's officially the holiday season! This week we'll be showcasing our holiday collections, and then starting next week we'll be sharing some quick and easy decor tutorials.


Our Season's Greetings collection is huge--we like to think that it contains pretty much anything you could ever want in a holiday print! From ornaments to snowflakes to poinsettias, trees, and stockings to bells and santas...if you're looking for it, you'll find it here! 


See the entire Season's Greetings 2015 collection here.

Tuesday, December 1, 2015

Home for the Holidays: Holiday Editions fabrics

The Christmas carols have been playing on the radio 24-7 since Friday morning...it's officially the holiday season! This week we'll be showcasing our holiday collections, and then starting next week we'll be sharing some quick and easy decor tutorials.


First up is the Holiday Editions collection: 
Poinsettias, pinecones and ivy in rich reds, greens and creams embellished with metallic gold details for a little extra sparkle! 

(If these prints look familiar, it's because they were featured in this neat notebook cover  here from Christmas Quilts and More magazine.)

See the entire Holiday Editions collection here.

Thursday, November 26, 2015

Happy Thanksgiving!


Hope you have relaxing Thanksgiving holiday weekend filled with family, friends, and your favorite turkey day side dishes (plus pumpkin pie!). 

And...if you need turkey cooking advice, go here.

For a few turkey laughs, go here. 

For some last-minute decorating and food ideas (thank you, Pinterest!) go here.