Thursday, December 22, 2016

Silent Night Sampler: Day 10

We're celebrating the season with 12 days of holiday-themed block tutorials using Ro Gregg's gorgeous and glittering Silent Night collection. Make sure you catch all of the tutorials, and then we'll show you how to assemble the blocks into a sampler quilt! 


Today is Star Block #3. We call it a star block, but we also think it also looks like the bow on a present from the top view. 

Cutting: 
From the cream:
Four 4" squares

From the red:
Two 4" squares
Two 3-1/2" squares

From the green: 
Two 4" squares
Two 3-1/2" squares

From the multi print:
Four 4" squares

Step 1: Draw a diagonal line on the wrong side of the four 4" cream squares and one each 4" green and red square. Pair two cream squares with the unmarked multicolor squares, and one each with the remaining unmarked red and green square. 

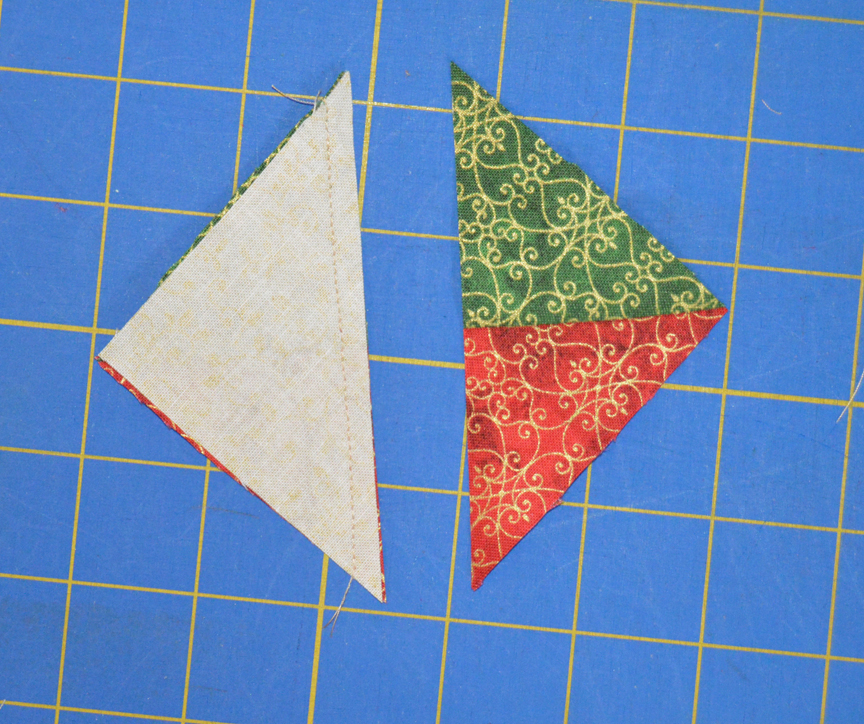
Step 2: Stitch 1/4" on either side of the drawn line and cut on the drawn line. Press both units open. 

Step 3: Trim HSTs to measure 3-1/2" square. You'll have two red/multi, two green/multi, two red/cream, two green/cream, and four cream/multi HSTs.

Step 4: Lay out the HSTs with the two 3-1/2" red squares and two 3-1/2" green squares as shown. 

Step 5: Sew the units into rows, alternating the pressing direction in each row. 

Step 6: Sew the rows together to complete the block. 

Here's the finished Star Block #3:


See the entire Silent Night collection 
here and ask for it at your local quilt shop.

See all of our Silent Night Sampler Blocks!
Day 1: Wreath Block

Day 2: Star Block #1
Day 3: Bow Block
Day 4: Stocking Block
Day 5: Star Block #2
Day 6: Present Block
Day 7: Tree Block
Day 8: Ornament Block
Day 9: Candy Cane Block
Day 11: Cardinal Block
Day 12: Assembly


Wednesday, December 21, 2016

Silent Night Sampler: Day 9

We're celebrating the season with 12 days of holiday-themed block tutorials using Ro Gregg's gorgeous and glittering Silent Night collection. Make sure you catch all of the tutorials, and then we'll show you how to assemble the blocks into a sampler quilt! 


Today is the Candy Cane Block! Simple half-square triangles make this delicious peppermint treat!
Block is 6" x 12" finished.

Cutting:
From the cream:
One 4-1/2" x 8-1/2" piece
One 3" square
One 2-1/2" square

From the red: 
One 3-1/2" square
Four 3" squares

From the green:
One 3-1/2" square
Five 3" squares


Step 1: Draw a diagonal line on the wrong side of four 3" green squares. Pair each marked square with a red square, right sides together. 


Step 2: Stitch 1/4" on either side of the marked line, cut on the line, and press the units open. Trim HST units to measure 2-1/2" square. 


Step 3: Cut the 3" cream square and the remaining 3" green square diagonally in half once. 


Step 4: Join a cream and a green triangle to make an HST unit.


Step 5: Trim to measure 2-1/2" square. 


Step 6: Make a red-green HST using the 3-1/2" squares. Trim to 3" square. Lay the remaining cream triangle on top of the HST as shown to make sure the resulting unit is oriented correctly. Stitch 1/4" from the long cream edge and trim off the unused triangle half. (Note: You can cut the red/green HST in half before stitching on the cream triangle if you prefer--we did it this way to make the unit orientation more obvious.)


Step 7: Trim to measure 2-1/2" square. Trim carefully so the red-green point remains centered. 


Step 8: Lay out the units as shown.


Step 9: Sew the units into rows as shown (top row, middle row, vertical row). 


Step 10: Join the two top rows, and sew the vertical row to the 4-1/2" x 8-1/2" cream piece. Join the two halves of the candy cane. 


The finished candy cane block: 


See all of our Silent Night Sampler Blocks!
Day 1: Wreath Block

Day 2: Star Block #1
Day 3: Bow Block
Day 4: Stocking Block
Day 5: Star Block #2
Day 6: Present Block
Day 7: Tree Block
Day 8: Ornament Block
Day 10: Star Block #3
Day 11: Cardinal Block
Day 12: Assembly

Tuesday, December 20, 2016

Silent Night Sampler: Day 8

We're celebrating the season with 12 days of holiday-themed block tutorials using Ro Gregg's gorgeous and glittering Silent Night collection. Make sure you catch all of the tutorials, and then we'll show you how to assemble the blocks into a sampler quilt! 


Today is the Ornament Block! Much like the stocking block, it's actually made up of multiple units that are joined together. There are two different ornaments--one with a thinner stripe (ornament A) and one with a wider stripe (ornament B). 

Cutting: 
From the cream: 
Two 2-1/2" x 6-1/2" pieces
Sixteen 2" squares
Eight 1-1/2" x 2-3/4" pieces

From each of red #1 and red #2:
Two 2-1/2" x 5-1/2" pieces (Ornament A)

From red #3:
Two 2-1/2" x 5-1/2" pieces (Ornament B)

From green #1:
Two 1-1/2" x 5-1/2" pieces (Ornament A)

From each of green #2 and #3:
Two 2" x 5-1/2" pieces (Ornament B)

From the gold/black:
Four 1" x 1-1/2" pieces

Step 1: To start Ornament A, sew 2-1/2" x 5-1/2" red pieces to opposite long sides of one 1-1/2" x 5-1/2" green piece. To start Ornament B, sew 2" x 5-1/2" green pieces to opposite long sides of one 2-1/2" x 5-1/2" red piece. 

Step 2: Make a second Ornament A and Ornament B unit.

Step 3: Draw a diagonal line on the wrong side of four 2" cream squares. Lay the marked cream squares on an Ornament A unit as shown. 

Step 4: Stitch on the drawn lines, trim seam allowance to 1/4", and press each corner open to complete an ornament body. 

Step 5: Repeat on the remaining three ornaments. 

Step 6: To make the ornament top, sew 1-1/2" x 2-3/4" cream pieces to opposite sides of one 1" x 1-1/2" black/gold piece. Make four. 

Step 7: Sew an ornament top to an ornament.


Step 8: Repeat with remaining three ornaments. Lay out the ornaments and the two 2-1/2" x 6-1/2" cream pieces as shown. Join the pieces together to complete the ornament block. 

Here's the finished block:


See the entire Silent Night collection here and ask for it at your local quilt shop.

See all of our Silent Night Sampler Blocks!
Day 1: Wreath Block
Day 2: Star Block #1
Day 3: Bow Block
Day 4: Stocking Block
Day 5: Star Block #2
Day 6: Present Block
Day 7: Tree Block
Day 9: Candy Cane Block
Day 10: Star Block #3
Day 11: Cardinal Block
Day 12: Assembly


Monday, December 19, 2016

Silent Night Sampler: Day 7

We're celebrating the season with 12 days of holiday-themed block tutorials using Ro Gregg's gorgeous and glittering Silent Night collection. Make sure you catch all of the tutorials, and then we'll show you how to assemble the blocks into a sampler quilt! 


Today's block is the Tree Block. We've spiced it up a little bit by using two different greens. Add more for a scrappier tree if you like! 

Block measures 12" square finished.

Cutting:
From the cream print:
Two 2-1/2" x 5-1/2" pieces
Two 2-1/2" x 4-1/2" pieces
Two 2-1/2" x 3-1/2" pieces
Twelve 2-1/2" x 2-1/2" squares
Two 2-1/2" x 1-1/2" pieces

From green print #1: 
One 2-1/2" x 4-1/2" piece
One 2-1/2" x 8-1/2" piece
One 2-1/2" x 12-1/2" piece

From green print #2:
One 2-1/2" x 6-1/2" piece
One 2-1/2" x 10-1/2" piece

From the gold/black print:
One 2-1/2" square


Step 1: Draw a diagonal line on the wrong side of ten 2-1/2" squares. 
Step 2: Layer a marked squares right sides together on both ends of the green print pieces as shown. 


Step 3: For the top green print #1 piece, stitch on the marked line. Trim seam allowance to 1/4" and press open. Position the second marked square as shown; sew, trim and press.


Step 4: Add the remaining marked squares in the same way. 


Step 5: Lay out the cream spacer pieces as shown below. The 2-1/2" x 4-1/2" pieces are in the top row, 2-1/2" x 3-1/2" in the second row, 2-1/2" squares in the third row, and 1-1/2" x 2-1/2" pieces in the fourth row. Sew the pieces into rows.


Step 6: To make the trunk, lay out the two 2-1/2" x 5-1/2" cream pieces with the 2-1/2" black/gold square. Sew the pieces together.


Step 7: Join the five tree rows and one trunk row together.


The finished block:


One tree block, ready to go!


See the entire Silent Night collection here and ask for it at your local quilt shop.

See all of our Silent Night Sampler Blocks!
Day 1: Wreath Block
Day 2: Star Block #1
Day 3: Bow Block
Day 4: Stocking Block
Day 5: Star Block #2
Day 6: Present Block
Day 8: Ornament Block
Day 9: Candy Cane Block
Day 10: Star Block #3
Day 11: Cardinal Block
Day 12: Assembly


Sunday, December 18, 2016

Silent Night Sampler: Day 6

We're celebrating the season with 12 days of holiday-themed block tutorials using Ro Gregg's gorgeous and glittering Silent Night collection. Make sure you catch all of the tutorials, and then we'll show you how to assemble the blocks into a sampler quilt! 


Today's tutorial is the present block. This tall and skinny block shows up twice in the sampler, so we'll be making two. It goes together really quickly! 

Block measures 6" x 12" finished.

Cutting:
From the medallion print: 
Two 3" x 10-1/2" pieces

From the red print:
One 1-1/2" x 10-1/2" piece
One 3" square

From the cream print:
One 3" square
Two 1-1/2" x 2-1/2" pieces

Step 1: Draw a diagonal line on the wrong side of the cream square. Layer right sides together with the red square. 

Step 2: Stitch 1/4" on both sides of the drawn line. Cut on the line and press both units open. Trim half-square triangle units to measure 2-1/2" square. 

Step 3: Lay out all of the pieces as shown.

Step 4: Sew the 1-1/2" x 2-1/2" cream pieces and half-square triangles together into a row. Sew the three long pieces together into a row. 

Step 5: Join the two rows to complete the block. 

Here's the finished present block: 

And our two present blocks. Isn't the medallion print the perfect wrapping paper?!

See the entire Silent Night collection here and ask for it at your local quilt shop.

See all of our Silent Night Sampler Blocks!
Day 1: Wreath Block

Day 2: Star Block #1
Day 3: Bow Block
Day 4: Stocking Block
Day 5: Star Block #2
Day 7: Tree Block
Day 8: Ornament Block
Day 9: Candy Cane Block
Day 10: Star Block #3
Day 11: Cardinal Block
Day 12: Assembly