Wednesday, April 29, 2015

Pattern Shopping!

We'd like to introduce you to a new feature here on the blog. We've added a new tab called "Pattern Shopping," which showcases quilt patterns that feature our fabrics. 


You'll find a photo of the pattern, the name of the fabric line it uses, and a link to a website where you can purchase the pattern. (We aren't selling the patterns--we're just promoting them on the blog for the designers and distributors who are offering them for sale.)
We'll update this list as new patterns become available, so keep an eye on it!

And, now, for a little eye candy, here are a few of our favorites:


Click on the "Pattern Shopping" link to find where you can purchase these patterns.

Tuesday, April 28, 2015

Botanical Society

We're at the tail-end of the April showers that are guaranteed to bring May flowers, so it's time for the fun florals and coordinates of the Botanical Society collection to bloom!

With large and medium packed floral prints, bouquet prints to fussy cut, plus a fun wavy stripe and curlicue meandering design, you'll find so much to play with in this line!


And don't miss this free quilt pattern, "Blooming Bouquets," featuring the Botanical Society prints--a fabric garden for your house!
"Blooming Bouquets" by Airborne Heirlooms

See the entire Botanical Society collection here.
Download the free quilt pattern here.

Friday, April 24, 2015

Lovely in Lavender

There's something soft and soothing about Tammy Silvers' "Lavender & Sage" quilt, featuring the Chelsea collection. The prints--both the main print that Tammy used as the "background" in the quilt--and the grays, greens and lavenders that almost read as solids--blend together beautifully in this easy design. You'll find the pattern featured in the May/June 2015 issue of McCall's Quilting.

"Lavender & Sage" by Tammy Silvers; machine quilted by Pat Yearwood;
featured in McCall's Quilting May/June 2015

Q. What attracted you to the Chelsea collection?  
Tammy: I don’t know about you, but I seem to go through phases of color preference - and right now I’m in my “gray” phase. Not as dreary as it sounds, and nope, not going through a depression (that I know of!).  But gray is such a wonderful neutral. It goes with practically every color, and really helps prints pop.

Q. Is there a particular fabric or fabrics that really catch your eye?  
Tammy: The main fabric, kind of the background fabric in this quilt, is wonderful. It reminds me of the Far East - full of movement, and soft, almost faded colors that practically scream “oriental rug.” It’s wonderful.


Q. What can you tell us about your fabric choices?
Tammy: Since the background/main fabric is such a busy print, and has so many curving lines, I thought some strong straight lines and fabrics that read as a solid would provide nice contrast, and create an illusion of depth.

Q. Can you talk about the on point look and how it's created in your design?
Tammy: It is actually much simpler than it looks!  Without giving it away (not that experienced quilters can’t tell just by looking), it is a simple two block quilt, and the blocks, while appearing to be set on point, are all actually straight set blocks.

Q. Can you talk about how you used the various prints in your design?
Tammy: Yes, the main fabric, the paisley look print, shows as a background fabric due to placement within all the blocks. Alternating the lime and the lavender prints gave some order to the quilt to keep it from getting too “busy.” And the border - well, while I would love to have another excuse to use the paisley print, the quilt really needing to be “grounded” or reigned in, and the mid-tone purple print does that well.

Q. What do you like best about the quilt?
Tammy: I love that, while all of the fabrics are lovely on their own, when combined they work wonderfully together.  And the overall effect, as I’ve mentioned before, is soft and subtle, like a wonderful old oriental rug that has mellowed over time.


Q. Did you do the machine quilting? 
Tammy: I wish!  I have my quilt fairy, Pat Yearwood, to thank (as always) for the wonderful machine quilting on the project.

Q. What do you see this quilt being used for? 

Tammy: Well, providing I can keep my sister-in-law from tucking it in her purse when she comes to visit (she LOVES anything purple), I think it is the perfect spring accent quilt for snuggling under when the air gets a bit nippy!

See the entire Chelsea collection here.
Find the kit for this project here.
Download the free pattern for a queen-size version of this quilt here.
Find McCall's Quilting magazine here.


Wednesday, April 22, 2015

Pre-cuts Winners!

We hope you enjoyed our Pre-Cuts Party blog hop last week! 


Here are the randomly drawn winners:


Marblehead Global Brights Snack Pack:
Josie S.


Shadows Charm Pack:
Emily C.

Baby Talk Snack Pack:
Anita C.

A Walk in the Park Charm Pack:
Lori M.

Congratulations to the winners! We'll be emailing you today for your mailing addresses so we can get your pre-cut prizes sent!

And if you missed any of our tutorials, here are the links:


Tuesday, April 21, 2015

This quilt is going places!

We love seeing what quilters create using our fabric, and when we saw this beauty, we knew that we needed to share it with all of you! Mary Louise Gerek designed her Seashell quilt using Ro Gregg's Marblehead Global Brights, and she recently learned that the quilt had been accepted into the Denver National Quilt Festival. Congratulations, Mary Louise! 


Q. What attracted you to the Global Brights fabric? 
Mary Louise: I had already designed Seashell before the Global Brights were released. When I first saw them, I knew they were just what the design needed. I really like working with the bright colors and textures of the Marblehead Global Brights. The fabric is high quality and has a wonderful hand. 

Q. Can you talk about your block design? 
Mary Louise: I started the block design by just drawing lines within a square. I then started adding and subtracting lines to see how it would work. I focused on straight-line piecing and what secondary patterns appear when the blocks are rotated and/or flipped.
The block consists of two half-square triangles, each with asymmetrical patches. All of the seams are straight lines. The final seam is the one diagonally down the middle where you only have to match two seams. The block does require accurate piecing of acute angles. That is the skill building part of the pattern.

Q. Why do the Global Brights, as a mottled type of fabric, work well for your Seashell pattern?
Mary Louise: The variation in the colors within each fabric results in very similar, but not identical blocks. I really like that kind of texture added to a quilt.

Q. Can you tell us about your border and cornerstone design decisions?
Mary Louise: When I looked at the quilt as a whole, it needed some boundaries. I also wanted to make the pattern variable in size to fit different size beds. By varying the width and number of strips in the border, I was able to accomplish that easily.
I originally tried putting four small blocks in each corner, but that was too much of the same thing. The points aiming toward the center brings the eye back to the center of the quilt. The points are a challenge and some
people may prefer paper-piecing the cornerstones. I do include a paper-piecing foundation in the published pattern.

Q. What do you like best about this quilt?
Mary Louise: I like the color and the secondary patterns that appear. It is a fun block to put together, and working with bright colors on a rainy day definitely makes the day brighter.

Q. What is one surprising thing about this quilt?
Mary Louise: Most surprising to me is people's reaction to it when they see it in person. The pictures show you what the quilt looks like, but the color really comes alive in person.

Q. Can you tell us about entering the show and your reaction upon being accepted?
Mary Louise: I really entered the quilt in the Denver National Quilt Festival on a whim. It was one of those "why not?" moments. I entered it with three days left in the entry window. So, I did not have to wait long. And, I really forgot about it. When the email came on April 3, I was really surprised. This is my first acceptance into a national show.

Q.  Where is this quilt headed after the show? 
Mary Louise: Seashell will be part of the Trunk Show that goes along with my lecture "Playing with Blocks." I use it to illustrate what can happen when you start playing with lines and asymmetrical blocks. The block is part of my
class, Polish Your Piecing, where I work with students on piecing acute angles, piecing curves and working out the best order to piece your patches for any given block.


Make this quilt yourself!
You can find Mary Louise's Seashell pattern here.
Browse Ro Gregg's Marblehead Global Brights collection here.
Find out more about Mary Louise, including her lectures, classes, and patterns, here.

Thursday, April 16, 2015

Pre-cut Party Blog Hop - Day 4

Welcome to the last day of our Pre-cut Party! blog hop.
This week's blog hop features four different projects using...you guessed it...pre-cuts! 
We're all busy, we love the time that pre-cut fabric saves, and we can never have enough ideas of ways to use them! Stop by each day to find a different tutorial and have a chance to win the featured pre-cut bundle. 


Hi, I'm Wendy and I blog at Tamarinis. Ro Gregg’s fabric line, A Walk in the Park, is so charming! As I was working with it,  the fabric practically demanded traditional blocks that echo the sentiment of the prints - and then of course, working with those blocks and wonderful fabric made me think of Sunday brunch at Grandma’s house.  I love modern and intricate as much as the next person, but sometimes it’s nice to have a sweet, simple project that pays homage to the traditional roots of quilting.  I hope others agree!


Head over to Tammy's blog to see her table runner tutorial, learn more about the coordinating placemat pattern, and enter to win A Walk in the Park snack pack! This giveaway is now closed.


Don't miss the other pre-cut fabric tutorials this week!
Day 1Connie from Freemotion by the River using a Marblehead Global Brights snack pack
Day 2Fabri-Quilt team using a Shadows charm pack
Day 3Dawn Stewart of Spring Water Designs using a Baby Talk snack pack

Wednesday, April 15, 2015

Pre-cut Party Blog Hop - Day 3

Welcome to the third day of our Pre-cut Party! blog hop.
This week's blog hop features four different projects using...you guessed it...pre-cuts! 
We're all busy, we love the time that pre-cut fabric saves, and we can never have enough ideas of ways to use them! Stop by each day to find a different tutorial and have a chance to win the featured pre-cut bundle. 


Hello!  I'm Dawn from Spring Water Designs, and today I'm sharing a quick and easy design to make two fun kid cuddle quilts from one Snack Pack of strips, plus a couple coordinating fabrics.  I love this cute Baby Talk Snack Pack, and as you'll see in my tutorial, it works well for making quilts for both girls and boys :)


Head over to Dawn's blog to see her tutorial for making these adorable quilts and find out how you can win a Snack Pack of Baby Talk! This giveaway is now closed.


Don't miss the other pre-cut fabric tutorials this week!
Day 1Connie from Freemotion by the River using a Marblehead Global Brights snack pack
Day 2Fabri-Quilt team using a Shadows charm pack

Day 4: Tammy Silvers of Tamarinis using A Walk in the Park charm pack

Tuesday, April 14, 2015

Pre-cut Party Blog Hop - Day 2

Welcome to the second day of our Pre-cut Party! blog hop.
This week's blog hop features four different projects using...you guessed it...pre-cuts! 
We're all busy, we love the time that pre-cut fabric saves, and we can never have enough ideas of ways to use them! Stop by each day to find a different tutorial and have a chance to win the featured pre-cut bundle. 


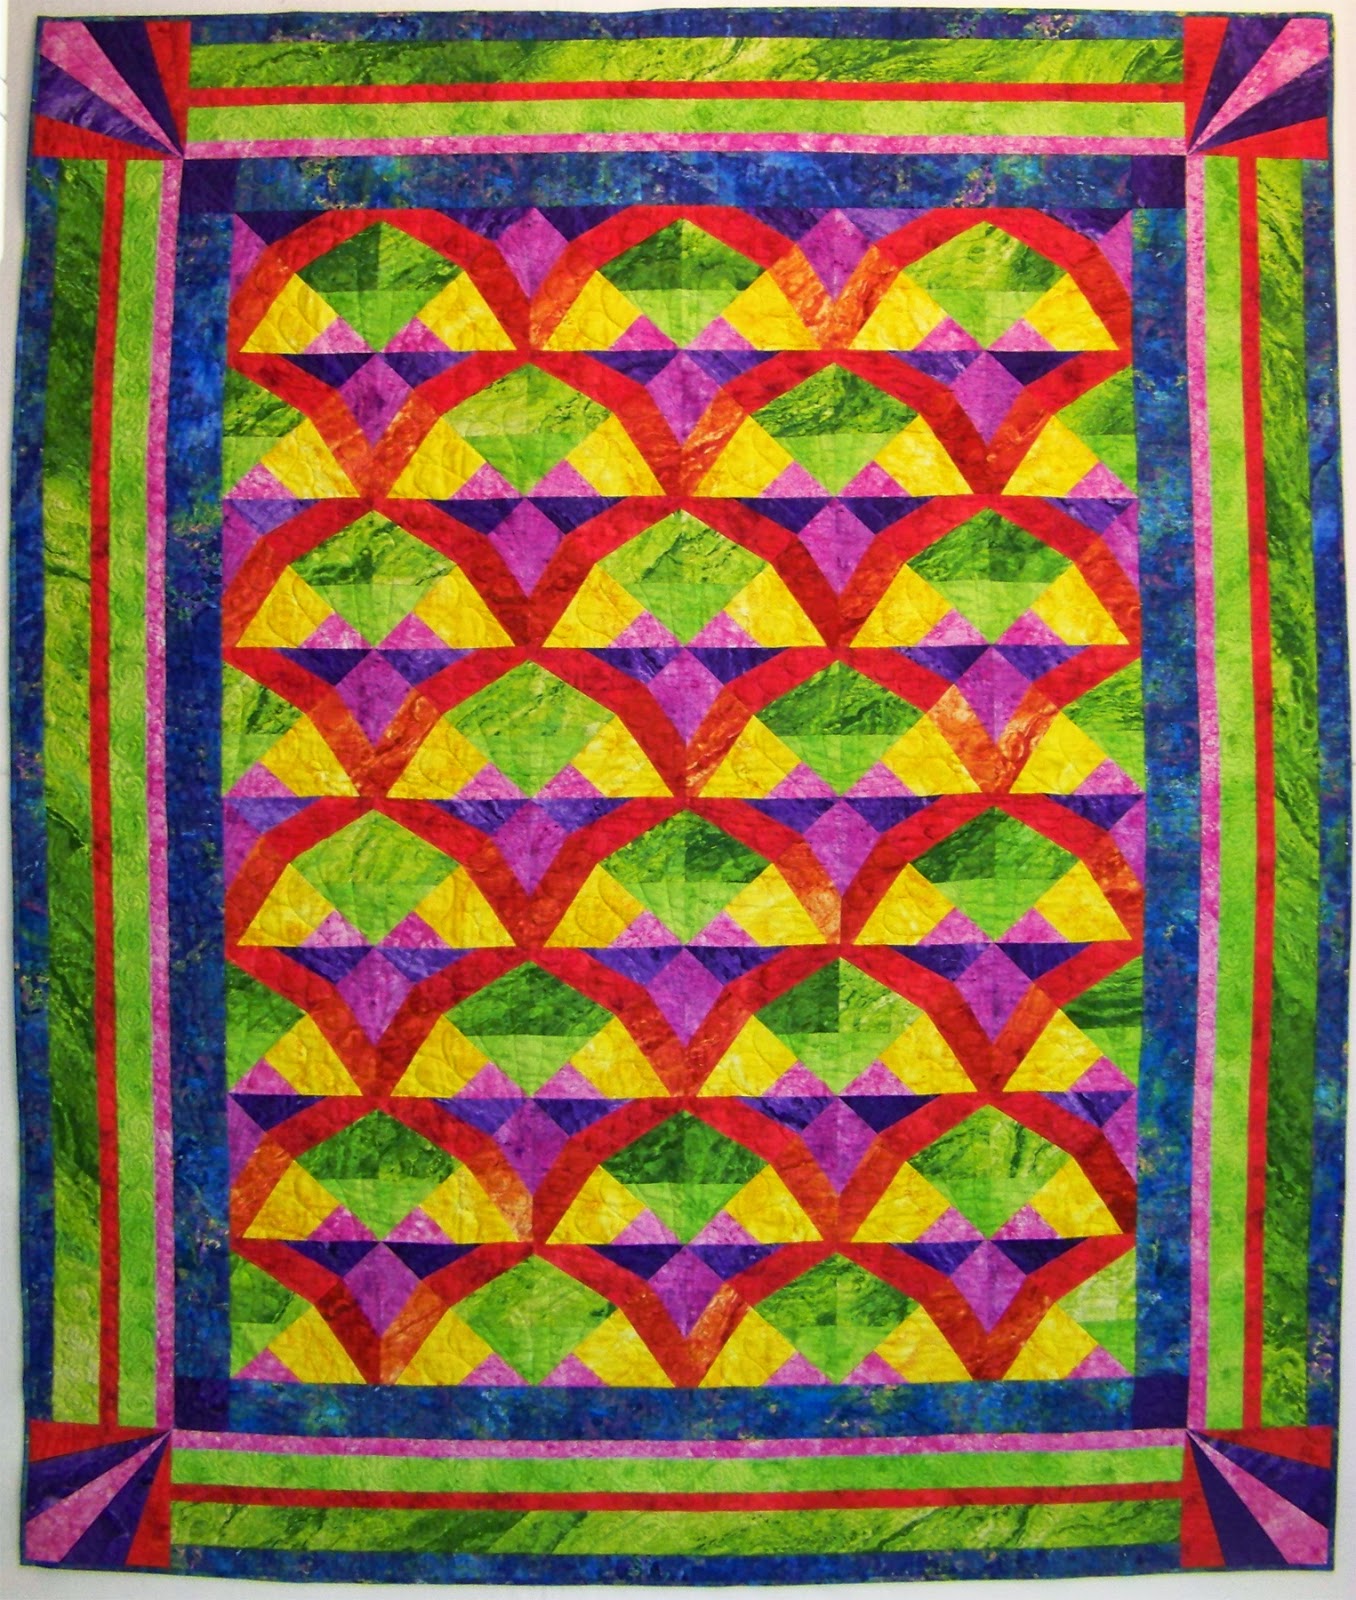
Today our Fabri-Quilt team is featuring a wall hanging made using a charm pack of the Shadows collection. The tutorial features the traditional brick layout--simple rectangles--with two twists to create a more contemporary design. As for the fabrics? The shading and layers of the colors and silhouettes of the leaves are gorgeous--it's like working with a rainbow! That turquoise you see below (the quilt backing and binding) is definitely a favorite! At the bottom of the tutorial, find out how you can win a charm pack of Shadows so you can play with this rainbow yourself!

Finished quilt size: 31-1/2" x 29-1/2"

For this project, you'll need:
1 charm pack of Shadows
1/2 yard yellow leaf
1-1/4 yards turquoise leaf for backing and binding
35" x 37" batting piece


A look at the various charm squares in the pack:

1. Sew two charm squares together. Make 16 sets of squares. You can carefully choose the fabric pairs here or just wing it, grabbing two squares and sewing them together. (Or the middle of the road approach--grab two squares, but if they're the same color, try again--controlled scrappiness!)

2. Cut each set of double squares in half, creating two 2-1/2" x 9-1/2" double rectangles. You'll be making 32 sets of double rectangles. You will only use 28, but having a few extra allows you to play with color placement in the quilt layout.

 A look at a variety of 2-1/2" x 9-1/2" double rectangles:

3. Cut 3 charm squares in half to make 2-1/2" x 5" rectangles. For greater variety of color in your quilt, you can cut some of the remaining squares in half as well, but you only need 5 single rectangles.

4. Sew a 2-1/2" x 5" rectangle to a 2-1/2" x 9-1/2" double rectangle to make a 2-1/2" x 14" triple rectangle. Make 5.

5. Lay out 6 rows of 6 rectangles each (three 2-1/2" x 9-1/2" double rectangles per row) alternating with 5 rows of 5 rectangles each (one 2-1/2" x 14" triple rectangle and one 2-1/2" x 9-1/2" double rectangle). Sew the rectangles into rows.

6. Cut ten 2-1/2" x 2-3/4" yellow rectangles. Lay out on both ends of the short rows as shown below. Be sure your yellow rectangles are oriented correctly--they should be 2-1/2" tall to fit with the rest of the row, and 2-3/4" wide.


7. Sew to both ends of the short rows as shown below. You should have 5 rows with yellow on both ends and 6 rows without.

8. Join the rows together. Cut two 4" x 42" yellow leaf strips and two 2-1/2" x 42" yellow leaf strips. Sew the wider strips to the top and bottom, press and trim, and sew the narrower strips to the sides, press and trim. Your quilt top is complete!

9. Lay the backing fabric face down, batting, and quilt top right side up. Baste the layers together and quilt as desired. Cut four 2-1/2" x 42" turquoise leaf strips and use to bind the wall hanging.

A close-up of the quilt center--the yellow ends on alternating rows create a different look than a traditional brick quilt, especially as they blend into the border made from the same fabric.

What else makes this design out of the ordinary? Traditional brick quilts run horizontally, like actual bricks. We've chosen to display this quilt with the bricks running vertically instead--a slightly different look with a more modern feel accentuated by vertical lines of quilting.

Thanks for checking out our tutorial! For a chance to win a charm pack of Shadows (they're so fun to play with!), make sure you're following our blog either by email or by blog reader (see both options in right hand sidebar). Leave a comment letting us know that you're a follower as well as if you prefer the vertical or horizontal orientation of this wall hanging. The giveaway will close Saturday, April 18th at 11:59 pm EST and then we'll randomly draw a winner to receive a Shadows snack pack!  This giveaway is now closed.


Don't miss the other pre-cut fabric tutorials this week!
Day 1: Connie from Freemotion by the River using a Marblehead Global Brights snack pack
Day 3Dawn Stewart of Spring Water Designs using a Baby Talk snack pack
Day 4: Tammy Silvers of Tamarinis using A Walk in the Park charm pack