Friday, May 29, 2015

Painting with fabric

If quilters are artists (and we all know they are!), and fabric is their paint, then the Fall's Canvas collection is the perfect medium with which to work. The rich hues of these fabrics really do justice to nature's majestic palette.


A few of our favorites:

Look at all the variety of plant life in this print!

A cool hexie tonal print!

This watercolor-look stripe would be great for sashing and binding!

Fall's Canvas is available in yardage, fat quarter bundles,

snack packs,
  and charm squares.

Here's a free pattern, "Acorn Harvest" by Airborne Heirlooms, using the snack pack:
Download the free quilt pattern here.

See the entire Fall's Canvas collection here.

Wednesday, May 27, 2015

Argyle: The Modern Plaid

Argyle's not just for sweaters! Transform your king-size bed into a haven of plaid in soothing purples, greens, and grays from our Chelsea line with Terry Albers' "Argyle" design, featured in McCall's Quilting magazine. Below, Terry talks about her design, the matching shams, and why she'll be designing another quilt from the Chelsea collection for herself.


"Argyle" designed by Terry Albers;
made by Lou Ann Eberhardt; machine quilted by Mary Klein;
featured in McCall's Quilting magazine, June/July 2015


Q. What attracted you to the Chelsea collection?
Terry: The soft colors, combining purple with gray, were the first thing that grabbed my attention in the Chelsea collection. And, of course, the paisley…I can’t resist a rich paisley.


Q. Can you talk about your manly plaid-look design? 
Terry: The whole group reminds me of a classy, understated gentleman's suit; from the dark tone-on-tone paisley with a crisp white shirt to the quietly elegant purple tie. Although argyle is for everyone now, it reminded me of a man's argyle sweater.


Q. Tell us about the coordinating pillow shams—they are just a smaller version of the quilt, correct?
Terry: I designed the pillow shams to repeat the woven aspect of the quilt without the extra borders so that they compliment instead of match the quilt. (Download the free pattern for the pillow shams here.)


Q. Can you talk about your border choices? 
Terry: My original plan was to feature the pale purple paisley patch print (how's that for alliteration?) in the quilt and build the design around it. But I had been playing with some woven ideas for a while and the argyle look took over. The center was dramatic but a bit stark and I wanted to soften the edges. The first three borders contain the center design and the wider patch print continues to soften the edges. The final borders keep the design lively and finish the neat, classy look.

Q. What do you like best about this quilt?
Terry: I love the quiet, understated look that has layers of design…you may not notice the two-color woven look of the stripes at first. The overall look is peaceful and elegant at the same time. Not only a “manly” design, the look crosses over from traditional toward contemporary.

Q. What can you tell us about the machine quilting?

Terry: My long arm quilter is a true artist. I give her free rein to choose the design and color to enhance the style of the quilt and she never fails. She did lots of custom, free-hand work on this quilt but it would be suited to an all-over, edge to edge design, as well.

Q. What's next for you?
Terry: Now that the quilt is residing on my son’s bed in another city, I think I’ll need to design something else using the pale purple paisley patch print, so I can keep it close and enjoy the colors on a daily basis.

See the entire Chelsea collection here.
Find the kit for this quilt here.
Find McCall's Quick Quilts here.

Monday, May 25, 2015

Stars & Stripes

In honor of Memorial Day, we've pulling out the stars and stripes--Barb Eikmeier's American Flag quilt, a bonus project that goes along with the Vintage Sampler BOM

Today we remember with gratitude all those who have died serving our country and protecting its freedoms, as well as those who have served or are serving today. Thank you, military men and women! 

Friday, May 22, 2015

Behind the Scenes: Around the World

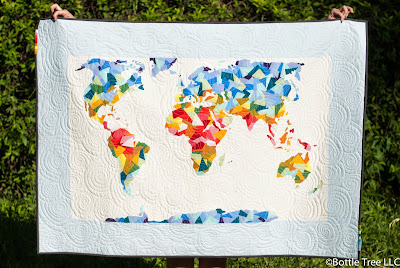
One of the quilts we showed you in our Quilt Market booth was Shannon Brinkley's Around the World quilt, made from our Prairie Cloth Solids collection. The design, from Shannon's new book, Scrappy Bits Applique, uses her fabric collage technique.


Meet Shannon.
I am a teacher turned quilter and designer. I really fell in love with quilting back in college when I visited the Houston Quilt Festival, and I fell in love with raw edge applique in particular. 
I design modern quilting patterns using my super fun and quick raw-edge applique techniques that I’ve developed and written about in my book Scrappy Bits Applique. Having my background in education, I adore teaching, and am lucky enough to get to teach my applique techniques all over the country. I nest in the lovely Austin, Texas with my wonderful husband and son. I spend my time sewing, quilting, knitting, reading, writing, cooking, yoga-ing, teaching, and enjoying time with my favorite people. 


Meet Shannon's technique.
I started playing and exploring with fabric and out of that came my technique, and I’ve been refining it over the past several years. I’ve always loved collaging in different mediums, so collaging with fabric was the perfect extension. I love the instant gratification that you get from collaging with fabric. There’s some tactile gratification you get from manipulating the fabric and fusing it, like a painter slapping paint on a canvas.


Shannon's Around the World quilt:
The Around the World quilt—The pattern is in my book, and I picked out various hues from the Prairie Cloth Solids and used my scrappy applique technique to make the map quilt. This quilt was the first time that I used all solids in a collaged quilt. I love how it turned out--the colors are all so vibrant and fun!


Read more about Shannon's Around the World quilt, including how she chose what colors went where, on her blog. We'll be sharing more about Shannon and her upcoming fabric collection soon!


See the colors available in our Prairie Cloth Solids collection here.
Find out more about Shannon's book here.

Thursday, May 21, 2015

Quilt Market Recap

Welcome to the virtual tour of our booth from Spring Quilt Market in Minneapolis!

First, an overview, and then we'll show some close-ups.

The left side of the booth:


Back corner:
Bonus flag pattern from Barb Eikmeier featuring her Vintage Shirting & Dress Prints collection; available through shops participating in the BOM program


 Right side of the booth:


Right side continued: 


And now, the closer look:
A period dress made from Vintage Shirting prints; behind is the free pattern for Ro Gregg's Marblehead Gemstones, Jewels & Quartz; download it here.


The booth included vignettes of fabrics and props related to the Vintage Shirting collection; here you see featherweight sewing machine cover that will be available through shops participating in the BOM program.


The free pattern using a Vintage Shirting & Dress Prints  snack pack; available on our website and blog soon!


Around the World quilt by Shannon Brinkley from her book, Scrappy Bits Applique (featuring our Prairie Cloth solids)


A close-up of this cool quilt--watch for more info on this quilt on the blog soon!


Table art: Changing Seasons quilt designed by Kristi and Rebecca Ryan; featuring Ro Gregg's Changing Seasons collection. Find the free quilt pattern here.


A free quilt pattern by Maria Pate using a Fall's Canvas snack pack; download the free quilt pattern here.


Quilt made using the many prints from the Classique basics collection


"Mesmerize" quilt embroidery design by Jayme Crow featuring our Batiks


From left, free patterns from A Walk in the Park, Botanical Society, Bear Hugs, and Eggcellent Adventures (Find the free patterns by clicking the links.)


Another vignette with a peek at the Botanical Society and Bear Hugs quilts


MonStar quilt by Rebecca Ryan, featured in her Modern Rainbow book and using our Prairie Cloth solids


On the table in the background: Briarcliff quilt by Diane Arganbright and Patty Sue Nelson; available soon as a free download on our website.
The table runner in the foreground features the huge variety of Classique prints, designed by Maria Pate 


Stratify by Jessica J.E. Smith; featuring Ro Gregg's Marblehead Global Brights (Purchase the pattern here)


Monkey Wrench quilt by Airborne Heirlooms featuring Shadows; available for free download here.


 And of course the Vintage Sampler BOM that we introduced you to last week. Watch for it in your local quilt shop this fall!


One of the booth polls wrapped in cotton bolls...we couldn't resist!

Tuesday, May 19, 2015

The Perfect Tote

Just as we quilters and sewers can never have too much fabric, we can never have too many bags. With so many different patterns, sizes, features, and fabrics to choose from, it's always easy to find another one you "have" to make! 

We're pretty sure that you'll be adding Maria Pate's Lavender and Leather tote, featured in the May/June 2015 issue of Fons and Porter's Love of Quilting to your summer to-do list. Not only does it contain all of the features that Maria considers necessary in a "perfect tote" (see her answer below), but it's made using our summery Piccadilly line combined with leather. That's right--leather! This soft calf leather (the white patches in the photo) is one of our newer products and gives this bag a little something extra. Plus it's easy to work with! Be sure to ask your local quilt shop to order some! Keep reading to learn more about this tote.

"Lavender and Leather" by Maria Pate;
featured in Love of Quilting May/June 2015

Q.  What can you tell us about working with leather?
Maria: Well, it depends on the type of leather you are using. The leather I used in the tote bag is calf leather, which is about the thickness of corduroy and just as pliable. You don't want to use anything thicker than that for patchwork as it is harder to cut, bend, and sew. Calf leather can be cut with your standard rotary cutter and sewn with a universal sewing needle and regular sewing thread. I have ironed on the leather but I used a pressing cloth to protect it.
When sewing with leather, you want to keep the leather on the bottom so that the feed dogs of your machine will push the textile through. You can use a Teflon foot or even put a piece of scotch tape on the bottom of your foot to help it slide over the leather more easily but I have found that by just keeping the leather on the bottom when piecing it with cotton is the easiest. When you do combine leather with cotton, you always want to press your seams toward the cotton as that is the natural way the seam will want to lay and you don't want to fight the leather.
Another important thing to remember when sewing with leather is that once you have stitched through it, the holes that the stitches make are there forever so if you have to use pins, make sure you pin in the seam allowance and not in the middle of the leather where the holes will show.

Q. What did you like about using the leather in your design?
Maria: I really like the added texture that the leather accents gave to the tote.

Q. Can you talk about the 2 different designs for the sides of the bags?
Maria: I chose to make the sides of the bag different so that it could be almost like a reversible bag and have two looks in one.

Q. What was your vision in creating all of the small patchwork pieces?
Maria: There actually is a very specific layout to the patchwork. I wanted it to look scrappy but still organized. The pieces are put together in 3" finished blocks, then into 6" x 9" panels, and finally the three panels are sewn together. I like to have the design look complicated but make the piecing simple so anyone can do it. This is the approach I take with all my designs and patterns. I give detailed instructions with tons of pictures and even arrows for pressing directions. I want all levels of quilters and sewers to feel that they can try any of my patterns and know they will be successful.
Also, if you look closely, you will see that the leather pieces are always next to cotton pieces. The patchwork side is made in three panels and I designed it so that when you sew the panels together, you would not have to sew with leather on both the top and bottom pieces. That way when you press, you can always press toward the cotton side.

Q. What do you like best about the bag?
Maria: Where do I begin? Let's see.....it's deep enough to carry a laptop or a notebook without it sticking out of the top and hitting you in the elbow, the pockets are deep enough so that you can store your sunglasses or phone without having to worry about them getting scratched, and I made the straps with both stabilizer and fusible fleece so that they are comfortable if you do have to carry anything heavy. Also, I added feet to the bottom to help protect it from wear and put a magnetic clasp in for added security. I basically thought about all the things I didn't like about bag patterns I had seen or made in the past and improved and combined them with this one to create what I think is the perfect tote.

Q. What do you envision using the tote bag for?

Maria: Fabric shopping, of course! This would be a great bag for any kind of shopping or for toting your laptop or notebook too, but I think mine will be used for fabric shopping. ;-)


See the Piccadilly collection here.
Find the digital Lavender and Leather tote bag pattern here.
Find information about the Love of Quilting episode where Maria makes this tote here.
Find Fons and Porter's Love of Quilting magazine here.