Showing posts with label Hannah. Show all posts

Thursday, August 7, 2014

Pre-Quilted Fabric Spotlight

We like to think that we're pretty well-known for our pre-quilted fabric--a great shortcut for sewing bags and other home dec items. And of course, when we hear about someone using this specialty fabric, we love to pass it along to you, our blog readers!

Judy Hansen, owner of Quilt Shop of Deland and one of our designers, recently shared this photo from a recent retreat. These ladies used the Sebago Tote pattern from Aunties Two and our pre-quilted fabric to make themselves brand-new colorful totes!

What a great looking group!


Want to see some of our pre-quilted fabric? Here's a sampling.

A New Leaf by Ro Gregg

Block Party by Ro Gregg

Calypso Goldfish by Ro Gregg


Imagine This by Linda Carlson and Diana Henage


Windsor Woods by Ro Gregg


Ask for both the Sebago Tote pattern and our pre-quilted fabrics at your local quilt shop! 
(And then send us a photo of your tote!)

Monday, May 12, 2014

Hannah Eye Candy


 We recently received an email with the subject line: "A Little Hannah Eye Candy." It certainly was, and we wanted to share it with all of you! 

Jessica J.E. Smith of The Quilt and Needle Forum designed a Mystery quilt using the Hannah collection. One March weekend later, retreat attendees left with this beauty, titled Frolic:

We asked Jessica to give us some background on her design:


Q. What was the starting point for this design?
Jessica: I started with the woven design in the center of the quilt top. Because the center is fairly busy, I added simple frames and a fun border that keep the focus on that main design element.

Q. What do like about the Hannah fabrics? Why do they work well for this pattern?
Jessica: I named the pattern Frolic - I had dancing ribbons and delicate lace in mind when designing it. The Hannah fabrics’ vibrant flowers and lacy textures naturally add to the fun nature of the quilt. As a bonus, the two greens play well off of one another, adding additional depth and movement to the design.


Q. Why did you choose the black tonal as the background color?
Jessica: It works with both light and dark backgrounds. We actually offered kits (through Happily Ever After Quilts) with a dark or a light background, depending on the preference of the quilter.

Q. What is your favorite part about the quilt?
Jessica: How intricate it looks, considering how simple it is to piece!

Q. Can you talk about the pieced border?
Jessica: I am not a huge fan of plain straight borders on quilts, unless they serve a framing purpose for the design. This one just really finishes off the quilt with a bang.

Q. What else do you want people to know about this quilt? 
Jessica: It is a large quilt, but the piecing is straightforward and fun. My retreaters made this as a mystery, and they were guessing right up until the big reveal.

Q. What are you planning to use for a binding?
Jessica: A bright green binding.

Q. Where was this quilt pieced?
Jessica: A group of quilters from The Quilt and Needle Forum comes together every March for a Mystery Quilt Retreat. They travel here from all over the country, and one even comes from the UK. This pattern was this year's mystery design, and Sherry W. from Arkansas pieced this particular quilt.


It may not be a mystery anymore, but you can purchase the pattern in digital format here and in paper format here.
Find out more about The Quilt and Needle Forum and Jessica's Mystery Quilt Weekends here.
Find the entire Hannah collection here.

Friday, April 18, 2014

It's Dye Time!

With Easter fast approaching, hard-boiled eggs everywhere are turning beautiful hues. We thought we'd have fun with some of our fabric lines and "dye" the eggs with fabric. 
We hope you like our creations! Enjoy!


Marblehead Venetian Glass

Batiks

Under the Sea

Marblehead Global Brights
Calypso Goldfish

Hannah

Lagoon
Block Party

Marblehead Pleasing Pastels

Monday, February 24, 2014

10 Signs of Spring

March is around the corner, hopefully bringing some signs of spring with the flip of a calendar page. Just in case the new month doesn't cooperate, here's a top ten list to get ready for spring--some of our favorite warm-weather-inspired fabric!

1. Block Party by Ro Gregg


3. Hannah


7. Lagoon


10. Calypso Goldfish by Ro Gregg
**Watch for more on this brand new collection (available in stores in March) soon!

Tuesday, January 28, 2014

Hannah fabric bundle winner!

Thanks to everyone who checked out Marilyn's puff pillow tutorial and left a comment for a chance to win a fat quarter bundle of the fun Hannah prints. 
Our winner:

Congratulations, Debbie!
Please email us at fabriquiltblog (at) gmail.com with your mailing address.


Wednesday, January 22, 2014

Puff Pillow Tutorial

Happy Wednesday! 
Today one of our blog followers, Marilyn, is sharing a tutorial for a puff pillow--taking that old biscuit quilt idea and updating it with contemporary, fun fabrics (the Hannah collection!) and a new use--a big floor pillow. Enjoy her tutorial and scroll down to the bottom to find out how you can enter to win a fat quarter bundle of Hannah fabrics for yourself. 
Take it away, Marilyn!


Hello! I'm excited to be featured on Inspired by Fabric today, sharing my puff pillow tutorial. Remember the biscuit quilt idea that was popular back in the 1980s? I used that concept but changed it up a little--first, I chose to recover a large floor pillow with the puffs/biscuits, and second, I chose the vibrant prints from Hannah to make the project feel more modern. I hope you like it! 

Here's a look at the fabrics in the Hannah collection. Some great colors!
Materials you will need:
  • 1/4 yard (or 1 fat quarter) each of 4 prints for pillow front
  • 1/4 yard dotted stripe for binding
  • 1-1/4 yards backing fabric (I used the large floral on black)
  • 2/3 yard muslin
  • Fiberfill


Cutting directions:
From each of the 4 prints:
Four 7-1/2" squares

From the dotted stripe:
Three 2-1/2" x 42" strips

From the backing fabric:
Two 18" x 24" pieces

From the muslin:
Sixteen 6" squares

Step 1: Pin a 7-1/2" print square to a 6" muslin square, matching the corners. You'll need to pin a couple pleats into each side to accommodate the extra fabric (this creates the space for the stuffing). Pin all four corners, but only pin three sides--leave one open for stuffing.


Step 2: Stitch on the three pinned sides, using a 1/8" seam allowance.

Step 3: Grab a handful of fiberfill--I used a small fist-full for each puff. Insert it in the puff.

Step 4: Pin the fourth side and stitch to close the puff.

Step 5: Make sixteen puffs. Don't they look cute?! I just want to squeeze them at this point!

Step 6: Arrange your puffs in four rows of four.

Step 7: Begin joining the puffs in pairs, right sides together. Pin before sewing. Make sure your seam is 1/4" or just slightly larger so that your original stitching lines don't show. 

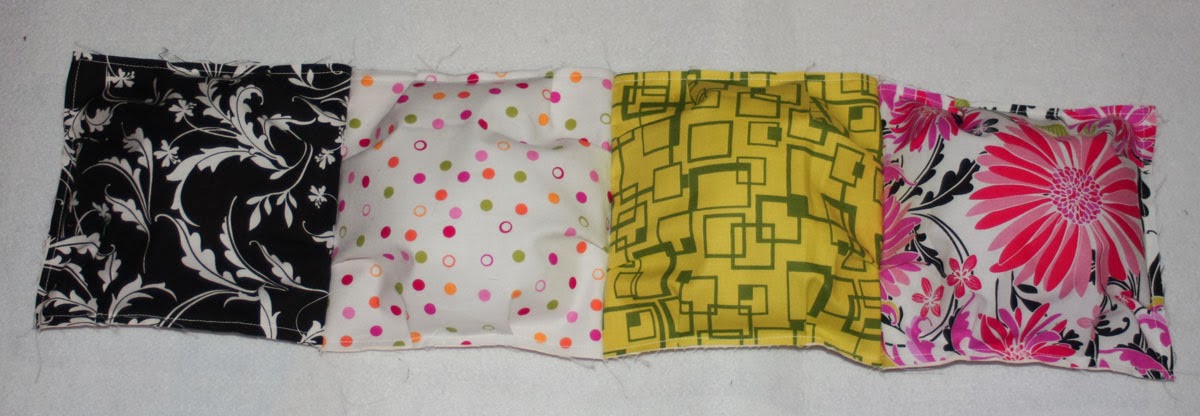
Step 8: Join the puffs into rows, and then join the rows. Here's a photo of a joined row and then the back of a joined row. 


Your finished pillow top will look something like this: 


Step 9: Fold one long edge of each backing piece over 1/4" and then 1/4" again to make a finished edge. Topstitch.

Step 10: With a normal pillow and an envelope backing, you can lay your pillow top down first and then add the backing pieces on top, and you'll know exactly how much they should overlap because of the size of the pillow top. That would be tricky with this dimensional pillow top. 
Instead, lay your backing pieces out right sides down (our pillow will have a bound edge, like a quilt!) on a cutting mat, using the markings on the mat to ensure your pillow backing measures 24". 

Step 11: Lay the pillow top on top, right sides up, and pin in place. At this point, you can either baste around the outer edge to secure before adding the binding, or you can live dangerously (like I did!) and pin the binding in place as well and stitch around the pillow once to secure backing and binding in place. Either way, you'll need to join your three 2-1/4" x 42" dotted stripe strips to make a long binding strip. Add the binding strip to the pillow just like you would for a quilt, and machine or hand stitch the binding to the back side. Insert your pillow and you're done!


Another look at the finished pillow:

I chose to add a binding to the pillow because I loved the dotted stripe and thought it would make a great finished edge to "frame" the pillow. You could also do a traditional pillow finish and skip the binding. 


You'll have to take my word for how squishy and comfy this pillow is! It's the perfect slipcover for a dingy old pillow I had in my house. 

One more close-up:

Thanks Marilyn! Great tutorial! 
For a chance to win a fat quarter bundle of Hannah fabrics, sign up to follow the blog (via email or the bloglovin' button on the right) and leave a comment letting us know that you are a follower and also how many throw pillows you have in your house. For a second chance to win, share the link for this post on your Facebook page and let us know that you did in a comment here. The giveaway will be open through Saturday, January 25th at 11:59 pm EST. Good luck!