Monday, June 20, 2016

Garden Rendezvous Hexified Panel Quilt

We showed you this gorgeous Garden Rendezvous quilt in our Market recap post; today's the day we're introducing designer Liz Granberg to tell us more about it! 


Q. What appeals to you about the Garden Rendezvous fabrics?
Liz: I absolutely love irises. My mother and auntie both grew irises, so I grew up around them and have always been drawn to them. The idea of a garden bouquet framed with a Celtic border (on the panel) intrigued me. 

Q. How did you get started making hexified panel quilts?
Liz: I had made a one-block wonder about 8 years ago. The one-block wonder concept was great fun and I loved working with the triangles. But once you’ve made one, you’ve made one—they’re all kind of the same in many ways. It’s color flow, but unless you do something different with it, there’s no big dramatic shift. About a year ago I joined the One-Block Wonder forum on Facebook and someone mentioned using a panel. I thought that was interesting and started playing.

Q. Tell us a bit about your technique.
Liz: I framed the panel with the one-block wonder concept. So it’s a hybrid. I work with seven repeats—six to get cut up and sew together and one to frame. I One-block wonders are typically made using 3-3/4 or 4” strips. have gone to cutting 3” strips so I have more hexies to play with. I get more color focused within each hexie, which gives me more flow to play with. I like to work with lights and darks and shots of color going diagonally. I also came up with the idea of adding a little flange frame around the panel itself so it was separate from but surrounded by the color flow.

Q. Do you lay these hexified panel quilts out on your design wall?
Liz: I have come up with a streamlined assembly technique that I share with the gals who take my class. I cut all of my strips, and then all of my triangles. I sit at my sewing maching and lay out hexies one at a time. Each hexie has three possible layouts because you’re working with equilateral triangles. You make 2 halves and pin them together. Then I take the panel, stick it up on my design wall and throw the hexies up on the wall randomly. Once they’re all on the wall, I start sorting, playing with shots of color.

Q. How do you come up with the layout?
Liz: I take a digital picture every time I move hexies around. Looking at these quilts from the perspective of a photo changes the dynamic completely. You can see where the design works and where it doesn’t in ways that the naked eye doesn’t notice. From the perspective of the photo, you can see what needs to be shifted. I’ve had color flows be done in a day and color flows stay on a design wall for two weeks! My oldest daughter ia puzzle freak and she can see how things fit together. More often than not, she’ll help fix a problem that I know isn’t right and she’ll spot what I’m missing. Sometimes it takes two of us to do it.

Q. How many hexies would you estimate are in your Garden Rendezvous quilt?
Liz: Close to 150.

Q. What do you like best about the hexified panel quilts?
Liz: Because they all come out so different, they’re completely addictive. Now I’m always looking for panels when I walk into a quilt store. I don’t know where it’s going to go until I get it on the design wall. Each one is a creative effort by itself.

See Ro Gregg's Garden Rendezvous collection here.
Learn more about Liz and her work on her website, gypsydreamerquilts.com.
Read her post about this quilt (and see more pictures!) here.
She is currently scheduled to teach the hexified panel quilt at these quilt shops:
Quilter’s Paradise, Baldwin City, KS
Meadows Quilting and Sewing, Leavenworth, KS


Friday, June 17, 2016

Behind the scenes with Garden Rendezvous

Recently we showed you Ro Gregg's latest collection, Garden Rendezvous (and don't forget the placemat tutorial using these prints!). We're back with more from this decadent line today, as Ro shares the inspiration behind the fabrics! 

Q. What inspired you to feature irises?  
Ro: I have always had Irises and tulips in my garden. Over the years, I also have collected vintage documentary fabric of irises and tulips.  The Iris is a spiritual sign and dates back to the Goddess Iris in Greek mythology who was associated with the rainbow and the link between heaven and earth.
The Iris denotes royalty in its shades of dark blue and purple. The yellow iris symbolizes courage and admiration. I started with the Iris and added the tulip to create the master pattern. 

The tulip is another favorite of mine, and depending on its color, it denotes true love and friendship.

Q. Tell us about the panel. We love the border around the edge!
Ro: I do like designing panels with a decorative flair. I like to use them to emphasize the theme of the collection, in this case nature's gift of flowers and her influence in design. The tile border around the panel adds the illusion of dimension as well as surface texture while also introducing a geometric to the collection.


Q. This has such a soft, pretty palette, but then includes the pops of bolder colors. Why do you think that mix of soft and bold colors in this collection works so well?  
Ro: Spring colors evoke a sense of freshness and new beginnings. They help to shake off the winter doldrums. Vibrant colors add a sense of excitement. This is the perfect time to bring the outside in. Floral prints are a key way of doing this. Mixing lights, mediums and dark are essential for quilting as well as punching bright colors.

Q. Tell us about the stripe.                                    
Ro: The floral stripe is so versatile! It repeats just about 6 times across the fabric, so it’s easy to create instant borders. It is also great for bindings as there our several sections you cut out.


Q. We know you love the main iris print and the stripe; do you have a favorite from the coordinates?                  
Ro: I love the etched tulip and iris, especially the intensity of color.


Q. How did you come up with the coordinates?
Ro: There’s quite a variety of designs. My collections typically have a master pattern with most of the motifs in it.  Next is a secondary pattern that anchors the collection.  I like to have several different sizes of coordinates for quilting and a Master stripe for borders and binding.  Textures are a must—at least a light, medium and dark that are multi-textural, giving energy and depth to the line.

Q. What do you like best about the collection as a whole?                       
Ro: I love how the patterns work in the quilts—like on a stage, all performing beautifully.


Q. Anything else to share about Garden Rendezvous?             

Ro: Nature provides us with a variety of flowers and colors. It is just like having an Iris and tulip garden in full bloom when you’re quilting with Garden Rendezvous!

See the entire Garden Rendezvous collection here and ask for it at your local quilt shop.

Wednesday, June 15, 2016

Summer of Sewing: Iris Garden Placemat Tutorial

Welcome back for our second Summer of Sewing tutorial here at Inspired by Fabric! 

We'll be featuring regular tutorials as part of our Summer of Sewing series, all using our newest fabric lines that you can find at your local quilt shop! Our tutorials will include a chance to win a bundle of the fabric line being used, so make sure to enter each time! 

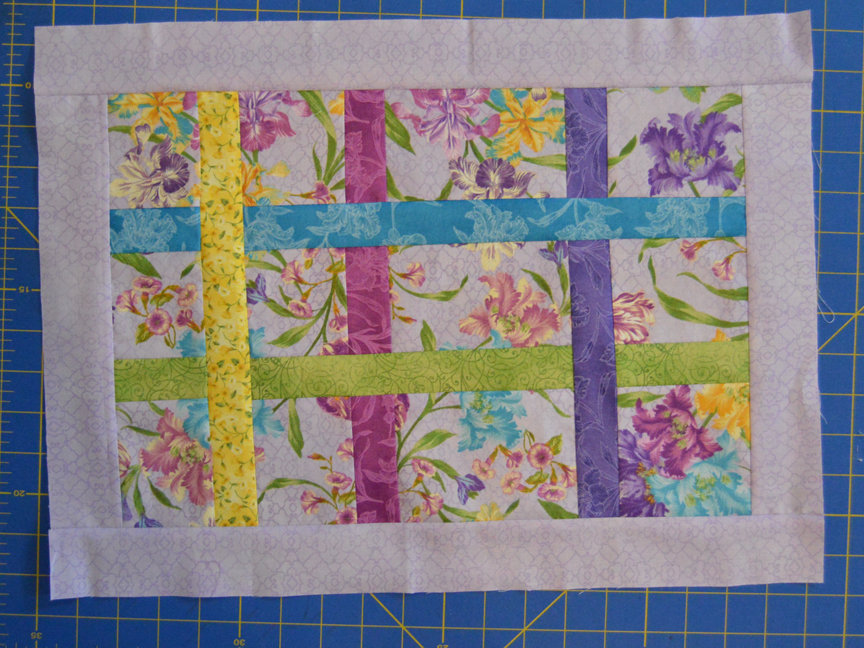
This week we're featuring Ro Gregg's beautiful floral line, Garden Rendezvous. This placemat design is so much fun to sew--measuring is optional! Adding tonal strips to a large piece of the focal iris print creates a trellis effect. We've even included instructions for making a simple pieced back so that these placemats can be reversible! Such pretty prints for a garden-themed summer table setting!

 Let's get started!
You'll Need:

(to make four placemats)
7/8 yard focal iris print
14 yard or fat quarter each of five coordinating tonals (we used purple, magenta, rose, yellow, and green)
5/8 yard lavender tonal
1/2 yard iris stripe (for optional pieced backing)
1 yard beige tonal (for optional pieced backing)
Thin batting (optional)

**If you opt not to piece the backing, you'll need 1 yard of backing fabric, which you'll cut into four 14" x 19" backing pieces 

Cutting: 
From the focal iris print: 
Four 13" x 15" pieces

From each of the five coordinating tonals:
Four 1-1/2" x 20" strips

From the lavender tonal: 
Eight 2" x 11" strips and eight 2" x 19" strips

Optional pieced backing: 
From the iris stripe:
Fussy-cut four 3-3/4" x 14-1/2" pieces, centering the stripe

From the remaining magenta tonal:
Four 1" x 14-1/2" strips

From the beige tonal:
Four 14-1/2" x 15-1/2" pieces

From the batting:
Four 14" x 19" pieces

Making the Placemat:
Note: You can make your cuts wherever you like on you focal iris piece; just stay at least 2" away from all four edges so you'll have room to trim when you've finished. We've included measurements for our cutting lines as a guide. 

1. Cut the focal iris pieced vertically 6" from the left edge. Sew a 1-1/2" x 20" magenta strip between the two pieces. Tip: To avoid fabric stretching, don't press until after you've sewn pieces to both sides of thin strip. 


2. Cut the focal iris piece horizontally 9" from the top edge. Sew a 1-1/2" x 20" green strip between the two pieces, making sure that the two magenta strips will align after you add the green strip. (Don't worry about extra strip length or about the outer edges of the iris focal piece not lining up exactly--we'll trim this when we're done.)


3. In the same way, add the purple strip after cutting the focal iris strip 4" from the right edge. 


4. Continued, adding the blue strip 6" down from the top edge. 


5. And finally, the yellow strip, 3" from the left edge. 


6. Trim the pieced unit to measure 16" wide x 11" tall. 
7. Sew 2" x 11" lavender tonal strips to the sides and press. Sew 2" x 19" lavender tonal strips to the top and bottom and press. Your placemat front is now complete.

8. To make the pieced back, sew the fussy-cut stripe strip, the 1" x 14-1/2" magenta strip, and the 14-1/2" x 15-1/2" beige tonal pieced together as shown. Trim to measure 14" x 19". 

9. Layer the batting piece, backing right side up and placemat top right side down. Pin around all four edges and sew around the edge with a 1/4" seam allowance, leaving a 6" opening for turning. Clip the corners, turn the placemat right side out and press. Press raw edges in and topstitch 1/8" from placemat edge to close the opening and create a finished edge. Add another line of stitching if desired. 
10. Repeat steps 1-9 to make three additional placemats. 


Finished front:

Finished back:

For a chance to win a fat quarter bundle of the Garden Rendezvous collection, make sure you follow us on the blog (options are in the right hand sidebar) and leave a comment letting us know you do, as well as telling us your favorite print from the Garden Rendezvous fabrics. Giveaway is open through Sunday, June 19 at 11:59 pm CST. We'll randomly draw a winner and announce it on the blog next week. Make sure we have a way to get in touch with you if you are selected as the winner!  This giveaway is now closed! 

Congratulations to the winner of the Happy bundle: Kira
We'll contact you for your mailing information! 

Saturday, June 11, 2016

Pillowcase Time!

We've teamed up again in 2016 with American Patchwork & Quilting for the 1 Million Pillowcase Challenge. The concept is simple: make a pillowcase and donate it to an organization in your community. Add your donation numbers to the online pillowcase counter and watch as the number creeps closer to the 1,000,000 goal. (The total number of pillows donated is almost 687,000 right now!) A small amount of fabric and a half hour's worth of sewing is such a gift to someone's life! 

Here are the latest free patterns on AllPeopleQuilt.com, shown in our fabrics. 


Pattern 57: Courthouse Steps Band
featuring Nature Trail
Photo from AllPeopleQuilt.com; download the pattern here.


Pattern 56: Travel Pillowcase
featuring Butterflies Are Free by Ro Gregg
Photo from AllPeopleQuilt.com; download the pattern here.


Pattern 55: Yo-Yo Band
featuring Bird Song
Photo from AllPeopleQuilt.com; download the pattern here.


Pattern 54: Building Blocks Band
featuring Shannon Brinkley's Dryad
Photo from AllPeopleQuilt.com; download the pattern here.

Learn more about American Patchwork & Quilting's One Million Pillowcase Challenge here.

Tuesday, June 7, 2016

Summer of Sewing: Our Happy Pouch Tutorial!

It's summer and we're ready to sew! 
We'll be featuring regular tutorials as part of our Summer of Sewing series, all using our newest fabric lines that you can find at your local quilt shop! Our tutorials will include a chance to win a bundle of the fabric line being used, so make sure to enter each time! 


We're starting off the Summer of Sewing series with this cute little pouch. It's simple to construct, but with fabric this fun, who needs a lot of complex piecing?! The pouch measures 9" wide x 8" tall.


We're calling this our "If you're HAPPY and you know it" Pouch because it's made with our bright and whimsical Happy collection. 


Let's get started!

You'll Need:
1 fat quarter each large floral print, swirl stripe, and cream medallion print
8" long coordinating zipper
Fusible batting

Cutting:
From the large floral print:
One 10" x 9" piece (for pouch back)

One 10" x 6" piece (for pouch front)

From the swirl stripe:
One 10" x 3" piece (for pouch front)

From the cream medallion print:
One 10" x 9" piece (for pouch back)
One 10" x 6" piece (for pouch front)
One 10" x 3" piece (for pouch front)

From the fusible batting:
One 10" x 9" piece
One 10" x 6" piece
One 10" x 3" piece

Making the Pouch:
1. Following manufacturer's directions, adhere each fusible web piece to the wrong side of the same sized large floral and swirl stripe pieces. 

2. You'll be sewing the zipper between two swirl stripe piece and the 10" x 6" large floral piece, sw shown below. You'll also be attaching the lining piece to each section at the same time. 

3. Lay the zipper face down on the swirl stripe piece and pin in place. 

4. Pin the 10" x 3" lining piece on top, right sides down, so the zipper is sandwiched between. Using your zipper foot, sew along the edge of the zipper. Fold fabric back so right sides are showing.
5. Repeat using the 10" x 6" large floral piece and 10" x 6" lining piece and sandwiching the other side of the zipper in between. At this point, your pouch front should look like this from the front: 

 And this from the back: 

6. Topstitch about 1/4" from the zipper edge using a coordinating thread.

7. Pin the 10" x 9" lining piece wrong side facing to the fusible fleece side of the pouch back. Layer the pouch front and back right sides together and pin around all edges. You will need to trim the pouch front slightly (approximately 1/2") so it's the same height as the pouch back. Make sure the zipper is partly open so you can turn the pouch right side out after sewing!

8. Sew around all four sides of the pouch using a 1/4" seam allowance. 
9. If you like, use a spool or other small round object to trace rounded corners. (We did this on all four corners!). Starting and ending on your existing stitching line, restitch the corner areas on these drawn lines. Trim excess corner fabric. Note: You can do this before sewing around the pouch in step 8, but adding the rounded corners afterward ensures your bag and corners are more uniform. 


10. Set your machine to a short and dense zigzag stitch and sew around pouch edges (while it's still inside out) to secure raw edges. 

11. Turn your pouch right side out, poke out the rounded corners, and you're done! 

Love the medallion print inside!

And the back--simple, but such fun flowers!

Happy summer! 

For a chance to win a fat quarter bundle of the Happy collection, make sure you follow us on the blog (options are in the right hand sidebar) and leave a comment letting us know you do, as well as telling us your favorite print from the Happy fabrics. Giveaway is open through Friday, June 10 at 11:59 pm CST. We'll randomly draw a winner and announce it on the blog next week. Make sure we have a way to get in touch with you if you are selected as the winner! 

Thursday, June 2, 2016

Accent on Color

Whether you love a great tonal collection or just really have fun pairing a brighter color with black and white prints, you'll find plenty to play with in our Accent on Color collection. It features 30 prints: 10 each black and white, purple and white, and red and white. Use them all together, or pick your favorite color. And like the name suggests, add in an "accent" of a different color. It's so much fun to play with value!


See the entire Accent on Color collection here and ask for it at your local quilt shop.