Showing posts with label Freeform 2. Show all posts

Saturday, February 17, 2018

FREE Download! Star of the Table Topper

We're swooning over this "Star of the Table" topper shown in our Freeform 2 prints!  


 Used with permission from American Patchwork & Quilting® magazine. 
©2018 Meredith Corporation. All Rights Reserved. 

American Patchwork & Quilting pattern tester Sharon McConnell created this asymmetrical topper as a modern (and smaller) version of the "Star Attraction" quilt featured in the April 2018 issue.

Add this small quilt to your hand-piecing to-do list! You can download the free quilt pattern from AP&Q here.

Love the Freeform 2 prints? 
See them all here and ask for them at your local quilt shop.

See all of the quilts from American Patchwork & Quilting's special 25th Anniversary April 2018 issue here.


What else can you make using Freeform 2? 
Download a FREE lap-size quilt pattern here


Check out our pillow trio tutorials here.


Tuesday, January 30, 2018

Freeform 2: All Angles Pillow tutorial

We made a third pillow using the Freeform 2 prints. The All Angles pillow uses freeform (ha!) piecing--you make four angled strips and sew them together. Fun and easy! 


Making the Fire & Ice Pillow:
You'll Need:
Fat quarter or 1/8 yard cut each of 10-12 assorted gray, orange and brown prints
1/2 yard muslin

1/2 yard of backing fabric
12" x 22" pillow form


Cutting:
From each of the fat quarters or 1/8 yard cuts:
(1) strip varying in width from 2" to 3"

From the muslin:
(4) 7" x 14" pieces

From the backing fabric:
(2) 14" x 18" pieces


Making the Pillow:
Note: You can trim strips to just longer than the muslin strip (14") as you position them for sewing. This is easier than sewing with a long tail! 
Step 1: Lay a strip right side up on one end of a muslin piece, making sure it covers the left end of the muslin. Note the left leaning angle. position a second strip on top, right sides together, aligning long raw edges. 

Step 2: Sew the strips to the muslin using a 1/4" seam allowance and press the second strip open as shown. 

Step 3: In the same way, position and add a third strip. You can vary the angle slightly as you add strips for interest, but make sure they all lean to the left. 

Step 4: Continue adding and pressing trips until the entire muslin piece is covered. Vary fabric strip width and color, and try to maximize contrast between your strip choices. Make a second left-leaning pieced strip. 

Step 5: Make a right leaning pieced strip in the same way, positioning the strips leaning in the opposite direction (toward the right at the top). 

Step 6: Make (2) right-leaning pieced strips. 

Step 7: Trim each pieced strip even with the muslin backing, so each measures 7" x 14". 

Step 8: Trim each pieced strip to measure 6" x 13". Position your pieced strip right side up and choose where to trim based on what looks best--you may choose to cut off more of one strip at one end then the other, for example. 
Step 9: Lay out the (4) trimmed strips into a row, alternating the angles as shown. 

Step 10: Sew the strips into a row and press the seams open to accommodate bulk. 

Step 11: Fold and press a short end of (1) 14" x 18" backing piece under 1/4". Fold and press under another 1/4" to created a finished edge and topstitch. Make a second backing piece. Lay pillow top right side up and position the backing pieces on top with right sides facing, matching raw edges and overlapping the hemmed edges. 

Step 12: Stitch around the outer edge using a 1/4" seam allowance. Turn pillow right side out and insert the pillow form. 


Make all 3 of our Freeform 2 pillows! 
Find the owl pillow here.
Find the Fire & Ice pillow here
Find the All Angles pillow here.

See the entire Freeform 2 collection here and ask for it at your local quilt shop. 

Tuesday, January 23, 2018

Freeform 2: Fire & Ice Pillow Tutorial

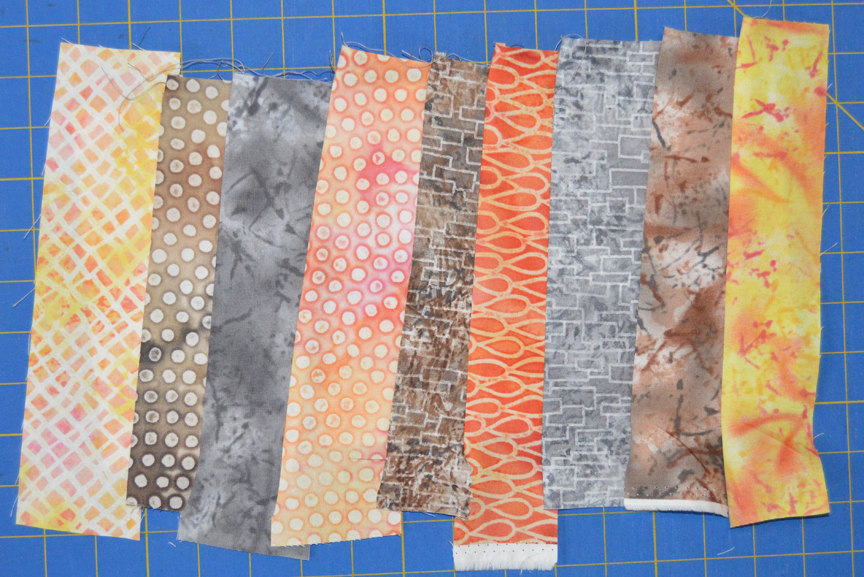
Today we've pulled just the orange and gray fabrics from our Freeform 2 fabrics. This cool prints look like batiks, but they're not. They are, however, perfect for the simple yet graphic Fire & Ice Pillow, and we're sharing the tutorial below. 


We used the six orange prints and six gray prints from the collection to make the pillow. We paired the fabrics and then made a block with the gray in the center and the orange on the outside, and an opposite block with the orange in the center and the gray on the outside. The pillow requires 20 blocks, so you'll need to make two blocks using a few of the fabrics.  

Making the Fire & Ice Pillow:
You'll Need:
Fat quarter each of 6 gray prints and 6 orange prints
1/2 yard of backing fabric
20" square pillow form

Preparation and Cutting:
Pair each orange print with a gray print; you'll use these combinations to make a block and a block in reverse. 

From each pair of gray and orange prints:
(2) 2" x 5-1/2" pieces
(2) 2" x 2-1/2" pieces
(1) 2-1/2" square

From each of the remaining fabric of two gray prints:
(2) 2" x 5-1/2" pieces
(2) 2" x 2-1/2" pieces
(1) 2-1/2" square

From each of the remaining fabric of two orange prints:
(2) 2" x 5-1/2" pieces
(2) 2" x 2-1/2" pieces
(1) 2-1/2" square

Making the Blocks:
Step 1: Lay out (1) 2-1/2" gray square, (2) 2" x 2-1/2" orange pieces, and (2) 2" x 5-1/2" orange pieces as shown to make a block. In the same way, lay out (1) 2-1/2" orange square, (2) 2" x 2-1/2" gray pieces, and (2) 2" x 5-1/2" gray pieces to make a block. 

Step 2: Sew the 2" x 2-1/2" pieces to opposite sides of the 2-1/2" square. Sew the 2" x 5-1/2" pieces to the remaining sides to make a 5-1/2" square block. 

Step 3: Make a total of (20) 5-1/2" square blocks: 10 with orange centers and 10 with gray centers. 

Step 4: Lay out the blocks into (4) rows of (4) blocks each, alternating colors. Rotate the orange blocks 90 degrees so the seam allowances of the blocks don't overlap and create bulk as you join the blocks. 

Step 5: Sew the blocks into rows and join the rows to complete the pillow top. 

Step 6: Fold the long edge of each 16-1/2" x 20-1/2" background piece over 1/2" and then 1/2" again. Stitch along the length to secure, creating a hemmed edge.  Make 2. 
Step 7: Lay the pillow top right side up and position the two hemmed pieces on top, right sides facing the top. Match raw edges, overlapping the hemmed edges in the center. Stitch around the entire pillow. 

Step 8: Turn pillow right side out and stuff with the pillow form. 


Make all 3 of our Freeform 2 pillows! 
Find the owl pillow here.
Find the Fire & Ice pillow here
Find the All Angles pillow here.

See the entire Freeform 2 collection here and ask for it at your local quilt shop. 


Tuesday, January 16, 2018

Freeform 2 Is a Hoot!

We're glad that you love the new Freeform 2 prints as much as we do! We've been having fun playing with these cool oranges, grays and browns. Our first thought? The colors and textures are perfect for an owl. 


We used this tutorial from The Objects of Design to piece an owl, and then transformed him into a throw pillow. Hoot hoot! We're in love!


Make all 3 of our Freeform 2 pillows! 
Find the owl pillow here.
Find the Fire & Ice pillow here

Find the All Angles pillow here.

See the entire Freeform 2 collection here and ask for it at your local quilt shop. 

Thursday, January 11, 2018

Introducing Freeform 2

If you loved our Freeform collection a while back, wait until you see this fantastic new color combination! A range of cool grays, warm oranges, and rich browns. These prints have the appearance of batiks, but they aren't. Each print is better than the next, and they work beautifully together.

Which print would fit well in your stash? 
Raindrops

Small Dots

Crosshatch

Bricks

Mottled


Pine Tree Country Quilts used the orange and gray prints (plus two Painter's Palette Solids!) to make the Freeform II quilt--all half-square triangles and four-patches.
This pattern is a free download on our website.
Download the free quilt pattern here.


See the entire collection here and ask for it at your local quilt shop.