Showing posts with label Farmer John's Garden Party. Show all posts

Tuesday, September 12, 2017

Summer of Sewing Roundup!

We hope you enjoyed following our Summer of Sewing series as much as we enjoyed sharing it with you! 


Here's a quick look at the projects we featured this summer; check out the tutorials and ask for the fabrics at your local quilt shop!


Polka Dot Pouches featuring the Thoroughly Modern collection by Virginia Robertson


Bargello in Blues featuring the Fleur de Bleu collection


Mayfair Placemats featuring the Mayfair collection


Farm Animals Soft Book featuring the Vintage 30s Ruby's Treasures collection


Walkabout Tote featuring the Walkabout 2 collection


Dino Balls Quilt featuring the Lost World collection


Pet Pillow featuring Love is a Four Legged Word collection


Hold Everything Fabric Boxes featuring the Goanna Walkabout collection


Patriotic Star Quilt featuring the American Pride collection

Pie Pincushions featuring the Farmer John's Garden Party collection


Garden Trivets featuring the Farmer John's Garden Party collection


Which was your favorite? 

Tuesday, August 1, 2017

Summer Veggies - free quilt pattern

It's August...farmer's markets are in full swing, and we have just the fabric (and free quilt pattern!) to celebrate! 

The fall 2017 issue of Quilts & More magazine features a digital version of Wendy Sheppard's Cinnamon Swirl quilt using Farmer John's Garden Party prints. Perfect for a kitchen wall hanging! And better yet, you can download the pattern from AP&Q.

Based on a design by Wendy Sheppard. Used with permission from Quilts and More
 magazine. © 2017 Meredith Corporation. All Rights Reserved.

Download the free quilt pattern for this kitchen version, An Almost Square Meal, here.
See the entire Farmer John's Garden Party collection here (including another free quilt pattern!) and ask for it at your local quilt shop.
Find Quilts and More magazine here

Thursday, June 8, 2017

Summer of Sewing: Pie Pincushions

During our Summer of Sewing series, we'll be featuring weekly tutorials using our new fabric collections (and giveaways, too!). Join us each week, sit back, relax, and then start sewing! 

This week's project features fruit prints from Farmer John's Garden Party, as well as a beige print from the Essentials 2 collection. We've made Pie Pincushions in two different sizes, and using two different crust options. These prints are mouth-wateringly delicious, and these pies are calorie-free!


We chose to make pies using the blueberry and cherry prints, but the peach and strawberry prints would be cute too! You'll also need cream or beige rick rack. 

Let's get started!
You'll Need: (for either pincushion)
(1) 6" square of a fruit print
1/4 yard beige print
6" x 12" piece of muslin
1 roll of cream or beige rick rack
(2) 6" squares of fusible batting
Crushed walnut shells or preferred pincushion filler
Straw or similar narrow tube and shish kebab stick or dowel that fits inside

Cutting (for either pincushion)
From the beige print:
(1) 1-1/4" x 42" strip (for shirred edge on cherry pie) 
OR 
(1) 2" x 42" strip (for ruffled edge on blueberry pie)
(1) 6" square

Click here to download the two circle templates (or find a bowl or roll of tape or other circle you can trace). The smaller template (for the cherry pin cushion) measures 4-1/2" in diameter; the larger template (for the blueberry pie pincushion) measures 5-1/2" in diameter.

The Cherry Pie Pincushion measures 4" in diameter. 


Make the Cherry Pie Pincushion:
Step 1: Print the small template circle onto paper and cut it out. 
Step 2: Fuse (1) square batting piece onto the wrong side of the cherry square. Position the template on top, trace, and cut out. 

Step 3: Cut (6) 6" lengths of rick rack. Position (1) length across the center of the circle. Position (3) lengths perpendicular to the first, with one laid over the top of first strip and the remaining two tucked underneath. Pin if desired.

Step 4: Stitch down the length of the original length of rick rack. Weave two more lengths of rick rack, alternating under and over the other lengths. Stitch down the middle of each length to secure. This creates the criss-cross appearance for the top of the pie. 

Step 5: Trim the rick rack ends even with the cherry circle. 

Step 6: Fuse the second batting square to the wrong side of the beige square. Mark the same circle shape on top and cut out. 

Step 7: Layer the cherry top right side up and crust right side down, aligning edges. Pin around the edges to secure and then sew, using a 1/4" seam allowance and leaving an opening for turning. 

Step 8: Cut wedges in the seam allowance (be careful not to cut through your stitched line!) to ease turning. 

Step 9: Turn pincushion right side out and press. 

Step 10: Fold the 6" x 12" muslin piece in half and trace the circle shape onto it. Keep the fabric folded and stitch a generous 1/4" inside the drawn line. Leave a small opening (1"). Use pinking shears to cut 1/4" past the stitch line. Use a funnel to fill the muslin pocket with crushed walnut shells and stitch the opening closed. Fill firmly but do not overfill. 

Step 11: Tuck the filled pocket inside the pie pincushion and slipstitch the opening closed. 

Step 12: Fold the 1-1/4" x 42" beige strip wrong sides together and stitch the long edge and one short edge. Use a straw or tube and narrow stick (like a shish kebab skewer) to turn right side out. If you haven't tried this technique, find out more here--it works great!

Step 13: Use a safety pin to work the elastic through the tube. Secure the elastic at each end with a pin. Tuck the raw edges in one end and stitch, securing the elastic. 
Step 14: Hand stitch the shirred strip to the edge of the pie pincushion, positioning it over the seam. As you get close to the starting point, determine how much more elastic and shirred fabric you need, stitch to secure the elastic at that point, and then trim elastic to 1/4" past the seam and fabric tube to 1/2". Fold the extra fabric in to create a finished edge and tuck the other end in. Continue stitching the "crust edge" in place. 

Your finished pie!


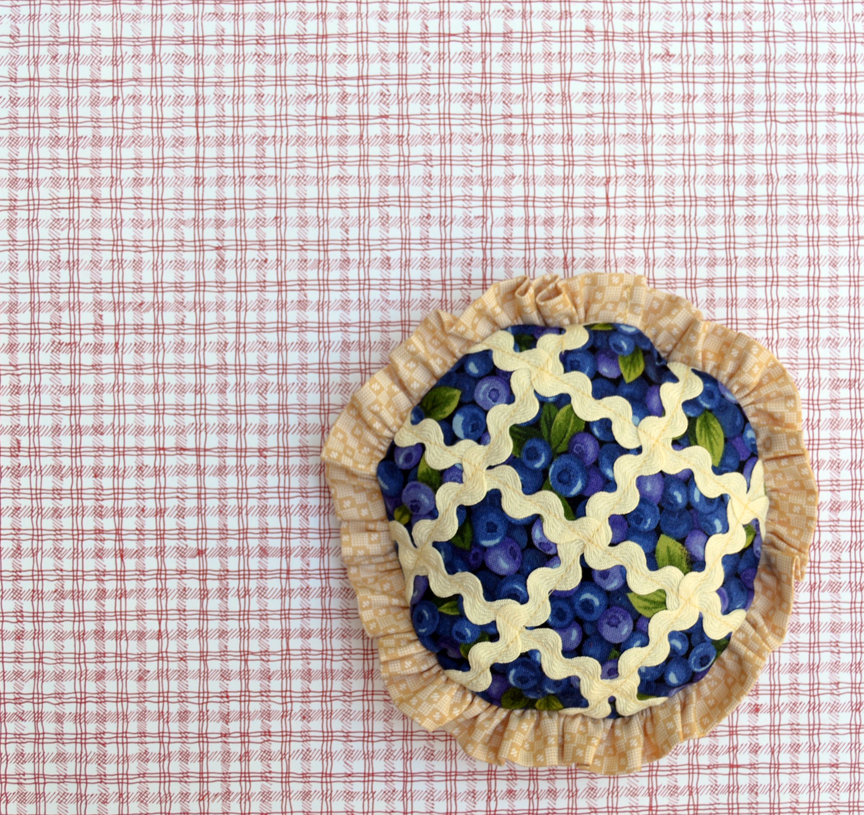
The Blueberry Pie Pincushion measures 5" in diameter (plus ruffled edge).


Make the Blueberry Pie Pincushion
Step 1: Follow steps 1-6 for the cherry pie, using the larger circle template. 
Step 2: Fold the 2" x 42" beige strip wrong sides together and press. Stitch the long edge using a long basting stitch. Pull on the basting stitch to create a ruffle approximately the same length as the diameter of the blueberry pie top.

Step 3: Fold one short raw edge under and stitch to create a finished edge. Pin the raw edges of the ruffle to the top of the blueberry pie as shown, adjusting the ruffle as you go so it's uniform. As you approach the starting point, estimate how much more ruffle you need, trim 1/4" past that point, and fold and stitch the short end to create a finished edge. Continue pinning, slightly overlapping the two short ends.

Step 4: Stitch the ruffle to the pie top to secure. 
Step 5: Repeat steps 7-11 for the cherry pie pincushion to finish this version.


Your finished pie!

Would you like to win a bundle of Farmer John's Garden Party? Leave a comment below (or on IG) telling us which is your favorite fabric in this collection. Giveaway is open through Sunday, June11th at 11:59 PM CDT. 


Find the entire Farmer John's Garden Party collection here and ask for it at your local quilt shop. 
Download our free quilt pattern to make a lap-size fruit and veggie quilt here.


Follow along with our Summer of Sewing Series! 
Click here to see all the tutorials. 


Thursday, June 1, 2017

Summer of Sewing: Garden Trivets

It may not be officially summer quite yet, but it's after Memorial Day, so we're already in a summer state of mind! 
That means it's time for the Summer of Sewing series again! We'll be sharing fun project tutorials featuring our recent fabric lines, and giving away prizes as well. Sit back with a glass of lemonade and relax...our first Summer of Sewing tutorial begins today. 


 Today we're sharing a tutorial made with the Farmer John's Garden Party collection. We love these prints--fresh fruits and delectable veggies in bright colors. 

Of course, our project is kitchen themed. We've stitched up two trivets--one made with fruit fabrics and one with veggie fabrics. These trivets measure approximately 11" square, so you could also use them as potholders, or just cute mini quilts. It's up to you! 


Let's get started!
You'll Need:
Fruit Trivet
8-9 fruit fat quarters (includes backing)
1/4 yard white solid
15" square of batting
11" square of InsulBright

Veggie Trivet
9-10 veggie fat quarters (includes backing)
1/4 yard black solid
15" square of batting
11" square of InsulBright

Cutting:
Fruit Trivet
From each fruit fat quarter:
(1) 2-1/2" x 21" strip

From the fruit text fat quarter:
(1) 12" square

From the white solid:
(2) 1" x 42" strips
(2) 2-1/4" x 42" strips for binding

Veggie Trivet
From each veggie fat quarter:
(1) 3" x 21" strip

From the veggie text fat quarter:
(1) 12" square

From the black solid:
(2) 1" x 42" strips
(2) 2-1/4" x 42" strips for binding

Making the Fruit Trivet
The Fruit Trivet uses a classic Log Cabin approach. 

Step 1: Cut a 2-1/2" square from the watermelon strip. Center on the 15" batting square and machine quilt in place with several straight lines. 

Step 2: Fold each 1" x 42" white solid strip lengthwise in half and press. 
Step 3: Cut a strip slightly longer than the watermelon square. From the 2-1/2" x 21" lemon strip, cut a piece slightly longer than the watermelon square. Position the folded white strip raw edges matching along one edge of the watermelon square. Position the lemon piece on top, right sides together. Stitch using a 1/4" seam allowance. Press open. Machine quilt the lemon piece with straight lines. 

Step 4: In the same way, cut another folded white strip and orange strip slightly longer than the watermelon/lemon section. Layer, stitch and press open. Machine quilt to secure. 

Step 5: Continue adding white folded and fruit strips in the same manner. You'll be covering the raw edges of pieces you've already stitched down. 


Step 6: Add strips until there are two on each side of the center square. Trim the piece to measure 11" square. 


Here's our backing fabric: Perfect for all these fruit prints! 

Step 7: Layer the backing square right side down, InsulBright square (this adds an element of heat resistance), and then the quilted top right side up. Baste the layers together (we used spray baste). Trim backing as needed. Use the (2) 2-1/4" x 42" white strips to bind the trivet. 


Veggie Trivet
The Veggie Trivet uses the wonky Log Cabin method. 

Step 1: Cut a 3" square from the pepper strip. Center on the 15" batting square and machine quilt in place with several straight lines. 

Step 2: Fold each 1" x 42" black solid strip lengthwise in half and press. 
Step 3: Cut a folded black strip slightly longer than the pepper square. From the 3" x 21" peapod strip, cut a piece slightly longer than the pepper square. Position the folded black strip raw edges matching along one edge of the pepper square and angle slightly as shown. Position the peapod piece on top, right sides together. Stitch using a 1/4" seam allowance. Press open. Machine quilt the peapod piece with straight lines.  


Step 4: In the same way, cut another folded black strip and mushroom strip slightly longer than the pepper/peapod section. Layer on an angle, stitch and press open. Machine quilt to secure. 

Step 5: Continue adding folded black strips and veggie strip, angling as you go to create a wonky look. 

Step 6: Add strips until the pieced unit measures at least 11" square (approximately two strips per side). 

Step 7: Trim to measure 11" square. 

Here's our backing fabric: 

Step 8: Layer the backing square right side down, InsulBright square (this adds an element of heat resistance), and then the quilted top right side up. Baste the layers together (we used spray baste). Trim backing as needed. Use the (2) 2-1/4" x 42" black strips to bind the trivet. 

Would you like to win a bundle of Farmer John's Garden Party? Leave a comment below (or on IG) telling us which is your favorite fabric in this collection. Giveaway is open through Sunday, June 4th at 11:59 PM CDT. 

Find the entire Farmer John's Garden Party collection here and ask for it at your local quilt shop. 
Download our free quilt pattern to make a lap-size fruit and veggie quilt here.

Follow along with our Summer of Sewing Series! 

Click here to see all the tutorials.