
Happy Wednesday!
Today one of our blog followers, Marilyn, is sharing a tutorial for a puff pillow--taking that old biscuit quilt idea and updating it with contemporary, fun fabrics (the Hannah collection!) and a new use--a big floor pillow. Enjoy her tutorial and scroll down to the bottom to find out how you can enter to win a fat quarter bundle of Hannah fabrics for yourself.
Take it away, Marilyn!

Hello! I'm excited to be featured on Inspired by Fabric today, sharing my puff pillow tutorial. Remember the biscuit quilt idea that was popular back in the 1980s? I used that concept but changed it up a little--first, I chose to recover a large floor pillow with the puffs/biscuits, and second, I chose the vibrant prints from Hannah to make the project feel more modern. I hope you like it!
Here's a look at the fabrics in the Hannah collection. Some great colors!

Materials you will need:
- 1/4 yard (or 1 fat quarter) each of 4 prints for pillow front
- 1/4 yard dotted stripe for binding
- 1-1/4 yards backing fabric (I used the large floral on black)
- 2/3 yard muslin
- Fiberfill
Cutting directions:
From each of the 4 prints:
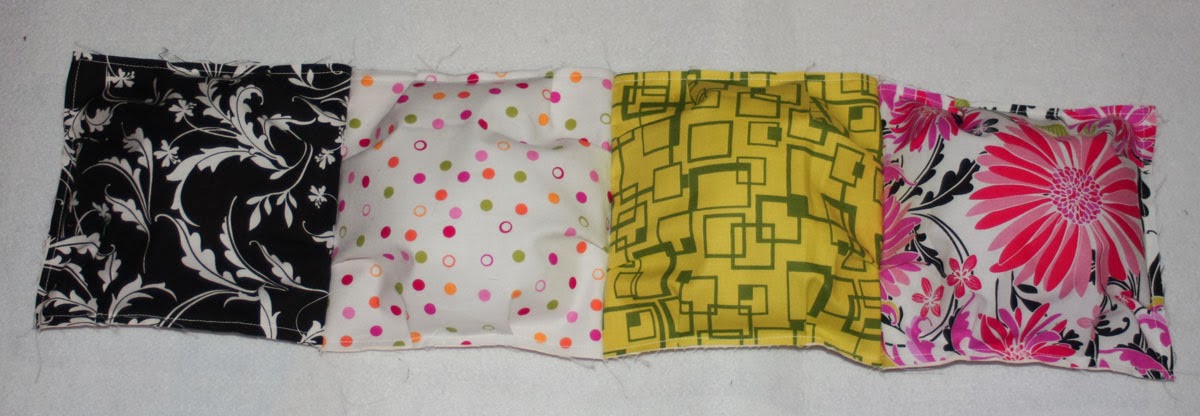
Four 7-1/2" squares
From the dotted stripe:
Three 2-1/2" x 42" strips
From the backing fabric:
Two 18" x 24" pieces
From the muslin:
Sixteen 6" squares
Step 1: Pin a 7-1/2" print square to a 6" muslin square, matching the corners. You'll need to pin a couple pleats into each side to accommodate the extra fabric (this creates the space for the stuffing). Pin all four corners, but only pin three sides--leave one open for stuffing.

Step 2: Stitch on the three pinned sides, using a 1/8" seam allowance.

Step 3: Grab a handful of fiberfill--I used a small fist-full for each puff. Insert it in the puff.

Step 4: Pin the fourth side and stitch to close the puff.

Step 5: Make sixteen puffs. Don't they look cute?! I just want to squeeze them at this point!

Step 6: Arrange your puffs in four rows of four.

Step 7: Begin joining the puffs in pairs, right sides together. Pin before sewing. Make sure your seam is 1/4" or just slightly larger so that your original stitching lines don't show.

Step 8: Join the puffs into rows, and then join the rows. Here's a photo of a joined row and then the back of a joined row.

Your finished pillow top will look something like this:


Step 10: With a normal pillow and an envelope backing, you can lay your pillow top down first and then add the backing pieces on top, and you'll know exactly how much they should overlap because of the size of the pillow top. That would be tricky with this dimensional pillow top.
Instead, lay your backing pieces out right sides down (our pillow will have a bound edge, like a quilt!) on a cutting mat, using the markings on the mat to ensure your pillow backing measures 24".

Step 11: Lay the pillow top on top, right sides up, and pin in place. At this point, you can either baste around the outer edge to secure before adding the binding, or you can live dangerously (like I did!) and pin the binding in place as well and stitch around the pillow once to secure backing and binding in place. Either way, you'll need to join your three 2-1/4" x 42" dotted stripe strips to make a long binding strip. Add the binding strip to the pillow just like you would for a quilt, and machine or hand stitch the binding to the back side. Insert your pillow and you're done!

Another look at the finished pillow:

I chose to add a binding to the pillow because I loved the dotted stripe and thought it would make a great finished edge to "frame" the pillow. You could also do a traditional pillow finish and skip the binding.

You'll have to take my word for how squishy and comfy this pillow is! It's the perfect slipcover for a dingy old pillow I had in my house.

One more close-up:

Thanks Marilyn! Great tutorial!
For a chance to win a fat quarter bundle of Hannah fabrics, sign up to follow the blog (via email or the bloglovin' button on the right) and leave a comment letting us know that you are a follower and also how many throw pillows you have in your house. For a second chance to win, share the link for this post on your Facebook page and let us know that you did in a comment here. The giveaway will be open through Saturday, January 25th at 11:59 pm EST. Good luck!
My family room couches are covered with pillows, 6 or 8, that make everyone comfortable and make great forts! I made a biscuit quilt a few years ago for a new granddaughter and put the rows together before stuffing the individual puffs; it seemed a lot easier to fit under the presser foot that way! I love following all your great ideas.
ReplyDeleteGreat tutorial! I was never sure what a biscuit quit was!! I shall be making a cushion to add to over 20 I have already!!
ReplyDeleteI have 3 throw pillows on my couch. They do need new covers. I follow via email. Thanks for the cute idea.
ReplyDeleteShared on Facebook (Maryellen McAuliffe) Thanks.
ReplyDeleteThanks for sharing MaryEllen, (teachpany, wonder what that means) I love this tutorial and I'll save this as one of my favorite blogs to follow.
ReplyDeleteThanks Debbie for sharing. Great tutorial and I will save this blog also.
ReplyDeleteI added this blog to my g+ but I much prefer to get them in my email box so I also used the RSS link
ReplyDeleteI already follow you by e-mail. Thank you for sharing the pillow. It is beautiful.
ReplyDeleteI shared on my facebook page. I have 2 throw pillows on my couch.
ReplyDeleteI am a follower. I have lots of trow pillows in my house, not all of them currently in use. And some definitely need new covers....
ReplyDeleteGreat tutorial. I have always loved the puff quilts, but never have taken the time to make one. This pillow tutorial is wonderful as I can try this technique out and finish it much quicker. My Granddaughter would love this pillow and she's asked for an Hello Kitty quilt so making a matching puff pillow for that will be a great gift for her birthday. Thank you.
ReplyDeleteI am already a follower via email notification as well as on Bloglovin.
I have shared this on my Facebook page as well
ReplyDeleteNice articles and your information valuable and good articles thank for the sharing information Pillow
ReplyDeleteGreat tutorial and I will save this blog Vector Tracing
ReplyDelete"This blog post is a great example of quality content. Well done!"
ReplyDeleteWooden home décor items
Ergonomic support products pillow cushion for home & office improve comfort and posture by providing targeted cushioning for the back, neck, and joints, reducing fatigue and preventing pain during daily activities.
ReplyDeleteSpecialized sleep cushions enhance pillow cushion comfort, support proper posture, reduce pressure points, and improve sleep quality, helping prevent pain and promote overall well-being.
ReplyDeleteOrthopedic sleep products support pillow cushion spinal alignment, reduce pressure on joints, prevent chronic pain, and improve sleep quality, offering lasting benefits for musculoskeletal health and overall well-being.
ReplyDeleteCervical pillows for travel recovery support pillow cushion the neck during long journeys, reduce stiffness, maintain spinal alignment, and relieve muscle tension, helping travelers arrive more comfortable and prevent neck pain after trips.
ReplyDeletePreventing neck stiffness with pillow cushion contour pillows involves supporting the natural curve of the cervical spine, reducing muscle strain, improving posture during sleep, and minimizing pressure points, keeping the neck relaxed and pain-free.
ReplyDeleteThis comment has been removed by the author.
ReplyDeleteNice articles and your information valuable and good articles thanks for the sharing information sleeping pillow
ReplyDeleteNice articles and your information valuable and good articles thanks for the sharing information Lap desk pillow
ReplyDeleteBest knee pillows for side sleepers provide firm support between the knees to maintain hip and spine alignment, pillow cushion reduce pressure on joints, ease lower‑back pain, and enhance overall sleep comfort.
ReplyDeleteNice articles and your information valuable and good articles thanks for the sharing information Square Memory Foam Cushion
ReplyDeleteNice articles and your information valuable and good articles thanks for the sharing information Spinal alignment pillow
ReplyDeleteNice articles and your information valuable and good articles thank for the sharing information Seat cushion
ReplyDelete