Friday, February 9, 2018

Confetti Heart Valentines Tutorial

If you follow us on Facebook or Instagram, you probably saw our confetti picture. It's February 9th, and we're making red, pink and purple confetti. It's no big surprise that it's for a Valentine's Day project! Today we're sharing two different ways to make a confetti heart. Give them as valentines, use them as mug rugs, or hang them as decorations. They're adorable and easy to make! 
And one word of warning...making (and playing with) fabric confetti is addicting! 


You'll need: 
(for both confetti hearts)

Approximately 3" square scraps of  8-12 red/pink/purple/coral solids
(2) 7" squares and (1) 2" x WOF strip of Smoke solid
(3) 8" squares and (1) 2-1/4" x WOF strip of Black solid
(1) 7" square of batting
(1) 8" square of batting
Fusible web
8" square piece of white tulle
Basting spray

Download the heart template page here and print it out. 

Making the Confetti
We started with the wide range of red/pink/purple/coral Painter's Palette Solids shown below. The more colors, the more interest your confetti has. 

Step 1: For most efficient cutting, trim scraps into 3" squares. Stack two squares, and working right to left (for right-handed people!), start cutting 1/4" wide strips. Leave the strips in place as you cut. Cut the entire square into strips. 

Step 2: Rotate your ruler 90 degrees and cut 1/4" wide strips again. This will create tiny 1/4" squares. 


Step 3: Repeat with your remaining squares to make a big pile of confetti. The (11) 3" squares we used made enough confetti to create the two hearts shown. 


Making the Heart on Gray:
Step 1: Trace the small heart onto the paper side of fusible web. Cut out on the drawn line and fuse to the center of  7" Smoke square. Tip: Fold the square in half in both directions and press lightly. Use these lines to center the valentine.

Step 2: Peel off the paper and sprinkle confetti onto the heart. Some of it will spill off the edges; that's okay, but pay attention to your general heart shape. Some confetti will layer on itself; that's okay too, but try to spread it out as much as possible. 

Step 3: *Using a pressing cloth*, press in place. You may need to press longer than normal. Gently shake off excess confetti. If you see background showing through, place individual confetti pieces and press again. 
Step 4: Layer gray square with batting and backing and machine quilt. You'll want quilting lines relatively close together to help secure the confetti. Ours uses 1/4" spacing. 

Step 5: Square up to 6-1/2" and use the 2" x WOF strip to bind the square. 

Making the Heart on Black:
Step 1: Trace the large heart shape onto the center of a black solid square. Layer the marked square with a piece of batting and spray baste in place. 

Step 2: Spray the heart shape with basting spray. Don't worry if the spray goes past the drawn line like ours did; it will be covered up later. 

Step 3: Layer a square of tulle over the heart and pin in place. 


Step 4: Machine quilt over the heart. The quilting doesn't have to be quite as tight here because the tulle is holding the confetti in place. The quilting lines also don't need to extend more than 1/2" or so beyond the heart shape, as they'll be covered as well. 

Step 5: Cut a 7-1/2" square of fusible web. Center and trace the heart onto the square and fuse to the second 8" square. 

Step 6: Cut out the heart center as shown: (we used a pinking shears)
Back side
Front side

Step 7: Remove the paper and center the cut out heart on top of the confetti heart. Adjust as needed to make sure that confetti fills the cut out heart shape. 

Step 8: Layer with the remaining black square. Machine quilt around the cut out heart, making sure to stitch near the cut edges. We chose to echo quilt out from the heart shape. Tip: If you're really bold, try stitching with a contrasting pink or red thread! Square up to 7-1/2"

Step 9: Use the 2-1/4" x WOF black strip to bind. 

See our other heart-themed tutorial featuring Painter's Palette Solids here
See all 168 Painter's Palette Solids here and ask for them at your local quilt shop.

Tuesday, February 6, 2018

Valentine Mini: Hearts Aplenty

Valentine's Day is around the corner...
are the reds and pinks in your sewing room calling your name? 

Make our Valentine Mini quilt, Hearts Aplenty
We used a variety of red, pink, and purple Painter's Palette Solids for the quilt, along with a warm Honeycomb background. The finished quilt measures 18" square. 

Painter's Palette Solids used: (background) Honeycomb; hearts (top row, from l-r)
Clematis, Claret, Bubblegum; (middle row, l-r): Real Red, Lipstick, Fuchsia;
(bottom row): Pale Pink, Raspberry, Claret

Find the tutorial here

Thursday, February 1, 2018

Are you ready for Sunday?

Sunday is the Super Bowl...and whether you're planning a party or skipping the game and spending time at your sewing machine, we've got you covered!


Our Super Bowl Party Ideas Pinterest board is stuffed with ideas for the big game: themed foods (including stadium snack bars!), cute decorations, and fun games.


Here are some of our favorites:


Our Non-Super Bowl Sunday Pinterest board is filled with everything you need to spend a relaxing Sunday without watching the game. We've pinned a bunch of soup recipes (get it? Soup/Super Bowl) and some of our favorite tutorials. If you want to combine sewing and soup, check out the soup bowl quilt blocks!

However you spend it, we hope you enjoy your Sunday!

Follow us on Pinterest here.

Tuesday, January 30, 2018

Freeform 2: All Angles Pillow tutorial

We made a third pillow using the Freeform 2 prints. The All Angles pillow uses freeform (ha!) piecing--you make four angled strips and sew them together. Fun and easy! 


Making the Fire & Ice Pillow:
You'll Need:
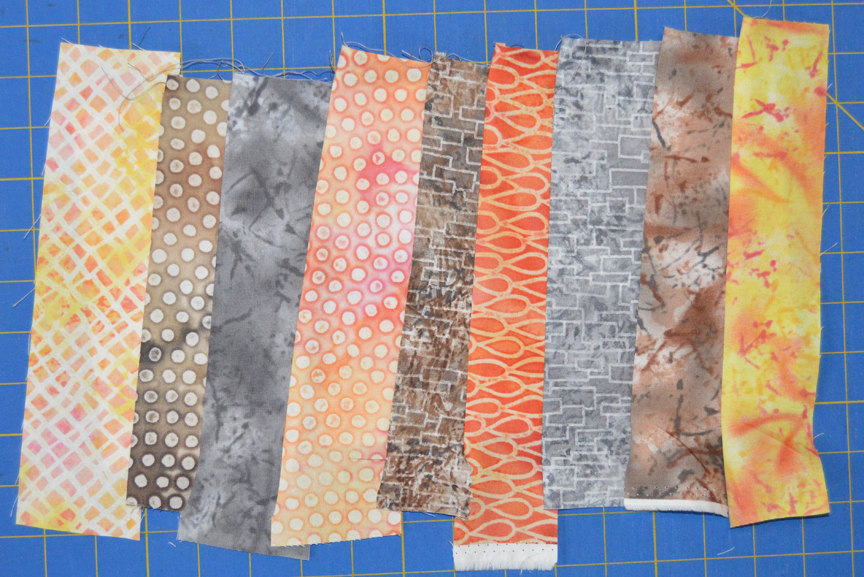
Fat quarter or 1/8 yard cut each of 10-12 assorted gray, orange and brown prints
1/2 yard muslin

1/2 yard of backing fabric
12" x 22" pillow form


Cutting:
From each of the fat quarters or 1/8 yard cuts:
(1) strip varying in width from 2" to 3"

From the muslin:
(4) 7" x 14" pieces

From the backing fabric:
(2) 14" x 18" pieces


Making the Pillow:
Note: You can trim strips to just longer than the muslin strip (14") as you position them for sewing. This is easier than sewing with a long tail! 
Step 1: Lay a strip right side up on one end of a muslin piece, making sure it covers the left end of the muslin. Note the left leaning angle. position a second strip on top, right sides together, aligning long raw edges. 

Step 2: Sew the strips to the muslin using a 1/4" seam allowance and press the second strip open as shown. 

Step 3: In the same way, position and add a third strip. You can vary the angle slightly as you add strips for interest, but make sure they all lean to the left. 

Step 4: Continue adding and pressing trips until the entire muslin piece is covered. Vary fabric strip width and color, and try to maximize contrast between your strip choices. Make a second left-leaning pieced strip. 

Step 5: Make a right leaning pieced strip in the same way, positioning the strips leaning in the opposite direction (toward the right at the top). 

Step 6: Make (2) right-leaning pieced strips. 

Step 7: Trim each pieced strip even with the muslin backing, so each measures 7" x 14". 

Step 8: Trim each pieced strip to measure 6" x 13". Position your pieced strip right side up and choose where to trim based on what looks best--you may choose to cut off more of one strip at one end then the other, for example. 
Step 9: Lay out the (4) trimmed strips into a row, alternating the angles as shown. 

Step 10: Sew the strips into a row and press the seams open to accommodate bulk. 

Step 11: Fold and press a short end of (1) 14" x 18" backing piece under 1/4". Fold and press under another 1/4" to created a finished edge and topstitch. Make a second backing piece. Lay pillow top right side up and position the backing pieces on top with right sides facing, matching raw edges and overlapping the hemmed edges. 

Step 12: Stitch around the outer edge using a 1/4" seam allowance. Turn pillow right side out and insert the pillow form. 


Make all 3 of our Freeform 2 pillows! 
Find the owl pillow here.
Find the Fire & Ice pillow here
Find the All Angles pillow here.

See the entire Freeform 2 collection here and ask for it at your local quilt shop. 

Friday, January 26, 2018

Feels like flannel season...

It's January...the month when many people are looking for warm and cozy projects. That means it's flannel season! 

Looking for flannel? Our Fluffy Flannels come in so many prints. Polka dots, zebras, construction equipment, bugs, dogs, hearts, and more... ask for them at your local quilt shop!


See our entire Fluffy Flannel collection here and ask for it at your local quilt shop.
Visit our Flannel! Pinterest board for a collection of tutorials to make with flannels. 

Tuesday, January 23, 2018

Freeform 2: Fire & Ice Pillow Tutorial

Today we've pulled just the orange and gray fabrics from our Freeform 2 fabrics. This cool prints look like batiks, but they're not. They are, however, perfect for the simple yet graphic Fire & Ice Pillow, and we're sharing the tutorial below. 


We used the six orange prints and six gray prints from the collection to make the pillow. We paired the fabrics and then made a block with the gray in the center and the orange on the outside, and an opposite block with the orange in the center and the gray on the outside. The pillow requires 20 blocks, so you'll need to make two blocks using a few of the fabrics.  

Making the Fire & Ice Pillow:
You'll Need:
Fat quarter each of 6 gray prints and 6 orange prints
1/2 yard of backing fabric
20" square pillow form

Preparation and Cutting:
Pair each orange print with a gray print; you'll use these combinations to make a block and a block in reverse. 

From each pair of gray and orange prints:
(2) 2" x 5-1/2" pieces
(2) 2" x 2-1/2" pieces
(1) 2-1/2" square

From each of the remaining fabric of two gray prints:
(2) 2" x 5-1/2" pieces
(2) 2" x 2-1/2" pieces
(1) 2-1/2" square

From each of the remaining fabric of two orange prints:
(2) 2" x 5-1/2" pieces
(2) 2" x 2-1/2" pieces
(1) 2-1/2" square

Making the Blocks:
Step 1: Lay out (1) 2-1/2" gray square, (2) 2" x 2-1/2" orange pieces, and (2) 2" x 5-1/2" orange pieces as shown to make a block. In the same way, lay out (1) 2-1/2" orange square, (2) 2" x 2-1/2" gray pieces, and (2) 2" x 5-1/2" gray pieces to make a block. 

Step 2: Sew the 2" x 2-1/2" pieces to opposite sides of the 2-1/2" square. Sew the 2" x 5-1/2" pieces to the remaining sides to make a 5-1/2" square block. 

Step 3: Make a total of (20) 5-1/2" square blocks: 10 with orange centers and 10 with gray centers. 

Step 4: Lay out the blocks into (4) rows of (4) blocks each, alternating colors. Rotate the orange blocks 90 degrees so the seam allowances of the blocks don't overlap and create bulk as you join the blocks. 

Step 5: Sew the blocks into rows and join the rows to complete the pillow top. 

Step 6: Fold the long edge of each 16-1/2" x 20-1/2" background piece over 1/2" and then 1/2" again. Stitch along the length to secure, creating a hemmed edge.  Make 2. 
Step 7: Lay the pillow top right side up and position the two hemmed pieces on top, right sides facing the top. Match raw edges, overlapping the hemmed edges in the center. Stitch around the entire pillow. 

Step 8: Turn pillow right side out and stuff with the pillow form. 


Make all 3 of our Freeform 2 pillows! 
Find the owl pillow here.
Find the Fire & Ice pillow here
Find the All Angles pillow here.

See the entire Freeform 2 collection here and ask for it at your local quilt shop. 


Friday, January 19, 2018

Simple Solids

When is the last time you made a two-color project? When you eliminate color variety and prints from a project, it's all about the design. 

Inspired by Corey Yoder's Stitch and Switch Pillow done in prints and featured in the Spring 2018 issue of Quilts & More, quilt tester Jan Ragaller created this version using our Painter's Palette Solids. A two-color star block--simple, yet graphic impact. We love it! 

Barn Star Pillow by Jan Ragaller.
A color option variation for Corey Yoder's Stitch and Switch Pillow,
featured in Quilts & More's Spring 2018 issue. 

Find the pattern to make the Barn Star Pillow here.
See all 168 colors of our Painter's Palette Solids here and ask for them at your local quilt shop.
Find Quilts & More here.