Who couldn't use a little hedgehog love in their lives?! Inspired by the adorable creatures in Judy Hansen's Hedgehog Village fabric collection, we've created the Hedgehog Love Pillow, featuring a 3-D hedgehog.
You'll Need
1/2 yard Mink solid (121-136)
1/2 yard taupe paw print (120-13731)
fat quarter yellow floral (120-13752)
1 yard periwinkle hedgehog print (120-13742)
6" square Mahogany solid (121-015)
2" x 4" piece of White solid (121-000)
1 yard Fusible Fleece
12" square muslin
12" square fusible web
Fusible web scraps
20" square pillow insert
Cutting
From the Mink solid:
(19) 5" squares
(4) 3" x 4-1/2" pieces (for paws)*
From the taupe paw print:
(1) hedgehog face
(4) 3" squares*
From the yellow floral:
(1) 14-1/2" square
From the periwinkle hedgehog print:
(2) 15" x 20-1/2" pieces for backing fabric
(2) 3-1/2" x 14-1/2" lengthwise strips
(2) 3-1/2" x 20-1/2" strips
From the Mahogany solid:
(2) pupils**
(1) nose**
From the White solid:
(2) eyes**
From the fusible fleece:
(1) 20-1/2" square
(1) hedgehog face
*Refer to steps 8 and 9 to make two-sided paws and ears.
**Trace shapes onto fusible web. Fuse to indicated fabric and cut out on drawn lines.
Download the templates for the hedgehog here.
Make the Hedgehog:
Step 1: Fold each 5" Mink square diagonally in half and press. Fold the two outer corners in to the bottom corner as shown and press. Make 19 hedgehog spikes.
Step 2: Fuse the 12" square of fusible web to the 12" square of muslin.
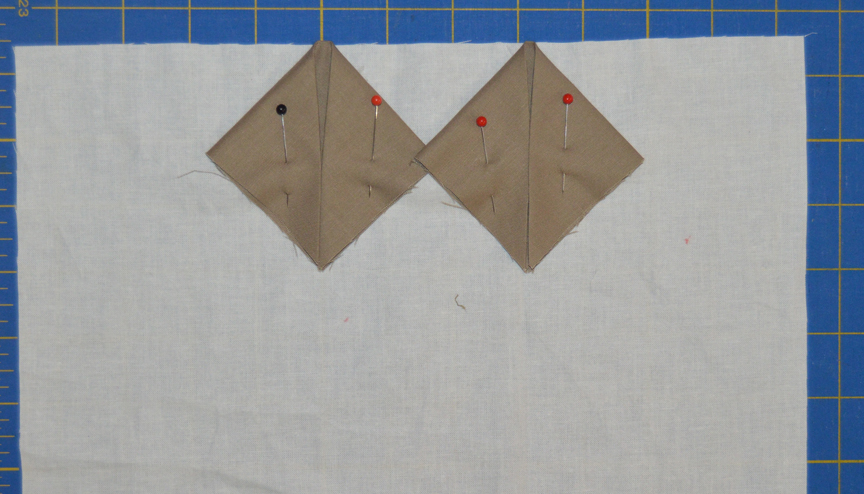
Step 3: Position (2) hedgehog spikes along the top edge of the muslin as shown, with the corners slight overlapping.
Step 4: Stitch along the bottom sides of each spike using a 1/8" - 1/4" seam allowance as shown.
Step 5: Position (3) spikes in a row as shown. Make sure the tips are above the spikes in the previous row. Pin in place. Stitch along the bottom edges to secure.
Step 6: Some outer spikes will need to have a finished edge. To make a spike with a finished edge, unfold a spike and press one long in 1/4" as shown. Stitch along the fold with a 1/8" seam allowance to create a finished edge. Refold. Make (3) spikes with finished edges on the left and (3) on the right.
Step 7: Add (3) more rows in the same way, with finished edge spikes on the outer edges. Add a row of (4), a row of (3), and another row of (4). Add a last row of (3) without finished edges (edges will be covered by the hedgehog face).
Step 8: Trace the ear shape onto the wrong side of (2) 3" squares of taupe paw print. Layer each with a second square, right sides together. Stitch along the drawn line, leaving the straight edge open.
Step 9: Turn ears right side out and press. In the same way, make (2) paws using the 3" x 4-1/2" Mink solid pieces. After turning right side out, use a tight zig zag stitch to add paw lines as shown.
Step 10: Sew 3-1/2" x 14-1/2" periwinkle hedgehog strips to opposite sides of the 14-1/2" yellow floral square. Sew 3-1/2" x 20-1/2" periwinkle hedgehog strips to the top and bottom. Fuse the 20-1/2" fusible fleece square to the back for added stability.
Step 11: Fuse the hedgehog face fleece piece onto the wrong side of the taupe paw print hedgehog face for additional padding. Fuse the eyes, pupils, and nose in place, using the photo for a guide. Use a decorative stitch to secure if desired.
Step 12: Trim muslin backing so it doesn't show behind the spikes, but leave as much as possible (out of view) because you'll be stitching on it to secure in a later step.
Step 13: Remove the paper from the back side of the spikes (you'll have to remove it in pieces because of the stitch lines). Position the spikes on the yellow square and fuse in place. Tip: Position with face and paws for placement to make sure hedgehog is centered, and then remove face and paws before fusing spikes in place. Because of all the layers, you'll need to fuse for a longer period of time.
Step 14: Add the hedgehog face, making sure it covers any exposed raw edges from the bottom rows of spikes. Tuck the ears and paws under the head as shown. Use a zig zag stitch and matching thread to secure the head, ears, and paws in place.
Step 15: Fold spikes back and stitch along muslin on sides and top (wherever possible) to further secure the spikes to the background.
Step 16: Fold and press 1/4" on (1) long edge of a 15" x 20-1/2" periwinkle hedgehog piece. Fold and press in another 1/4" and topstitch to create a finished edge. Make (2).
Step 16: Position the pillow top right side up and the backing pieces on top, right sides together, with raw edges matching (finished edges should overlap in the middle). Pin in place and stitch around the entire pillow using a 1/4" seam allowance.
Step 17: Turn the pillow right side out and stuff with the insert. Enjoy!
See the entire collection here and ask for it at your local quilt shop.
Learn more about Judy's Hedgehog Village collection here.