Friday, April 19, 2013

Not Your Average Punch & Judy


When you hear "Punch & Judy" do you think of this?

Image: http://www.telegraph.co.uk/sponsored/in-the-know/london-entertainment/9687460/punch-and-judy-show-london.html

Cathy Miles has a slightly less traditional take on Punch & Judy.
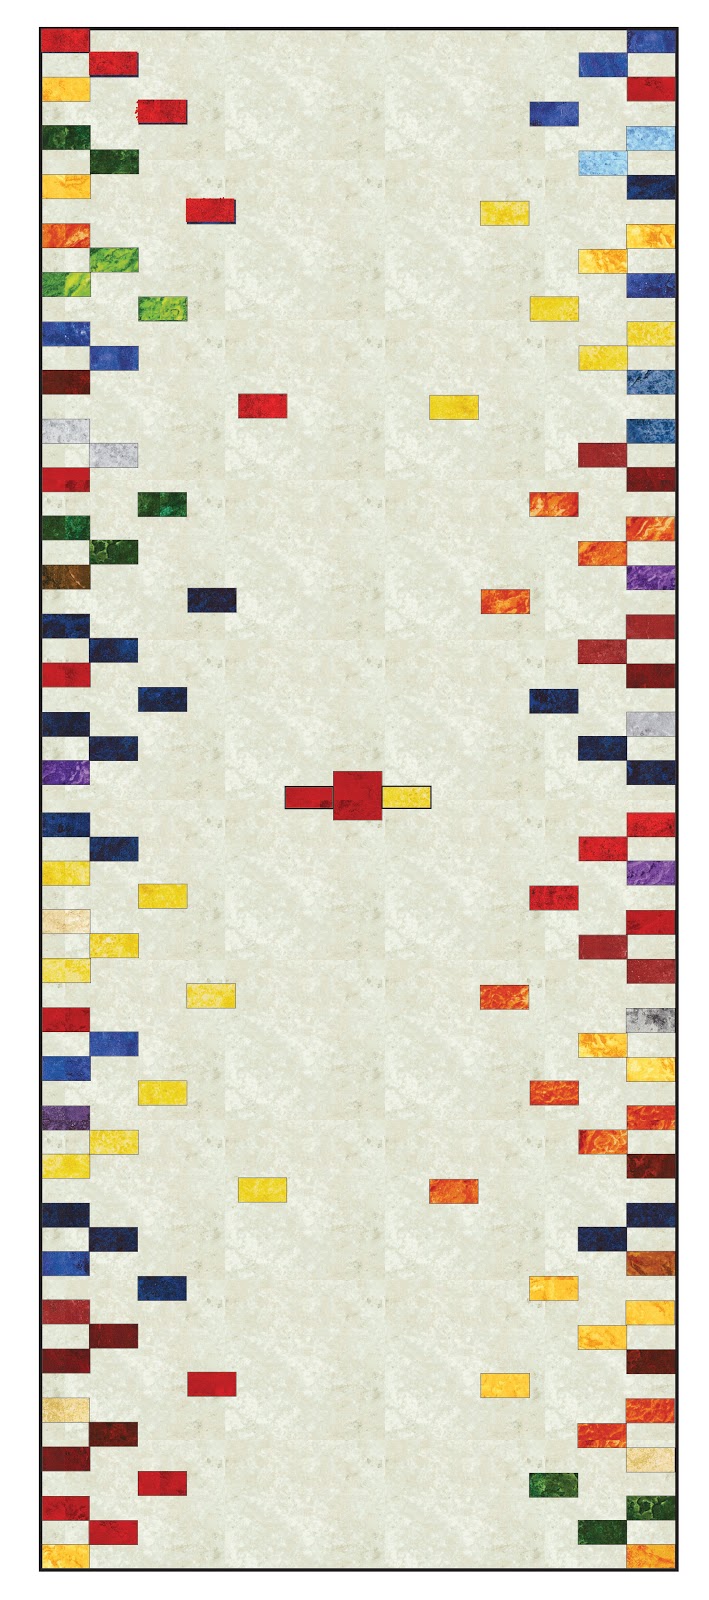
"Punch & Judy" by Cathy Miles
Image: Fons & Porter

We love the patchwork look of her bright, summery quilt, made from the Marblehead Global Brights and featured in the Summer 2013 issue of Fons & Porter's Easy Quilts. Where did the name for this quilt come from? Keep reading; Cathy will tell you! 

Q. How did you come up with the design?
Cathy: Sister's Choice is a favorite block pattern of mine; I like the nine-patch center paired with the 'almost a star' effect of the points, and when they are alternated with a simple block, such as the 25-patch, there is a strong diagonal effect. I like the movement it creates, so there is interest horizontally, vertically, as well as on both diagonals.

Q. How did you come up with the name for this quilt?
Cathy: The colors in this group are irresistible! Tart lemons, tangy limes, ripe raspberries, plus a few blueberries, looked like fruit punch to me! And I have a sister named Judy. When naming quilts, I often give a nod to family and other special interests.

Q. What is your favorite thing about the Marblehead Global Brights?
Cathy: This collection has mottled and shaded bright fabrics, which lend interest to the fabrics. While the design would work well with solids, these fabrics create an effect similar to batiks, which gives some depth to the colors.

Q. What did you do differently on this quilt from your usual designs?
Cathy: I usually add a border to frame the pieced center, but this one stands on its own. I just used a lime green binding to finish. That is a different effect and since it is a good size for a throw, it didn't seem necessary to make it bigger.

Q. What prompted you to design Punch & Judy?
Cathy: I was playing with the fabric colors in EQ6 and I liked the way this one turned out. The bonus is that digital designs always look better in fabric.

Q. Give us your vision for using this quilt.
Cathy: This is a throw that would brighten a guest room, especially on a bed 'dressed' Euro style with white sheets and duvet.

Q. Any special machine quilting tricks?
Cathy: I used my favorite shaded kiwi green to quilt this one, and it is surprising how it blends with the other colors in the quilt since the green is actually the fabric used the least. The design is a freehand swirl, that I use a lot, because it fills the space fairly evenly and moves along fairly quickly!


See the entire Marblehead Global Brights collection here.
Find the magazine here.
Find the kit here


Wednesday, April 17, 2013

Small-Scale High Fashion


If you're a follower of this blog, you've seen Judy Hansen's two most recent lines, Garden Whimsy and Cook's Helper in quilts, aprons, bags, and more, but we bet you've never seen these fabrics on Barbie dolls!

Until today.


Rita Nussbaumer, a sewer who shops at Judy Hansen's store, Quilt Shop of Deland, shared her story with us. Through a pastor friend, Rita contributes shoeboxes of basic hygiene items and toys that are sent on mission trips for needy children.


The boxes are supposed to include a toothbrush, toothpaste, comb, bar of soap and a facecloth (which Rita knits), then she adds a coloring book, crayons, balloons – ''whatever other little treasures I find on clearance,'' she says, as well as pencils and a pencil sharpener.


Last year, Rita began buying used Barbies and making clothes for the dolls to go in the little girls' boxes, many of whom have never had a doll. Enter Judy's fabric. ''I saw Judy's main print [from the Garden Whimsy line)—it's small but it has so much color that you can put anything together with it. It was just perfect!" She uses old patterns from when her daughters were young, and aims for finger-friendly clothing for easy wardrobe changes.


From August through November last year, Rita stitched clothes and hunted down/received used Barbies for 40 boxes. This year, she started right after winter, and has 5 big boxes of clothes already made. A gift certificate she received for Christmas went toward more of Judy's Garden Whimsy fabrics, as well as some from Cook's Helper.


Friends scout yard sales for used Barbies, buying them for $1-$2 each, and Rita cleans them up, combs their hair, dresses them. ''I usually put one robe in the box with a nightie with a long and short bottom, a jumpsuit, a dress, jumper, undies, and a variety of blouses with shorts, slacks, culottes, knickers and skirts - all mix and match to make more outfits,'' Rita says.

''The kids carry those shoeboxes around for years because that's all they have what's in that box. I can sew some scraps together and give them something special," Rita says.

Rita, thanks so much for sharing your story!  

Monday, April 15, 2013

The Zen of Black and White


There's a magic (zen-fullness?) to black and white. It's both classic and trendy, both chic and simple. 

Cathy Miles used our Black and White collection to make this little beauty, featured in Simple Quilts & Sewing magazine. What a great design, and so easy too! We asked her to share a bit about the design process with us, and she did!
"Black Tie Affair" by Cathy Miles
featured in Simple Quilts & Sewing magazine Spring 2013

Q. How did you come up with the design?
Cathy: This elegant fabric reminded me of formal attire, so it was a natural for bow tie blocks. I shifted them around until I liked the effect.

Q. What attracted you to the fabrics?
Cathy: I am usually drawn to bright colors & lots of them, so I was surprised at the appeal of this black & white group. It is frosted with pearl and the artwork is really something special.

Q. What is your favorite print from the collection?
Cathy: It's hard to choose a favorite. I like the teardrop-shaped black bits on white, but the random white drops with strings of pearls on black is also very appealing, and the large print that is on the back is worthy of a frame to hang on the wall. I know I already mentioned the glisten of pearls on the fabric, but we see a lot of gold accent on fabrics these days and the pearl effect is a much more subtle way to add interest to the fabric.


Q. What do you like best about the quilt?
Cathy: It reminds me of men in tuxedos & white dinner jackets- like those great classic movies with stars like Cary Grant & Bette Davis.

Blog editor's note: So more like this...
Image: www.weddingplanninginstitute.com

and not so much like this!
Image: www.inknburn.com

Q. What prompted you to design the quilt?
Cathy: Some days I just feel like whacking into great fabric and doing something that is finished quickly- this was a project completed on a rainy Sunday.

Q. What do you envision it being used for?
Cathy: Beyond gracing a table or buffet, it could be used for a dresser scarf, or an accent piece across the back of a chair or couch.

Q. Can you talk about the machine quilting?
Cathy: I free motion quilted it on my home machine. I wanted to keep it simple and let the bow ties dominate, so I used black thread. I did avoid quilting in the white spaces, and those were small enough that just quilting through the black pieces was enough for the kind of use this runner will have.


The editors of Simple Quilts & Sewing included a great tip--since black and white go with everything, consider using a "surprise pop of color" for the backing or binding!

See the entire Black and white collection here.
Find the kit for this project at Canton Village Quilt Works.
Find Simple Quilts & Sewing here.

p.s. If this fabric line looks familiar, that's because it's also being used in the Maine Shop Hop, running all through the month of April. Find out more here.


Thursday, April 11, 2013

How to Showcase Your Favorite Prints


Have you seen Heidi Pridemore's latest design in the spring 2013 issue of Quilt Trends magazine? We love it and are excited to share it with you!

Tribal Modern designed by Heidi Pridemore
for Quilt Trends spring 2013

Heidi used the bright colorway of Ro Gregg's Tribal Council line to a modern design. We love how she contrasted the vibrant prints (don't you love the giraffes?!) with the solid white narrow sashing so that the block components really pop. Here's the skinny on easy-to-make strip-pieced quilt, straight from Heidi.

Q. How did you come up with the idea for this design?           
Heidi: I wanted to play with rectangles and create a clean look that was easy to make.

Q. What prompted you to use white for the sashing?                       
Heidi: For the longest time I did not like to use white in my quilts, but now I can see the value in the crisp, clean look you get when using white, especially with bright and busy prints. It is like putting a spotlight on each fabric and letting them shine.

Q. What attracted you to the Tribal Council line?                                                           
Heidi: The colors: it is always about the colors for me. The brighter, the better!
                                               
Q. What do you like best about the quilt?                                               
Heidi: I really like the giraffes! They look like they are peeking out from their world into ours, It is almost like a scrapbook page with photos.


Q. How did you choose to machine quilt this?
Heidi: We kept the quilting very simple to accent the look of the quilt. It is all anchored with stitch in the ditch, and then there are doodle vines and leaves in the blocks for added interest.

Q. What's one thing you'd like quilters to know about this design?
Heidi: It is such a wonderful pattern to showcase any collection. Many times my patterns can be fabric specific, but this gem can be made with anything.


Find out more about Heidi here.
Find the kit for this project here.
Click here to find QuiltTrends.

Tuesday, April 9, 2013

Tutorial: Tasty Treats Part 2

Today Christina is sharing a fantastic project with us. Check out her tutorial (2 of 3 to make the whole set! You can find the first one here.) and don't miss entering the giveaway for a fat quarter bundle--we tell you how at the bottom of this post!

Hi, I'm Christina from 2 little hooligans and I'm back again to share the second tutorial for my little fabric bakery items.  


Today I'm going to share with you how I made this little ruffled cake.   

 The fabric I was given to use was is Peggy Sue from Ro Gregg with a few Marblehead tonals mixed in. Isn't it simply beautiful? I was given 1/2 yards of each and I would recommend buying half yards to work with as well especially if you are going to make more then one cake or cupcake. Of course you could use something smaller you are just going to have to piece them together to get the correct measurements.

Materials Needed:


* Eight 1/2 yard pieces of fabric (Or scrap pieces that will need to be pieced together.)
1 bag of batting or more depending on number of cakes and how firm you make them.


Start off by printing the templates for the circle pieces. You will need to print off all three. Page 1, Page 2 and Page 3. They are labeled as nesting baskets but just ignore that. They are the same templates that I used to make these. I did notice that when I printed the templates off that the margins on the circle templates were a tiny bit off. Don't line up the circles right next to each other. Just line them up as close to a complete circle as you can. When I made my cakes I used the two smallest templates. The larger circle just seemed a little too big for the kiddos to play with. Once you have printed off the circle templates, piece them together and then cut out the middle sized circle out. 

 Now figure out which fabrics you want to work with for your first cake. You are going to need a main fabric for the cake and then another fabric for the ruffles. You are also going to need another fabric for the cake insert or you can use the same fabric as the cover of the cake. The choice is yours. You will start out by making a cover for the insert and then the insert later. I did it this way so that once the cover got dirty you could simply take it off the insert and throw it in the washer. Let's face it--fabric will get dirty when paired with kids play.
Ok, let's start by making the cake cover.

To make one small ruffled cake cover you will need to cut out:
*From the main fabric cut out one small sized circle and one piece of fabric that measures 7-1/2" x 22" for the side. Now cut the 7-1/2" x 22" piece of fabric into 1-1/2" wide strips. You should get 5 of them now measuring 1-1/2" x 22" .

*From 6 different fabrics cut one piece from each that measures 3" x 42" long for the ruffles. If you want your ruffles rufflier, just cut your length longer then 42" long.


Start by pinning the two short ends of the 3" x 42"  fabric pieces together. Sew ends.
     

Iron the seam flat and then fold the whole tube in half. Iron flat.    

Now ruffle the tube with your sewing machine. On the raw edge just sew with your machine on the largest stitch length. Then gently pull one of the threads to make the fabric ruffle.     

Use the circle piece of the main fabric as a guide to see how much you should ruffle your piece of fabric. Now pin the ruffled piece around the circle as well as pin one of the 1-1/2" x 22" pieces of fabric right side down.
   

Find the spot where you started pinning the 1-1/2" x 22" piece of fabric around the circle. Measure in about 1" from the end of that side piece. This is where you want to start sewing around the circle. Then stop stitching about 2" from where the two side pieces will meet. Now pin the remaining fabric around the circle until the two ends meet. From the middle where they meet measure in your 1/2" sew seam and then trim away any excess fabric. Now sew the two ends of the 1-1/2" x 22" piece together. Now that the ends are sewn together you can finish sewing the side onto the circle piece.
   

Now repeat with the remaining ruffled pieces (3" x 42" pieces) as well as the side pieces
 (1-1/2" x 22" pieces). Use a zig-zag stitch or serge raw edges.    

Use your seam ripper or scissors to clean up all those loose threads. You don't want any loose threads showing. Turn right side out and iron all the layers.   

Now you have just made your cake cover. Super easy right?! 
Now we are going to make the insert for your cake. It is sorta done the same way we made the cake cover but easier with no ruffles.


You will need to cut the following pieces to make one small-sized insert:
*Cut out two small circle pieces.
*One piece of fabric that is 5" x 22".    

You are going to assemble the insert just like we did above. Pin the 5" x 22" piece of fabric around the circle piece.   

Find the spot where you started pinning the 5" x 22" piece of fabric around the circle. Measure in about 1" from the end of that side piece. This is where you want to start sewing around the circle. Then stop stitching about 2" from where the two side pieces will meet. Now pin the remaining fabric around the circle until the two ends meet. From the middle where they meet measure in your 1/2" sew seam and then trim away any excess fabric. Now sew the two ends of the 5" x 22" piece together sew. Now that the ends are sewn together you can finish sewing the side onto the circle piece.     

Pin the other circle piece to the side piece. Sew all around leaving a 1" opening for turning right sides out.    

Turn right sides out. Iron seams. Start stuffing. Work in small bunches. It will give you a more even look. Keep stuffing until you get the firmness you want. I made mine fairly firm. Stitch opening closed.    

Now place the insert inside of the cake cover piece. Pretty darn cute?                                                            

To make the cake toppers I just made a bunch of ruffled and scrappy flowers. There are a ton of fabric flower tutorials on the web. A quick search will bring you to hundreds of them if you are in need on of. All I did was sew the flowers onto a smaller circle piece so that they could swap them from cake to cake.          

I made this scrappy bow from a bunch of scrap pieces of fabric tied into little bows.     

The next tutorial will be for these cute little cupcakes. They are my little girls' favorite pieces in the bakery!

Monday, April 8, 2013

From 64 to just 1

The clock ran out, the confetti fell, the players celebrated. And just like that, March Madness is over for another year. Congratulations to Louisville, who won an exciting game!


We started with 64 different teams, represented by Marblehead fabrics that matched school colors, and today we crown a bright red as the champion. Our virtual bracket quilt is complete! 
Thanks for following along--same place, same time next year! 


Here's a close-up of our Final Four all filled in.

p.s. Looking for more Marblehead excitement? We will soon be announcing the details of our Marblehead Challenge!