Showing posts with label Judy Hansen. Show all posts

Wednesday, December 27, 2017

Everything You Need to Know for A Snow Family Christmas Medallion Quilt

If you've been following along with our Medallion Quilt, we've compiled the information you need to make the quilt here in one handy post! 


Required Yardage and Cutting:
Fat Quarter Navy allover snowman print:
(1) 12-1/2” square

3/4 yard Stripe:
(4) 6-1/2“ x 12-1/2” fussy cut strips

1/2 yard green holly:
(4) 3-1/2” x 24-1/2” strips
(4) 4-1/2” squares
(8) holly leaves

3/4 yard red check:
(8) 1-1/2” x 4-1/2” strips
(8) 1-1/2” x 6-1/2” strips
(4) 3-1/2” squares
(8) 2-1/2” x 8-1/2” strips
(8) 2-1/2” x 12-1/2” strips
(12) berries

7/8 yard white solid:
(4) 6-1/2” x 30-1/2” strips

1/2 yard red text:
(32) 2-1/2” squares
(12) ornaments

1/4 yard navy check:
(8) ornaments

1/4 yard green check:
(8) ornaments

1/2 yard gray check:
(16) 2-1/2” x 4-1/2” pieces
(16) 2-1/2” squares
(1) 3-1/2” x 13” piece for cutting fusible ornament stems

1 yard blue text print:
(4) 6-1/2" x 30-1/2" lengthwise strips

1/2 yard binding (red check)

(6) 2-1/2” x 42” strips for binding

Make the quilt here: 
The links below will guide you through the assembly process for the quilt.
See the entire A Snow Family Christmas collection here and ask for it at your local quilt shop.

Wednesday, December 20, 2017

A Snow Family Christmas Medallion Quilt - Day 5

It wouldn't be the holiday season without a quilting project! 
Follow along as we use Judy Hansen's A Snow Family Christmas collection to make a medallion quilt perfect for winter! We'll start with a center square and add easy borders to create a 54" square quilt. Follow along as work toward the final quilt reveal.


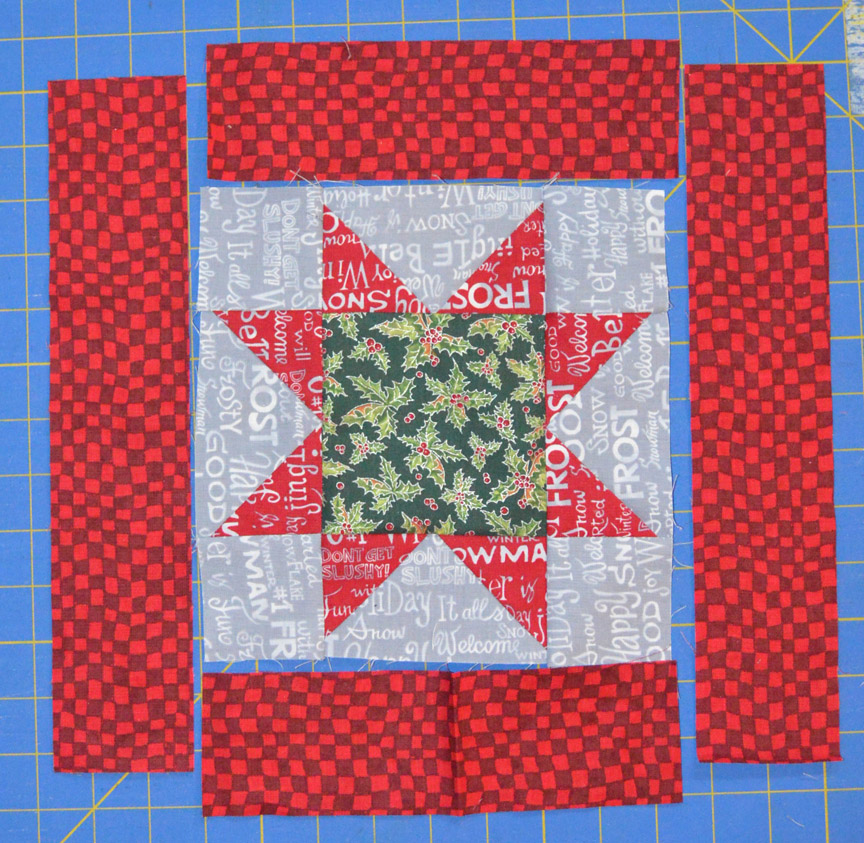
Today we're making the corner blocks for the outer border. They're star blocks, made with flying geese units for the points. These classic blocks look extra festive in red, green and gray holiday prints!

Cutting:
From the green holly:
(4) 4-1/2" squares

From the gray text print:
(16) 2-1/2" x 4-1/2" pieces
(16) 2-1/2" squares

From the red text print:
 (32) 2-1/2" squares

From the red check:
(8) 2-1/2" x 12-1/2" strips
(8) 2-1/2" x 8-1/2" strips

Step 1: Draw a diagonal line on the wrong side of the 2-1/2" red text squares. If you prefer the text to be facing the same direction on both the red and gray prints in the finished flying geese unit, you'll need to draw the line on (16) of the squares as shown on the left (with top of the text print facing to the right) and the opposite on the remaining (16) squares (with top of the text print facing to the left). This is how you'll position the marked squares on each gray piece to stitch as well. 

Step 2: Matching raw edges, position the left side triangle on (1) 2-1/2" x 4-1/2" gray text piece. Stitch on the drawn line, trim seam allowance to 1/4", and press open. 
Step 3: Position the second marked square on the right edge and repeat. 

Step 4: Here's your finished flying geese unit. Notice how the text print pieces are all facing the same way. Repeat to make a total of (16) flying geese units.

Step 5: Lay out (1) 4-1/2" green holly square, (4) flying geese units, and (4) 2-1/2" gray text print squares into (3) rows as shown. 

Step 6: Sew the pieces into rows and join the rows to complete the star unit. Make (4) star units. 

Step 7: Sew 2-1/2" x 8-1/2" red check pieces to opposite sides of the star unit. Sew 2-1/2" x 12-1/2" red check pieces to the remaining sides to complete the block. Make a total of (4) star blocks. 

Here's your finished block! 


Follow along as we make our Medallion quilt!

See the entire A Snow Family Christmas collection here and ask for it at your local quilt shop.

Thursday, December 14, 2017

A Snow Family Christmas Medallion Quilt - Day 4

It wouldn't be the holiday season without a quilting project! 
Follow along as we use Judy Hansen's A Snow Family Christmas collection to make a medallion quilt perfect for winter! We'll start with a center square and add easy borders to create a 54" square quilt. Follow along as work toward the final quilt reveal.

Ready for a lot of applique? 
Today we're creating rows of ornaments that will go around the quilt center. 


Cutting: 
From the white solid:
(4) 6-1/2" x 30-1/2" strips

From the gray text print:
(1) 3-1/2" x 14" piece

From the red text print: 
(12) ornaments*

From each of the green check and navy check:
(8) ornaments*

*Follow the step-by-steps below to create the fused ornament shapes. 

Note: Download the ornament shape here.

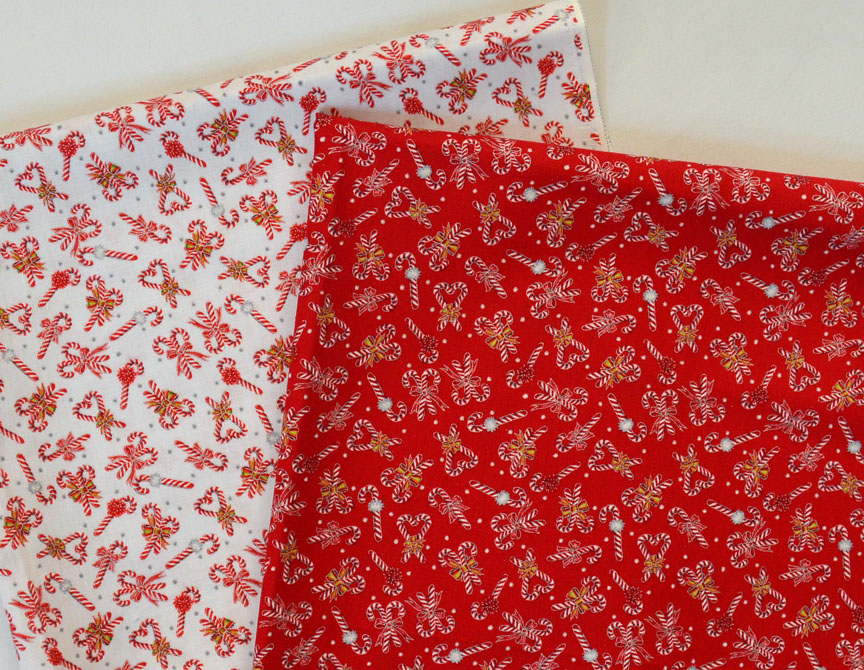
Today's fabrics:

Step 1: Trace (28) of the template shape onto the paper side of fusible web.  

Step 2: Fuse (12) of the shapes onto the wrong side of the red text fabric and (8) each onto the wrong side of the green check and navy check fabrics. Cut out each shape on the drawn line and remove paper. 

Step 3: Fuse a 3" x 13" piece of fusible to the wrong side of the 3-1/2" x 14" gray text piece. Trim piece to measure 3" x 13". Cut (16) 1/2" x 3" long pieces from the strip. Tip: if you remove the paper backing before cutting, you won't have to peel the paper off each individual piece. But the fusible web will stick slightly to your board, so be aware.

Step 4: Cut the remaining fused strip in half, lengthwise, to make (2) 1-1/2" wide strips. From those strips, cut (12) short  pieces.

Step 5: Here are all your fused pieces for today's rows. Remove paper backings and head over to your ironing board with them and your (4) 6-1/2" x 30-1/2" white strips. 

Step 6: Find the center of the first white strip and position a short gray piece and a red ornament on that center point. The gray piece should touch the top edge of the strip, and the opposite end should be tucked just under the edge of the ornament. Fuse in place. 

Step 7: Position a ruler along the bottom edge of the white strip, approximately 5/8" from the edge. Use it to align the bottom edges of the green and blue ornaments. Lay out all ornaments and eyeball the space between them. Make sure to leave at least 1/2" off space on both short ends. 

Step 8: Add short and long gray pieces to the ornaments, tucking edges under the ornament. Fuse all pieces in place. 


Here's your finished row! Use a decorative stitch to secure appliques in place, or wait until you quilt the finished quilt and secure then. 

Step 9: Make a total of (4) rows. 


Follow along as we make our Medallion quilt!

See the entire A Snow Family Christmas collection here and ask for it at your local quilt shop.

Friday, December 8, 2017

A Snow Family Christmas Medallion Quilt - Day 2

It wouldn't be the holiday season without a quilting project! 
Follow along as we use Judy Hansen's A Snow Family Christmas collection to make a medallion quilt perfect for winter! We'll start with a center square and add easy borders to create a 54" square quilt. Follow along as work toward the final quilt reveal.


Today we'll be fussy cutting the fun stripe in this collection to use as the first border, and then we'll be assembling the first border around the quilt's center square. 

Cutting:
From the stripe:
(4) 6-1/2" x 12-1/2" fussy-cut pieces (see photos below)

From the navy allover snowman print:
(1) 12-1/2" square (you can fussy-cut it to center snowman if you prefer)

Here's a look at the stripe. You can fussy cut whichever section you'd like; we chose the larger snowman section with the candy cane strips at the bottom. 

Position a ruler on the stripe, adjusting fabric as needed so stripes on fabric align with the ruler edge. Remember that 1/4" on each side of the stripe will be lost in the seam allowance, so plan accordingly. In the fussy cut stripe pieces below, the solid red will be the seam allowance and the candy cane stripe will create a great "extra" border along the center square.


Add the First Border:
Step 1: Lay out the 12-1/2" navy allover snowman square, (4) 6-1/2" x 12-1/2" stripe pieces, and the (4) holly blocks from yesterday, orienting the holly berries as shown. 


Step 2: Sew the fussy-cut stripe pieces to the sides of the square. Tip: As you stitch, keep the fussy cut piece on top. This allows you to "steer" the stitching slightly so that the red solid doesn't show.

Step 3: Here's the quilt center with the side border pieces added. Isn't that candy cane stripe great?!

Step 4: Sew the holly blocks to opposite ends of both fussy-cut strips as shown, noting orientation of the blocks. 

Step 5: Sew the pieced borders to the top and bottom of the center square. Border #1 is complete! 

Follow along as we make our Medallion quilt!

See the entire A Snow Family Christmas collection here and ask for it at your local quilt shop.

Wednesday, December 6, 2017

A Snow Family Christmas Medallion Quilt - Day 1

It wouldn't be the holiday season without a quilting project! 
Follow along as we use Judy Hansen's A Snow Family Christmas collection to make a medallion quilt perfect for winter! We'll start with a center square and add easy borders to create a 54" square quilt. Follow along as work toward the final quilt reveal.


Here are the prints we'll be using:


Cutting:
From the gray text:
Four 4-1/2" squares

From the red check:
Eight 1-1/2" x 6-1/2" pieces
Eight 1-1/2" x 4-1/2" pieces
Twelve berries from template*

From the green holly:
Eight holly leaves from template*

*See Step 1

Note: Download the template for the holly leaves and berries here

Step 1: Trace the indicated number of leaves and berries onto the paper side of fusible web. Adhere to the correct fabric, and cut out each shape on the drawn line. Set aside.

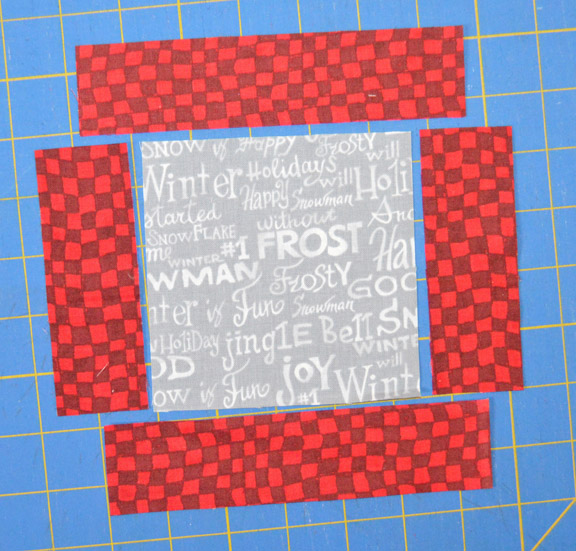
Step 2: Lay out a 4-1/2" gray square with two 1-1/2" x 4-1/2" red check pieces and two 1-1/2" x 6-1/2" red check pieces. 

Step 3: Sew 1-1/2" x 4-1/2" red check pieces to opposite sides of a 4-1/2" gray text square. 

Step 4: Sew 1-1/2" x 6-1/2" red check pieces to the top and bottom to complete the pieced square.

Step 5: Position two holly leaves and three berries on the block as shown. Fuse in place. 

Step 6: Repeat to make a total of four blocks. note the placement of the holly leaves and berries on each block; these will be corner blocks in the first border, so be sure text print is oriented correctly before you fuse.


An elf on the shelf has joined our studio for December (see him more often on Instagram). We've been lucky that he hasn't caused much mischief yet--he even offered to hold up today's quilt block for a photo!

Follow along as we make our Medallion quilt!

See the entire A Snow Family Christmas collection here and ask for it at your local quilt shop.

Tuesday, November 14, 2017

December comes early: A Snow Family Christmas

It's official! The radio stations have started playing Christmas music. Thanksgiving may be next week, but it appears the holidays have begun. Cue up Jingle Bells; this week we'll be sharing our holiday lines.

We love a great snowman-themed collection. Without Santa, the reindeer, and decorated trees, snowman prints can be used in a quilt that lasts all winter long! Judy Hansen's A Snow Family Christmas fabric line is exactly that. 

All the prints:

Imagine all the different uses for this stripe! Fussy cut inner borders, blocks...

The main focal print combines snowmen with the text print:

Candy canes in two colors:

 Checkerboard in red, navy and green:

Two more fun prints--holly and adorable snowmen:

The text print in gray, red and navy:

The Snow Family collection also includes a stocking panel, which can be made into a detailed stocking with minimal fuss. Perfect for a last-minute gift to be hung by the chimney with care!

See the entire A Snow Family Christmas collection here and ask for it at your local quilt shop. 

Friday, October 20, 2017

Hedgehog Love Pillow Tutorial

Who couldn't use a little hedgehog love in their lives?! Inspired by the adorable creatures in Judy Hansen's Hedgehog Village fabric collection, we've created the Hedgehog Love Pillow, featuring a 3-D hedgehog. 


You'll Need
1/2 yard Mink solid (121-136)
1/2 yard taupe paw print (120-13731)
fat quarter yellow floral (120-13752)
1 yard periwinkle hedgehog print (120-13742)
6" square Mahogany solid (121-015)
2" x 4" piece of White solid (121-000)
1 yard Fusible Fleece
12" square muslin
12" square fusible web
Fusible web scraps
20" square pillow insert

Cutting
From the Mink solid:
(19) 5" squares
(4) 3" x 4-1/2" pieces (for paws)*

From the taupe paw print:
(1) hedgehog face
(4) 3" squares*

From the yellow floral:
(1) 14-1/2" square

From the periwinkle hedgehog print:
(2) 15" x 20-1/2" pieces for backing fabric
(2) 3-1/2" x 14-1/2" lengthwise strips
(2) 3-1/2" x 20-1/2" strips

From the Mahogany solid:
(2) pupils**
(1) nose**

From the White solid:
(2) eyes**

From the fusible fleece:
(1) 20-1/2" square
(1) hedgehog face

*Refer to steps 8 and 9 to make two-sided paws and ears.
**Trace shapes onto fusible web. Fuse to indicated fabric and cut out on drawn lines. 
Download the templates for the hedgehog here.
Make the Hedgehog:
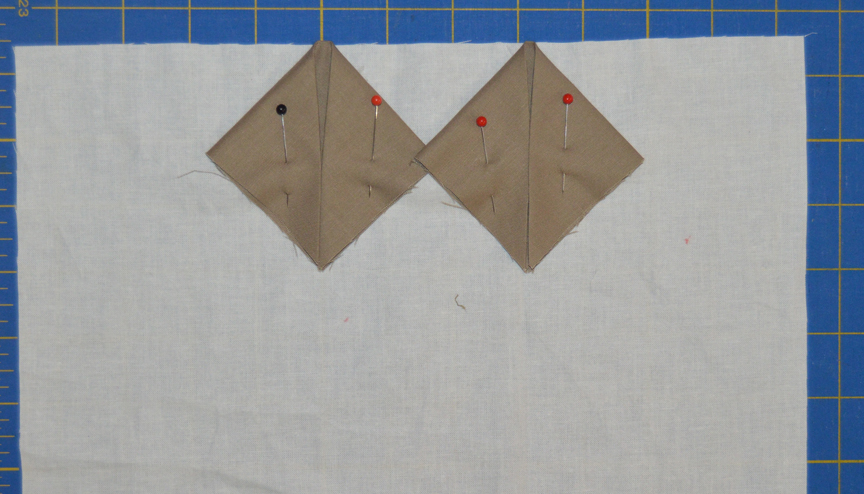
Step 1: Fold each 5" Mink square diagonally in half and press. Fold the two outer corners in to the bottom corner as shown and press. Make 19 hedgehog spikes. 


Step 2: Fuse the 12" square of fusible web to the 12" square of muslin. 
Step 3: Position (2) hedgehog spikes along the top edge of the muslin as shown, with the corners slight overlapping. 

Step 4: Stitch along the bottom sides of each spike using a 1/8" - 1/4" seam allowance as shown.

Step 5: Position (3) spikes in a row as shown. Make sure the tips are above the spikes in the previous row. Pin in place. Stitch along the bottom edges to secure. 


Step 6: Some outer spikes will need to have a finished edge. To make a spike with a finished edge, unfold a spike and press one long in 1/4" as shown. Stitch along the fold with a 1/8" seam allowance to create a finished edge. Refold. Make (3) spikes with finished edges on the left and (3) on the right.


Step 7: Add (3) more rows in the same way, with finished edge spikes on the outer edges. Add a row of (4), a row of (3), and another row of (4). Add a last row of (3) without finished edges (edges will be covered by the hedgehog face).


Step 8: Trace the ear shape onto the wrong side of (2) 3" squares of taupe paw print. Layer each with a second square, right sides together. Stitch along the drawn line, leaving the straight edge open.  

Step 9: Turn ears right side out and press. In the same way, make (2) paws using the 3" x 4-1/2" Mink solid pieces. After turning right side out, use a tight zig zag stitch to add paw lines as shown.

Step 10: Sew 3-1/2" x 14-1/2" periwinkle hedgehog strips to opposite sides of the 14-1/2" yellow floral square. Sew 3-1/2" x 20-1/2" periwinkle hedgehog strips to the top and bottom. Fuse the 20-1/2" fusible fleece square to the back for added stability. 


Step 11: Fuse the hedgehog face fleece piece onto the wrong side of the taupe paw print hedgehog face for additional padding. Fuse the eyes, pupils, and nose in place, using the photo for a guide. Use a decorative stitch to secure if desired. 
Step 12: Trim muslin backing so it doesn't show behind the spikes, but leave as much as possible (out of view) because you'll be stitching on it to secure in a later step. 
Step 13: Remove the paper from the back side of the spikes (you'll have to remove it in pieces because of the stitch lines). Position the spikes on the yellow square and fuse in place. Tip: Position with face and paws for placement to make sure hedgehog is centered, and then remove face and paws before fusing spikes in place. Because of all the layers, you'll need to fuse for a longer period of time. 
Step 14: Add the hedgehog face, making sure it covers any exposed raw edges from the bottom rows of spikes. Tuck the ears and paws under the head as shown. Use a zig zag stitch and matching thread to secure the head, ears, and paws in place.

Step 15: Fold spikes back and stitch along muslin on sides and top (wherever possible) to further secure the spikes to the background.

Step 16: Fold and press 1/4" on (1) long edge of a 15" x 20-1/2" periwinkle hedgehog piece. Fold and press in another 1/4" and topstitch to create a finished edge. Make (2).

Step 16: Position the pillow top right side up and the backing pieces on top, right sides together, with raw edges matching (finished edges should overlap in the middle). Pin in place and stitch around the entire pillow using a 1/4" seam allowance. 

Step 17: Turn the pillow right side out and stuff with the insert. Enjoy!

See the entire collection here and ask for it at your local quilt shop.
Learn more about Judy's Hedgehog Village collection here.