Showing posts with label Season's Greetings. Show all posts

Friday, December 1, 2017

In Love with Tree Skirts!

It's started. Parking lots are transforming into Christmas tree lots, and you pass cars on the road with a prickly green visitor tied to the top. Whether you're on team live tree or artificial all the way, what every tree needs is a great tree skirt. 

We've compiled some of our favorites on our Holiday Quilting Projects board. Sure, it may not be a project you finish for this year, but what's one more UFO?! 


Need more inspiration? Check out our holiday fabric lines below and ask for them at your local quilt shop. 
A Snow Family Christmas
Holiday Editions
Season's Greetings

Thursday, November 16, 2017

December comes early: Season's Greetings

It's official! The radio stations have started playing Christmas music. Thanksgiving may be next week, but it appears the holidays have begun. Cue up Jingle Bells; this week we'll be sharing our holiday lines.


Season's Greetings is a large holiday collection that has a little something for everyone. Snowflakes, snowmen, plaid, stripes, Santas, trees, dots and more! 


The collection also includes an advent calendar panel and a stocking panel--ready to stitch and use!


See the entire Season's Greetings collection here and ask for it at your local quilt shop.


Missed our other holiday fabric posts? 
A Snow Family Christmas

Tuesday, October 11, 2016

Christmas is Coming!

Christmas is in just 75 days!
That means there's still time to start (and finish) a holiday project! 
This week and last week we are featuring our new holiday lines. 
Enjoy the preview and ask for them at your local quilt shop. 

Today's collection is Season's Greetings
We like to think of this as the holiday collection to end all holiday collections. 
With 55 different prints, it has something for every style!

Let's browse through the line:

Snowmen in grays and reds 

One of our most popular prints--the holiday camper (plus coordinates)!  

A panel of snowman blocks and coordinating snowflakes

Santas, snowmen, ornaments, candy canes and candy houses

And a coordinating advent calendar panel!


 Red and green prints with a Scandinavian feel (plus reindeer!)

Elegant damask and checkered prints

Modern Christmas trees

Holiday berries


Peppermint swirls

Adorable dogs wearing hats and scarves


Classic winter birds--the beautiful cardinal--with birdhouses, stars and snowflakes in a cool, frosty palette

See the entire Season's Greetings collection here and ask for it at your local quilt shop.

Thursday, December 17, 2015

Day 8: Home for the Holidays Blog Hop

Welcome to the last day of our Home for the Holidays blog hop! 
This week we've be featuring a variety of small sewing projects to add holiday cheer to your house. These are fast and easy--you can still make them for this year, or bookmark the tutorial until after the holidays! We hope you enjoy these tutorials--and don't miss a chance to win a bundle of the fabrics featured each day!


Today, Stephanie Palmer from Late Night Quilter is sharing a tutorial on her blog for making quick Cinnamon Scented Coasters. A sweet-smelling quilted project--we love it! She used both the Peace on Earth and Season's Greetings fabrics. 


Here's Stephanie:
I love to give my friends brightly colored baskets filled with goodies during the holiday season.  I often fill them with cookies, tea and a cute mug.  These cinnamon scented coasters are the perfect addition to your tea-themed basket to let your friends know you went the extra mile to make something special for them. 


Please hop over to my blog for the tutorial, and enter to win A Quilter's Planner while you're there! 

Thanks Stephanie!
We're also giving away a bundle of holiday fabric here in connection with Stephanie's tutorial. Leave a comment letting us know that you follow the Inspired by Fabric blog (if you don't already, sign up in the sidebar at right using the email or blog reader option). In your comment, also let us know: what's your favorite seasonal scent? Giveaway is open through Monday, December 21st at 11:59 pm EST. This contest is now closed.


See the entire Peace on Earth collection by Ro Gregg here.
See the entire Season's Greetings collection here.

Check out each day of our Home for the Holidays Hop!
Day 1: The Ho Ho Ho Pillow
Day 2: The Present Pillow
Day 3: Snowflake Pillow
Day 4: O Christmas Tree Pillow
Day 5: Peace on Earth Table Runner
Day 6: Snowflake Table Topper

Day 7Let It Snow Applique Quilt

Friday, December 11, 2015

Day 4: Home for the Holidays Blog Hop

Welcome to the fourth day of our Home for the Holidays blog hop! 
This week, our focus will be on throw pillows--a fun and often overlooked way to add some holiday joy to your home! Next week we'll have a variety of small sewing decor projects, so be sure to stop by each day!

We think you'll enjoy the tutorials this week--including possibly new-to-you techniques. One of the great things about pillows is that by creating envelope-style or zipper pillows (we'll show you both methods), you can switch them out with your regular throw pillow covers for a quick and easy holiday decoration (and they don't require much storage space the rest of the year!).


Today's tutorial, the O Christmas Tree pillow, uses a variety of green prints from Season's Greetings, plus improv piecing techniques to create a modern-looking tree. Assemble the pillow top with reverse applique, and then quilt it and voila, your pillow is complete!


Materials

1/4 yard (or fat quarter) each of 4 green prints
1/2 yard of cream tree print
15" square of muslin
15" square fusible web
15" square fusible batting
12" zipper in coordinating color
Fabric marking pen
14" square pillow insert


Cutting
Green prints:

Cut a strip from each ranging in width from 2" to 4"

Cream tree print:
One 15" square and one 14-1/2" square

Make the Pillow
Download the tree template here.
Step 1: Fold the 15" muslin square in half and mark the center line. Cut out the half tree template, position it on the center line and trace. Flip template over and trace to complete the tree shape.

Note: Our muslin isn't quite 15" square--do as we say, not as we did! :)
Step 2: Trim two strips to slightly longer than width of tree shape bottom. Position one strip covering the bottom of the tree on a slight angle, right side up, and place a second strip on top, right side down. Pin and then stitch in place using a 1/4" seam allowance.

Step 3: Flip strip open and press. 

Step 4: Continue adding strips in the same manner. Angle the strips to created added interest. If your strips overlap a lot, fold the muslin foundation back and trim excess strip only (not foundation). You can also trim strip widths before adding to the tree. 


Step 5: Continue adding strips and pressing them open, trimming when needed. Strips only need to cover the tree outline, not the entire muslin square, so trim strip lengths as you work your way up. 
The finished pieced tree:

Step 6: Find the center of the 15" fusible web square and mark it. Trace the tree shape onto the fusible web. 

Step 7: Following manufacturer's directions, fuse to the wrong side of a 15" cream tree square. Cut out the tree shape, reserving the square with the negative shape and discarding the center tree shape. 

Step 8: Fuse the cream tree square onto the pieced green foundation piece. 

Step 9: Applique tree edges with a decorative stitch if you like. Fuse the 15" square of fusible web to the back of the pillow front. Quilt pillow front as desired (we used a 1" wide crosshatch). 

Step 10: Trim pillow top to measure 14-1/2" square. Use the remaining 14-1/2" cream tree square and 12" zipper to finish the pillow. Refer to the Present Pillow tutorial for steps. Stuff with pillow insert and enjoy!


For a chance to win a bundle of Season's Greetings prints, leave a comment letting us know that you follow the blog (if you don't already, sign up in the sidebar at right using the email or blog reader option). In your comment, also let us know: live tree or artificial? Giveaway is open through Friday, December 18th at 11:59 pm EST.

See the entire Season's Greetings collection here.

Check out each day of our Home for the Holidays Hop!
Day 1: The Ho Ho Ho Pillow
Day 2: The Present Pillow
Day 3: Snowflake Pillow
Day 5: Peace on Earth Table Runner
Day 6: Snowflake Table Topper
Day 7Let It Snow Applique Quilt
Day 8: Cinnamon Scented Coasters


Thursday, December 10, 2015

Day 3: Home for the Holidays Blog Hop

Welcome to the third day of our Home for the Holidays blog hop! 
This week, our focus will be on throw pillows--a fun and often overlooked way to add some holiday joy to your home! Next week we'll have a variety of small sewing decor projects, so be sure to stop by each day!

We think you'll enjoy the tutorials this week--including possibly new-to-you techniques. One of the great things about pillows is that by creating envelope-style or zipper pillows (we'll show you both methods), you can switch them out with your regular throw pillow covers for a quick and easy holiday decoration (and they don't require much storage space the rest of the year!).


You can leave this Snowflake Pillow on the couch all winter long! The pillow uses a reverse applique technique--no worrying about the darker background fabric showing through the lighter snowflake fabric. We have a few different snowflake templates to choose from, including the one shown here. Imagine a couch full of snowflake pillows using the blue and white Season's Greetings prints--your own Winter Wonderland! This pillow measures 14" square.


Materials
1 fat quarter of blue snowflake plaid
1/2 yard of white snowflake print
14-1/2" square of fusible web
14" square pillow insert

Cutting
Blue snowflake plaid:
One 14-1/2" square

White snowflake print:
One 14-1/2" square
Two 10-1/2" x 14-1/2" pieces

We've created four different snowflake patterns that you can use. Our tutorial uses #2; you can see all four designs:
Download the pdf containing all four designs here; then print whichever you'd like to use.


Make the Pillow
Step 1: Tape the two pattern pages together along the dotted line as indicated. Mark the center line in both directions on the 14-1/2" square piece of fusible web. Layer the pattern under the fusing side of the fusible web, aligning the dotted lines with the drawn lines. Trace the snowflake half onto the paper side of the fusible web. Rotate the snowflake pattern and trace the other side as well.  


Step 2: Following manufacturer's directions, fuse the fusible web square to the wrong side of the 14-1/2" blue snowflake plaid square.
Step 3: Cut out the snowflake shape, leaving the negative space around the design as shown. 

Step 4: Fuse the blue snowflake outline to the 14-1/2" white snowflake square. Tip: Align the two squares and then quickly press down the points near the center just to get them in place. Then, working from the center out, press the directed amount of time with the iron to adhere the entire square. 

Step 5: Use a decorative stitch of choice to secure the applique edges (we used a zigzag stitch and silver thread).

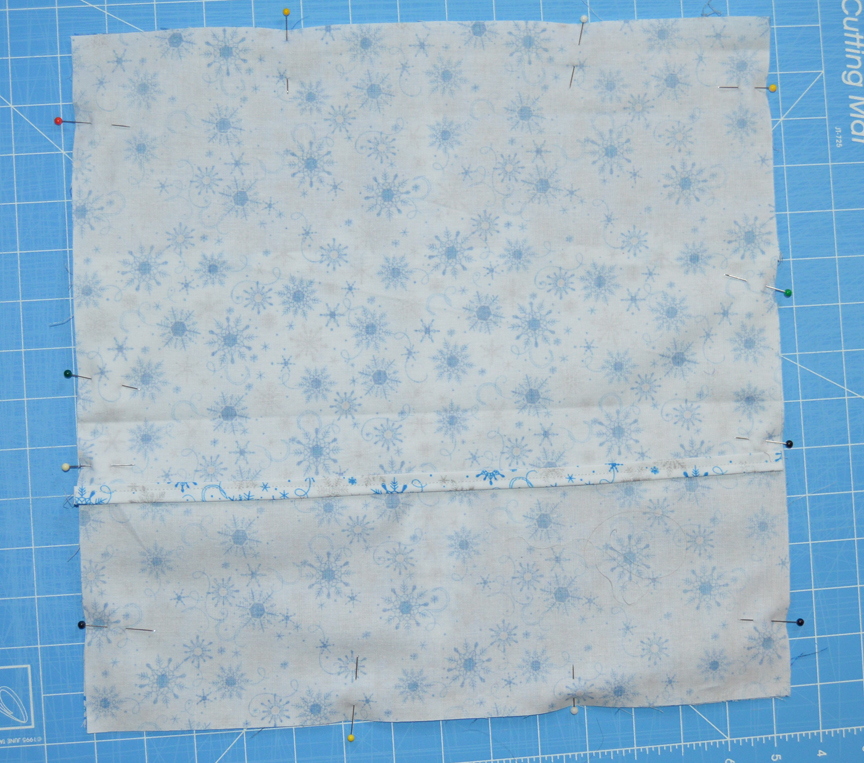
Step 6: On each of the 10-1/2" x 14-1/2" white snowflake pieces, fold one long edge over 1/4" wrong sides together and then fold over another 1/4". Topstitch to secure the hemmed edge. 

Step 7: Lay the pillow top right side up. Lay the two back pieces on top, right sides down, so the raw edges line up with the pillow top and the hemmed edges overlap in the center. Pin in place. 

Step 8: Sew around the outer edge of the pillow using a generous 1/4" seam allowance. Turn pillow right side out and stuff with a 14" square pillow insert. 


For a chance to win a bundle of Season's Greetings prints, leave a comment letting us know that you follow the blog (if you don't already, sign up in the sidebar at right using the email or blog reader option). In your comment, also let us know: do you still cut out paper snowflakes like you did when you were a child? Giveaway is open through Friday, December 18th at 11:59 pm EST. This contest is now closed.

See the entire Season's Greetings collection here.

Check out each day of our Home for the Holidays Hop!
Day 1: The Ho Ho Ho Pillow
Day 2: The Present Pillow
Day 4: O Christmas Tree Pillow
Day 5: Peace on Earth Table Runner
Day 6: Snowflake Table Topper
Day 7Let It Snow Applique Quilt
Day 8: Cinnamon Scented Coasters

Wednesday, December 9, 2015

Day 2: Home for the Holidays Blog Hop

Welcome to the second day of our Home for the Holidays blog hop! 
This week, our focus will be on throw pillows--a fun and often overlooked way to add some holiday joy to your home! Next week we'll have a variety of small sewing decor projects, so be sure to stop by each day!

We think you'll enjoy the tutorials this week--including possibly new-to-you techniques. One of the great things about pillows is that by creating envelope-style or zipper pillows (we'll show you both methods), you can switch them out with your regular throw pillow covers for a quick and easy holiday decoration (and they don't require much storage space the rest of the year!).


The Present Pillow is exactly what the name says--a pillow that looks like a present. A fabric "ribbon" creates the 3-D bow on the front. We chose a wrapping paper-style red and gold snowflake print for the "present" and a metallic gold scroll for ribbon, both from the  Season's Greetings collection--a touch of elegance for your holiday decor. This pillow measures 17-1/2" square.


Materials
2/3 yard red/gold snowflake print
2/3 yard gold print
16" red zipper
18" square pillow form
Turning stick

Cutting
Red/gold snowflake:
One 18-1/2" square
Two 8" x 18-1/2" strips

Gold print:
Two 6-1/2" x 42" strips
One 3-1/2" x 18-1/2" strip

Make the Pillow
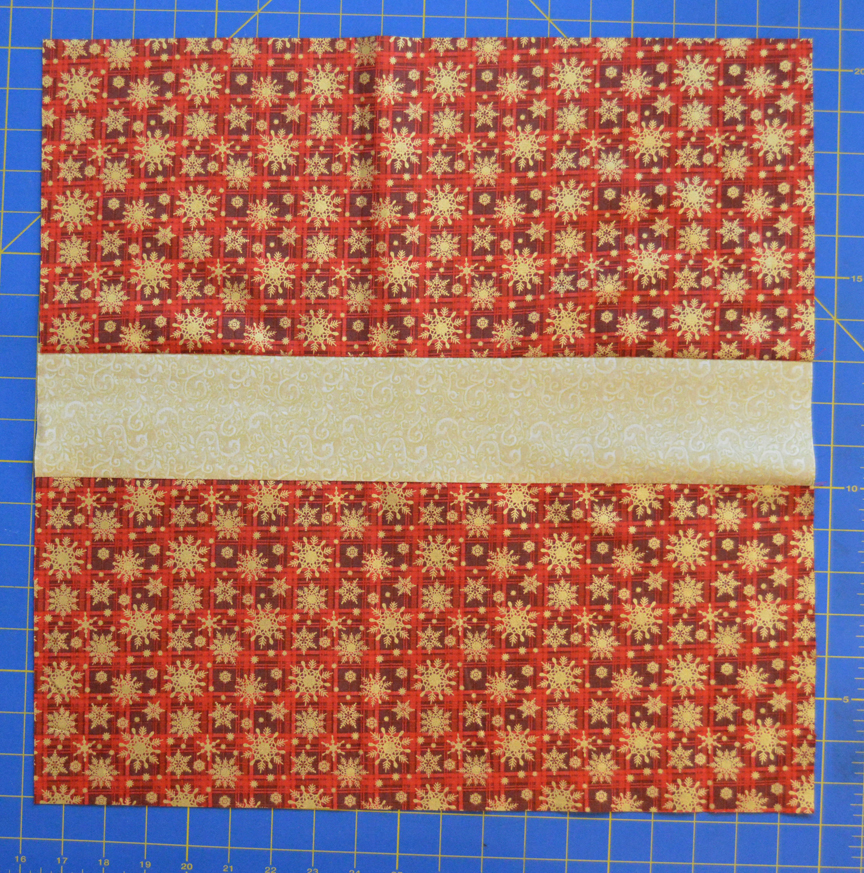
Step 1: Sew an 8" x 18-1/2" red/gold snowflake strip to opposite sides of a 3-1/2" x 18-1/2" gold print strip. Topstitch on the gold strip 1/4" from each seam line.


Step 2: Press a 6-1/2" x 42" gold print strip lengthwise in half wrong sides together to create a fold line. (This will make it easier to press later.) Refold lengthwise in half right sides together and stitch down the long edge.

Step 3: On one end, use the 45 degree line on a ruler to create a diagonal line as shown. 


Step 4: Stitch on the drawn line and trim 1/4" past the seam.

Step 5: Turn the strip right side out and use a turning stick to push the point out. Press this ribbon strip. Topstitch 1/4" from the outer edge of the strip.
Step 6: Repeat steps 3-5 to make a second ribbon strip.
Step 7: Position the pieced square and 18-1/2" red/gold snowflake square right sides together with a pieced edge oriented up. Lay the zipper near the pieced edge of the square as shown. Mark the ends of the zipper with pins. Sew along this edge of the pillow using a 1/2" seam allowance. Sew with a regular length stitch outside the pins, backstitching at the pins. Sew with a large basting stitch between the pins. 


Step 8: Press the seam between the square and pieced square open and position the zipper on it, face down. Pin the zipper in place and use a zipper foot to stitch from edge to edge on each side of the zipper to secure it in place. 

Step 9: Pick the basting stitch open to expose the zipper. Open the zipper at least halfway. 

Step 10: Find and mark the center point on the left and right sides of the pieced square. Pin the raw ends of the ribbon strips at these center points. Tie a test bow; you may prefer to shorten the ribbon strips before sewing in place. Tip: Shortening one of the strips by 3-4" will help to create a bow with more equal ends, but try it yourself in case your tying technique is different.
Step 11: Baste the ribbon strips in place.

Step 12: Position pillow halves right sides together and pin. Double check that the zipper is at least halfway open! Make sure (and double check!) that the ribbon strips are tucked inside so you don't accidentally sew them in the seam.

Step 13: Sew around the outer three edges of the pillow using a 1/2" seam allowance. Turn right side out through the zipper opening. 

Step 14: Insert the pillow form into the pillow. Tie a bow with the ribbon strips.


Voila...the pillow present!


For a chance to win a bundle of Season's Greetings prints, leave a comment letting us know that you follow the blog (if you don't already, sign up in the sidebar at right using the email or blog reader option). In your comment, also let us know: gift wrapping--an opportunity for creativity or a labor of love? In other words, love it or hate it? Giveaway is open through Thursday, December 17th at 11:59 pm EST. This contest is now closed.

See the entire Season's Greetings collection here.

Check out each day of our Home for the Holidays Hop!
Day 1: The Ho Ho Ho Pillow
Day 3: Snowflake Pillow
Day 4: O Christmas Tree Pillow
Day 5: Peace on Earth Table Runner
Day 6: Snowflake Table Topper
Day 7Let It Snow Applique Quilt
Day 8: Cinnamon Scented Coasters