Wishing you health and happiness in 2016!
Thursday, December 31, 2015
Tuesday, December 29, 2015
Follow the Light
Follow the Light is a gorgeous collection of ocean-y blues by Monica Sabolla Gruppo. These marine-themed prints have a soft, painterly feel--they're beautiful!

Terry Albers used the Follow the Light fabrics combined with a few tonal Leather prints for her "Migration Quilt."
 |
| Download the free quilt pattern here. |
See the entire Follow the Light collection here.
Monday, December 28, 2015
Home for the Holidays Bundle Winners
Thanks to everyone who followed along with our Home for the Holidays Blog Hop. We hope you were inspired by the projects that were shared!
Here are the winners, selected randomly, for each of the featured bundles:
Day 1: The Ho Ho Ho Pillow
Rochelle
Day 2: The Present Pillow
Kathleen C.
Day 3: Snowflake Pillow
Sisylyn2
Day 4: O Christmas Tree Pillow
Mary Ann
Day 7: Let It Snow Applique Quilt
Kathy E.
Day 8: Cinnamon Scented Coasters
Sally
Congrats, winners! We'll be emailing you get your mailing addresses for the bundles.
Thursday, December 24, 2015
Wishing you...
...relaxing time with family and friends during the holiday season.
...health and happiness as we enter 2016.

Facebook Graphics, Happy Holidays Graphics at WishAFriend.com
...health and happiness as we enter 2016.

Facebook Graphics, Happy Holidays Graphics at WishAFriend.com
Tuesday, December 22, 2015
Thursday, December 17, 2015
Day 8: Home for the Holidays Blog Hop
Welcome to the last day of our Home for the Holidays blog hop!
This week we've be featuring a variety of small sewing projects to add holiday cheer to your house. These are fast and easy--you can still make them for this year, or bookmark the tutorial until after the holidays! We hope you enjoy these tutorials--and don't miss a chance to win a bundle of the fabrics featured each day!
Today, Stephanie Palmer from Late Night Quilter is sharing a tutorial on her blog for making quick Cinnamon Scented Coasters. A sweet-smelling quilted project--we love it! She used both the Peace on Earth and Season's Greetings fabrics.
Here's Stephanie:
I love to give my friends brightly colored baskets filled with goodies during the holiday season. I often fill them with cookies, tea and a cute mug. These cinnamon scented coasters are the perfect addition to your tea-themed basket to let your friends know you went the extra mile to make something special for them.
Please hop over to my blog for the tutorial, and enter to win A Quilter's Planner while you're there!
Thanks Stephanie!
We're also giving away a bundle of holiday fabric here in connection with Stephanie's tutorial. Leave a comment letting us know that you follow the Inspired by Fabric blog (if you don't already, sign up in the sidebar at right using the email or blog reader option). In your comment, also let us know: what's your favorite seasonal scent? Giveaway is open through Monday, December 21st at 11:59 pm EST. This contest is now closed.
See the entire Peace on Earth collection by Ro Gregg here.
See the entire Season's Greetings collection here.
Check out each day of our Home for the Holidays Hop!
Day 1: The Ho Ho Ho Pillow
Day 2: The Present Pillow
Day 3: Snowflake Pillow
Day 4: O Christmas Tree Pillow
Wednesday, December 16, 2015
Day 7: Home for the Holidays Blog Hop
Welcome to the seventh day of our Home for the Holidays blog hop!
This week we'll be featuring a variety of small sewing projects to add holiday cheer to your house. These are fast and easy--you can still make them for this year, or bookmark the tutorial until after the holidays! We hope you enjoy these tutorials--and don't miss a chance to win a bundle of the fabrics featured each day!
Today Shannon from Bottle Tree is here sharing a cool modern mini quilt--the Let It Snow Applique Quilt. We hope you enjoy her tutorial and the chance to win a bundle of her new Dryad collection.

Cool blues and blue/greens plus a touch of gold from Dryad would be so fun in this snowflake design on a solid white background!
Here's Shannon!


Icy blues and gold gave this quilt a modern, classy look. I satin stitched around the snowflake for a nice, clean finish.

This quilt is made using my Scrappy Applique technique, where I collage fabric scraps to create the applique piece; you can find my book, Scrappy Bits Applique and my Scrappy Applique patterns here. Our tutorial today shows you how to whip this up using one piece of fabric for the snowflake with my Simple Raw-Edge Applique technique.
Let it Snow Applique Quilt
Finished Size: 20" x 20"

Materials
- Fabric pieces to create the applique piece (a piece slightly larger than the template)
- Fusible Web* (a piece slightly larger than the template)
- Printed template to trace
- Marking utensil
- Thread that coordinates with the applique fabric
- Thread that blends in with the background fabric
- ¾ yds of white fabric for the background
- 1 yd fabric for backing and hanging sleeve
- batting approximately 27” x 27”
- ¼ yd of binding fabric (for 2.5” binding strips)
Make the Applique Piece
- Download and print the free pattern: Simple Raw-Edge Applique instructions and template
- Prepare the applique piece according to the instructions.
Finish the Wall Hanging
Make the Quilt
- Cut the background fabric to about 4” wider and taller than your finished size. This is optional, but I like to include the extra fabric in case there is any stretching during the quilting process, this way I can square it up nicely at the end.
- Center the prepared appliqué piece on the pressed background fabric, fuse or pin in place.
- Satin stitch around the outside edge of the appliqué piece.
- Finish quilt as desired.
Add a Hanging Sleeve
- Cut a strip of the leftover backing fabric 9” wide x the width of the finished quilt.
- Hem each of the shorter ends by folding toward the wrong side ¼” twice, then stitching along the fold.
- Fold the sleeve in half, wrong sides together, along the length then sew together with a ¼” seam. You will not need to turn the sleeve right-side out since you will place the seam against the backside of the quilt.
- Press the sleeve with the long seam down the center of one side.
- Pin the long edge of the sleeve to the back of the quilt, about 1” below the top edge and ½” from each side, with the long seam hidden against the back of the quilt.
- Pin the lower edge of the quilt, keeping the back seamed side flat against the quilt and shifting the pressed edge about ½” up toward the top fold. This creates a gap in the sleeve that will allow for the dimension of the hanging rod.
- Hand stitch both long edges and the back edge of the sleeve at each end to the quilt back, being careful not to stitch through to the front of the quilt.
Thanks Shannon!
See the entire Dryad collection by Shannon Brinkley here.
Check out each day of our Home for the Holidays Hop!
Day 1: The Ho Ho Ho Pillow
Day 2: The Present Pillow
Day 3: Snowflake Pillow
Day 4: O Christmas Tree Pillow
Tuesday, December 15, 2015
Day 6: Home for the Holidays Blog Hop
Welcome to the sixth day of our Home for the Holidays blog hop!
This week we'll be featuring a variety of small sewing projects to add holiday cheer to your house. These are fast and easy--you can still make them for this year, or bookmark the tutorial until after the holidays! We hope you enjoy these tutorials--and don't miss a chance to win a bundle of the fabrics featured each day!
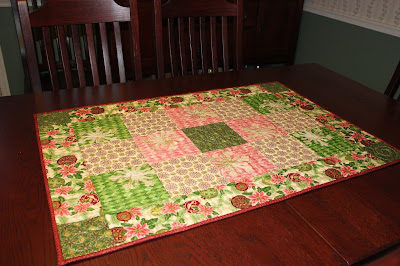
Today Dawn from Spring Water Designs is here sharing a snowflake table topper made using Ro Gregg's Peace on Earth collection. We love the large off-center fused snowflakes showcased on the beautiful coordinates in Ro's collection.
Here's Dawn:
This week I got to play with these luscious fabrics from Ro Gregg's Peace on Earth fabric line to make something for the Inspired by Fabric's Blog Hop :)
I decided to make a Holiday Table Topper for my dining room table.
To make it, you'll need:
1/2 yard of the Large Holiday print for the borders, cut:
(2) 4-1/2" x 30-1/2" strips
(2) 4-1/2" x 18-1/2" strips
1/4 yard of the Green Diamond print, cut:
(4) 6-1/2" squares
1/4 yard of the Pink Diamond print, cut:
(4) 6-1/2" squares
1/4 yard of the Dark Green print, cut:
(1) 6-1/2" square
(4) 4-1/2" squares
1/2 yard Cream with round snowflakes for setting squares, cut:
(6) 6-1/2" squares
3/8 yard Red print for binding, cut:
(4) 2-1/2" WOF strips
1/2 yard of Cream Textured print for applique snowflakes
After applying fusible web to the back side of some of the light textured fabric, I cut 8 snowflake shapes using my AccuQuilt GO! and the Holiday Medley Die #55043. If you don't have a GO! Cutter, you can use any snowflake shape that you want and scale it 4 - 5" in size. You can click Here for a link to a blog post from Inspired by Fabrics Home for the Holidays series last week that has some snow flake shapes you can download.
I laid out the snowflakes on the pink and green squares ~ and to give it the look of snowflakes softly falling, I did not center them on the squares, but off-set them on each square. Play here to find an arrangement that's pleasing to you...and if you like them centered on the squares, that's ok too ~ again, do what you like and have fun :)
Tip: You might want to pin the snowflakes in place once you choose the position of each one on the square, so they don't get shifted around when you are taking them to your pressing station. Snapping a photo of your overall arrangement is helpful too in case you get things turned around between pressing and sewing.
Then using a pressing cloth underneath to protect your ironing surface, fuse the snowflake in the position that you chose on each square. If you chose to off-set them, let them hang over the edges in some places like the one shown above.
Then once fused, trim off the extra snowflake parts that hang over the edge of the square.
I like the effect that occurs of the snowflakes "peeking" through the squares when they are placed on the edges like this.
Next I top stitched on the snowflake from tip to tip across each snowflake. If you prefer, this step can be done at the quilting stage to stitch through all layers of the quilt on the snowflakes.
Next sew the rows together, pressing each seam allowance toward the setting square. This helps to nest the seams together in the next step when you sen the rows together.
Then, add the long border strips to the sides, pressing the seams towards the border strips.
Finally, after adding the 4-1/2" green corner stone squares to the ends of the shorter border strips (again press those seams towards the border strip), sew these units to the ends of your table runner.
To complete your table topper, layer with batting, and backing fabric and quilt. I did a quick allover, swirly free motion design going around the snowflakes. Bind using the red strips you cut for binding.
Finally, add a few Holiday decorations, and...
Merry Christmas!
Thanks Dawn!
Head over to Dawn's blog to find out how you can win a bundle of the Peace on Earth fabrics. This contest is now closed.
See the entire Peace on Earth collection by Ro Gregg here.
Check out each day of our Home for the Holidays Hop!
Thanks Dawn!
See the entire Peace on Earth collection by Ro Gregg here.
Check out each day of our Home for the Holidays Hop!
Day 1: The Ho Ho Ho Pillow
Day 2: The Present Pillow
Day 3: Snowflake Pillow
Day 4: O Christmas Tree Pillow
Monday, December 14, 2015
Day 5: Home for the Holidays Blog Hop
Welcome to the fifth day of our Home for the Holidays blog hop!
This week we'll be featuring a variety of small sewing projects to add holiday cheer to your house. These are fast and easy--you can still make them for this year, or bookmark the tutorial until after the holidays! We hope you enjoy these tutorials--and don't miss a chance to win a bundle of the fabrics featured each day!
Today Connie from Freemotion by the River is here sharing a patchwork table runner made using Ro Gregg's Peace on Earth collection. Two coordinates help the large focal print to shine, and a tonal outer border adds the perfect frame.
Here's Connie!
I'm glad to be taking part in the Home for the Holidays Blog Hop!
The beautiful Christmas collection I'm working with is called Peace on Earth by Ro Gregg. The dark green border I used is from the Leather collection. The size of the table runner is 19" x 43".
Materials:
1/3 yard Christmas print
1/3 yard cream print
1/3 yard light green print
1/2 yard dark green
2/3 yard backing
Cutting:
Cream print:
cut one - 5 1/2" WOF (width of fabric) strip
sub-cut - three - 5 1/2" x 5 1/2" squares
cut two - 2 1/4" WOF (width of fabric) strips
sub-cut - 24 - 2 1/4" x 2 1/4" squares
Light green print:
cut two - 2 1/4" WOF (width of fabric) strips
sub-cut - 24 - 2 1/4" x 2 1/4" squares
cut three - 1 1/2" WOF (width of fabric) strips for first border
sub-cut - 2 - 1 1/2" x 12 1/2" pieces
sub-cut - 2 - 1 1/2" x 38 1/2" pieces
Christmas print:
cut two - 5 1/2" WOF (width of fabric) strips
sub-cut 12 - 4" x 5 1/2" rectangles
Dark Green Border:
cut three - 3" - WOF (width of fabric) strips
sub-cut 2 - 3" x 19 1/2" pieces
sub-cut 2 - 3" x 38 1/2" pieces
Dark Green Binding:
cut three - 2 1/2" WOF (width of fabric) strips
Make the Table Runner:
Use a 1/4" seam allowance for the entire project and press to the darkest fabric.
Sew the 2 1/4" squares together as shown below. Make 12 groups.
Then add the 3" x 19" pieces to the sides.
Add your batting and backing and quilt as desired. Use the 2 1/2" strips of dark green for the binding.
Enjoy your new table runner for the holidays!
Thanks Connie!
This contest is now closed.
See the entire Peace on Earth collection by Ro Gregg here.
Check out each day of our Home for the Holidays Hop!
Day 1: The Ho Ho Ho Pillow
Day 2: The Present Pillow
Day 3: Snowflake Pillow
Day 4: O Christmas Tree Pillow
Day 6: Snowflake Table Topper
Day 7: Let It Snow Applique Quilt
Day 8: Cinnamon Scented Coasters
Day 6: Snowflake Table Topper
Day 7: Let It Snow Applique Quilt
Day 8: Cinnamon Scented Coasters
Subscribe to:
Posts (Atom)


