Showing posts with label Shannon Brinkley. Show all posts

Wednesday, July 27, 2016

Summer of Sewing: Sew Many Strips Quilt Back

Welcome back to our Summer of Sewing tutorials here at Inspired by Fabric! 

We'll be featuring regular tutorials as part of our Summer of Sewing series, all using our newest fabric lines that you can find at your local quilt shop! Our tutorials will include a chance to win a bundle of the fabric line being used, so make sure to enter each time!


Last week we shared how to make Log Cabin-style triangle blocks for a modern quilt front; this week we're showing how to make a pieced back, 1600-style, using yardage plus the remaining strips from the Dryad Snack Pack. Of course, this design could be used for a quilt front, too! 


A Snack Pack of the Dryad collection by Shannon Brinkley

If you're unfamiliar with the concept of a 1600 quilt, the name comes from the fact that you use (roughly) 1600" of fabric--a full Snack Pack. It's easy sewing, and the quilt will look different every time based on how the strips are joined. In the basic 1600 quilt, you sew all the 2-1/2" strips short ends together into a long strip. Then you fold the strip in half, align the short ends, and sew the two strip halves together to make a strip half as long and twice as wide. You continue doing that until it's quilt shaped. Variations include cutting strips into shorter pieces to make it scrappier, adding squares of an alternate fabric between strips, and using diagonal seams (like for piecing a binding, for example). We're borrowing from that concept today to add some excitement to a quilt back as well as use up our Snack Pack strips. 

Let's get started!
You'll Need:
The remaining strips from your Dryad Snack Pack (shorter pieces plus full-length strips)
3-3/4 yards of white text print


Make the Quilt Back:
1. Begin by sewing partial strips to other partial strips or two full strips using a diagonal seam.  Trim and press open each join. Vary the fabrics and the strip lengths to create the most interest. 

2. Here's a look at some of our partial strips (leftover from the triangle blocks last week) sewn together. 


3. Sew all partial strips, pieced strips, and full strips together to make one long strip. Our strip is about 26 yards long, which is plenty to create the quilt as you see it here.
4. Align the short ends of the long strip, right sides together. Begin sewing down the long edges of the strip to make a pieced strip that is two strips wide (2x-wide) and half as long. Tip: If you're comfortable with the speed, now is the perfect time to adjust your sewing machine to the highest speed--lots of long, straight sewing stitches! When you get near the end, you'll need to cut the strip into two pieces to finish sewing. Here's what a portion of the 2x-wide strip will look like: 


5. Fold the 2x-wide strip over on itself, right sides together, so the short ends meet. Sew down the length again. You'll need to cut the strip near the end.  


6. Your pieced strip is now 4x-wide:

7. Fold the pieced strip over again and repeat to make a unit that is 8x wide. 

8. Follow the diagram below to cut the pieces for the background. Note that this fabric is directional, and the cutting takes that into account. Cut one 88" long piece for the right side of the quilt. Cut the remaining section into two 21"-wide pieces. These will become the left side. 

9. Sew the 21" pieces short ends together. You'll need to trim this strip to measure 88" as well. Here are the background pieces of your quilt back. Stitch the pieced section between them. 


Here's a look at the entire quilt back. because it is a backing, it is sized larger than the quilt front from last week. The extra will be trimmed off after you quilt it. 

A close-up of the quilt back. Love that text fabric with the splash of color in the middle, plus the interest created from the strips running vertically contrasting with the horizontal text! 

If you missed the tutorial for making the quilt front from Dryad Snack Pack strips, find it here!

 See the entire Dryad collection here and ask for it at your local quilt shop.

For a chance to win a Snack Pack of Dryad, make sure you follow us on the blog (options are in the right hand sidebar) and leave a comment letting us know you do, as well as telling us if you've ever made a quilt with a pieced back. Giveaway is open through Sunday, 31st at 11:59 pm CST. We'll randomly draw a winner and announce it on the blog next week. Make sure we have a way to get in touch with you if you are selected as the winner!  

Congratulations to the winner of last week's Dryad snack pack: PK Sews
We'll contact you for your mailing information! 

Wednesday, July 20, 2016

Summer of Sewing: Triangle Block Quilt

Welcome back to our Summer of Sewing tutorials here at Inspired by Fabric! 

We'll be featuring regular tutorials as part of our Summer of Sewing series, all using our newest fabric lines that you can find at your local quilt shop! Our tutorials will include a chance to win a bundle of the fabric line being used, so make sure to enter each time!


This week and next, we'll be sharing tutorials to make a lap-sized quilt top using a Dryad strip set plus additional yardage. This week we'll demonstrate how to make these triangle strip blocks (a variation on a Log Cabin block) for the quilt front, and next week we'll show you how to make a pieced back using additional strips.  This is definitely a quilt with modern appeal--we think you'll like it! 


A Snack Pack of the Dryad collection by Shannon Brinkley

Let's get started!
You'll Need (to make the quilt top only):
1 Dryad snack pack (we'll use the leftovers next week)
3-5/8 yards blue branch print
Ruler with a 60-degree angle line on it

Cutting:
From the blue branch print:
Cut one 5" x 42" strip
(See diagram for quilt background cutting in step 8)


Make the Triangle Blocks:
1. Align your ruler as shown in the photo with the 60-degree line parallel to the strip edge. Cut to create one side of the triangle. 

2. Flip over the strip and the ruler and align the 60-degree line along the left triangle edge. Cut to create the triangle. Cut a total of eight triangles. 

3. Select a 2-1/2" wide strip from the Snack Pack. Sew to one side of the triangle, making sure to leave at least 2" of strip on both sides of the triangle. 

4. Use your ruler to trim the strip edges even with the triangle. This is why you need the extra 2" on either side!

5. Choose another strip and sew to an adjoining side, again making sure you have 2" of extra strip on both sides of the triangle. 

6. Trim the second strip and work your way around the triangle, adding and trimming strips until all sides have two strips on them. This is your block. It should measure approximately 20" from point to point and 17" tall. Make a total of eight triangle blocks. 

7. Lay out the eight triangle blocks in row, alternating triangles pointing up with triangles pointing down, and join them together. Trim both ends of the triangle row 1/4" past the last triangle's point, as shown. Your row should measure approximately 50-1/2". Trim long edges if needed to ensure your row is straight, but try not to cut off triangle points. 

8. Referring to the Cutting Diagram below, cut the three pieces needed from the blue branch yardage to create the background. Note that cutting like this will only work with a non-directional fabric. 

9. Referring to the diagram below, sew the two 50-1/2" pieces together to make the quilt background top. The remaining piece is for the quilt background bottom.


10. Sew the triangle row between the quilt background top and bottom pieces. You may need to trim the sides slightly after all three pieces are added together. Your quilt top is done! 

Love these triangle blocks! You could make a whole quilt of them!

Be sure to come back next week for the tutorial on making the pieced backing using additional Dryad Snack Pack strips!

 See the entire Dryad collection here and ask for it at your local quilt shop.

For a chance to win a Snack Pack of Dryad, make sure you follow us on the blog (options are in the right hand sidebar) and leave a comment letting us know you do, as well as telling us if you've ever made a project using pre-cut 2-1/2" strips. Giveaway is open through Sunday, July 24th at 11:59 pm CST. We'll randomly draw a winner and announce it on the blog next week. Make sure we have a way to get in touch with you if you are selected as the winner!  

Congratulations to the winner of the Fun in the Sun bundle: Amanda Best
We'll contact you for your mailing information! 

Saturday, June 11, 2016

Pillowcase Time!

We've teamed up again in 2016 with American Patchwork & Quilting for the 1 Million Pillowcase Challenge. The concept is simple: make a pillowcase and donate it to an organization in your community. Add your donation numbers to the online pillowcase counter and watch as the number creeps closer to the 1,000,000 goal. (The total number of pillows donated is almost 687,000 right now!) A small amount of fabric and a half hour's worth of sewing is such a gift to someone's life! 

Here are the latest free patterns on AllPeopleQuilt.com, shown in our fabrics. 


Pattern 57: Courthouse Steps Band
featuring Nature Trail
Photo from AllPeopleQuilt.com; download the pattern here.


Pattern 56: Travel Pillowcase
featuring Butterflies Are Free by Ro Gregg
Photo from AllPeopleQuilt.com; download the pattern here.


Pattern 55: Yo-Yo Band
featuring Bird Song
Photo from AllPeopleQuilt.com; download the pattern here.


Pattern 54: Building Blocks Band
featuring Shannon Brinkley's Dryad
Photo from AllPeopleQuilt.com; download the pattern here.

Learn more about American Patchwork & Quilting's One Million Pillowcase Challenge here.

Friday, February 12, 2016

Dryad Blog Hop Day 9

It's Day 9 of the Dryad blog hop!


Head over to 
Kristi's blog today--she's sharing one of her patterns done up in Dryad fabric! Such a great modern quilt! You'll also have a chance to win some Dryad fabric while you're there!

Here's the schedule for the rest of the hop:

2/2 Shannon Brinkley @ Bottle Tree
2/4 Angela Walters @ Quilting Is My Therapy
2/5 Aurifil
2/8 Casey York @ Studiolo 
2/10 Rebecca Bryan @ Bryan House Quilts
2/11 Stacey Day @ Stacey in Stitches
2/12 Kristi Schroeder @ Initial K Studio

Thanks so much for following along through our Dryad Blog Hop! We hope you enjoyed seeing many different ideas for using Shannon's fabric (and entering for a chance to win some too!)
p.s. We're now on Instagram! Come follow us for more inspiration!


Wednesday, February 10, 2016

Dryad Blog Hop Day 7

It's Day 7 of the Dryad blog hop!


Head over 
Rebecca's blog today to see the quilt she's making using a snack pack of Dryad prints. You'll also have a chance to win some Dryad fabric while you're there!


Here's the schedule for the rest of the hop:

2/2 Shannon Brinkley @ Bottle Tree
2/4 Angela Walters @ Quilting Is My Therapy
2/5 Aurifil
2/8 Casey York @ Studiolo 
2/10 Rebecca Bryan @ Bryan House Quilts
2/11 Stacey Day @ Stacey in Stitches
2/12 Kristi Schroeder @ Initial K Studio

p.s. Fabri-Quilt is now on Instagram! Come follow us for more inspiration!

Tuesday, February 9, 2016

Dryad Blog Hop Day 6

It's Day 6 of the Dryad blog hop!


Head over to C&T's blog today to find a free pattern for the Fallen Leaves Throw Pillows from Shannon's book, Scrappy Applique Bits. You'll also have a chance to win a copy of her book and some Dryad fabric while you're there!

Here's the schedule for the rest of the hop:
2/2 Shannon Brinkley @ Bottle Tree
2/4 Angela Walters @ Quilting Is My Therapy
2/5 Aurifil
2/8 Casey York @ Studiolo 
2/10 Rebecca Bryan @ Bryan House Quilts
2/11 Stacey Day @ Stacey in Stitches
2/12 Kristi Schroeder @ Initial K Studio

p.s. Fabri-Quilt is now on Instagram! Come follow us for more inspiration!

Monday, February 8, 2016

Dryad Blog Hop Day 5

It's Day 5 of the Dryad blog hop!


Head over to Casey's blog today to see the quilt she made using Shannon's Dryad fabrics (hint: it's tree themed!).  You'll also have a chance to win some Dryad fabric while you're there. 

Here's the schedule for the rest of the hop:
2/2 Shannon Brinkley @ Bottle Tree
2/4 Angela Walters @ Quilting Is My Therapy
2/5 Aurifil
2/8 Casey York @ Studiolo 
2/10 Rebecca Bryan @ Bryan House Quilts
2/11 Stacey Day @ Stacey in Stitches
2/12 Kristi Schroeder @ Initial K Studio

p.s. Fabri-Quilt is now on Instagram! Come follow us for more inspiration!

Friday, February 5, 2016

Dryad Blog Hop Day 4

It's Day 4 of the Dryad Blog Hop!


Head over to Aurifil's blog for a great interview with Shannon, including more information about her coordinating thread line and how she uses it. In addition to the bundle of Dryad, Aurifil is offering a  coordinating Aurifil Designer Collection--12 gorgeous spools of 50wt thread!

Here's the schedule for the rest of the hop:
2/2 Shannon Brinkley @ Bottle Tree
2/4 Angela Walters @ Quilting Is My Therapy
2/5 Aurifil
2/8 Casey York @ Studiolo 
2/10 Rebecca Bryan @ Bryan House Quilts
2/11 Stacey Day @ Stacey in Stitches
2/12 Kristi Schroeder @ Initial K Studio

p.s. Fabri-Quilt is now on Instagram! Come follow us for more inspiration!


Thursday, February 4, 2016

Dryad Blog Hop Day 3

It's Day 3 of the Dryad Blog Hop!


Head over to Quilting Is My Therapy to see what Angela Walters has done with Shannon's fabrics (and enter to win a bundle of Dryad for yourself!). 

Angela is also offering 10% off Dryad fabrics during the hop, so now is your chance to stock up!

Here's the schedule for the rest of the hop:
2/2 Shannon Brinkley @ Bottle Tree
2/4 Angela Walters @ Quilting Is My Therapy
2/5 Aurifil
2/8 Casey York @ Studiolo 
2/10 Rebecca Bryan @ Bryan House Quilts
2/11 Stacey Day @ Stacey in Stitches
2/12 Kristi Schroeder @ Initial K Studio

Learn more about Shannon and her Dryad line in our original blog post debuting the fabric, here.

p.s. Fabri-Quilt is now on Instagram! Come follow us for more inspiration!


Wednesday, February 3, 2016

Dryad Blog Hop: Messenger bag tutorial

Welcome! Thanks for visiting on our day of the Dryad Blog Hop! If you haven't seen Shannon Brinkley's Dryad collection yet, you'll get a thorough introduction to it over the two weeks of this blog hop. Be sure to ask for it at your local quilt shop!

Today we're sharing a tutorial for a quilt-as-you-go messenger bag using nine 2-1/2" precut strips from the Dryad snack pack plus a little yardage for the bag back and lining. Enjoy!

You'll Need:
1 Dryad Snack Pack (you'll use nine 2-1/2" strips and can save the rest for another project...or a few more tote bags?!)
1 fat quarter of the gold/blue focal print
1/2 yard of the blue twig print
Two 16" squares of batting
One 1-3/4" x 42" strip of batting

Cutting:
From the Dryad Snack Pack, cut the following lengths:
Coral Twig: 6-1/2"
Gold Bark Lines: 7-1/2"
Blue Twig: 6-1/2"
Floral Branches: 5-1/2"
Gray Wood Print: 8-1/2"
Gold/Blue Focal: 12-1/2" 

From a 2-1/2" wide text print strip, cut the following lengths: 
(you should be able to get all of these pieces out of one strip)
9-1/2"
8-1/2"
8-1/2"
7-1/2"
6-1/2
2-1/2"

Reserve the remaining blue twig and text print strip for the handle.

From the gold/blue focal print:
One 15" x 14" piece for bag back
One 8" x 11" piece for pocket

From the blue twig print:
Two 14" x 12-1/2" pieces for lining

Make the Bag:
Step 1 Sew each text piece to the colored print strip as indicated:
8-1/2" text strip + 6-1/2" coral twig strip
7-1/2" text strip + 7-1/2" gold bark strip
8-1/2 text strip + 6-1/2" blue twig strip
9-1/2" text strip + 5-1/2" floral branch strip
6-1/2" text strip + 8-1/2" gray wood strip
2-1/2" text strip + 12-1/2" gold/blue focal strip


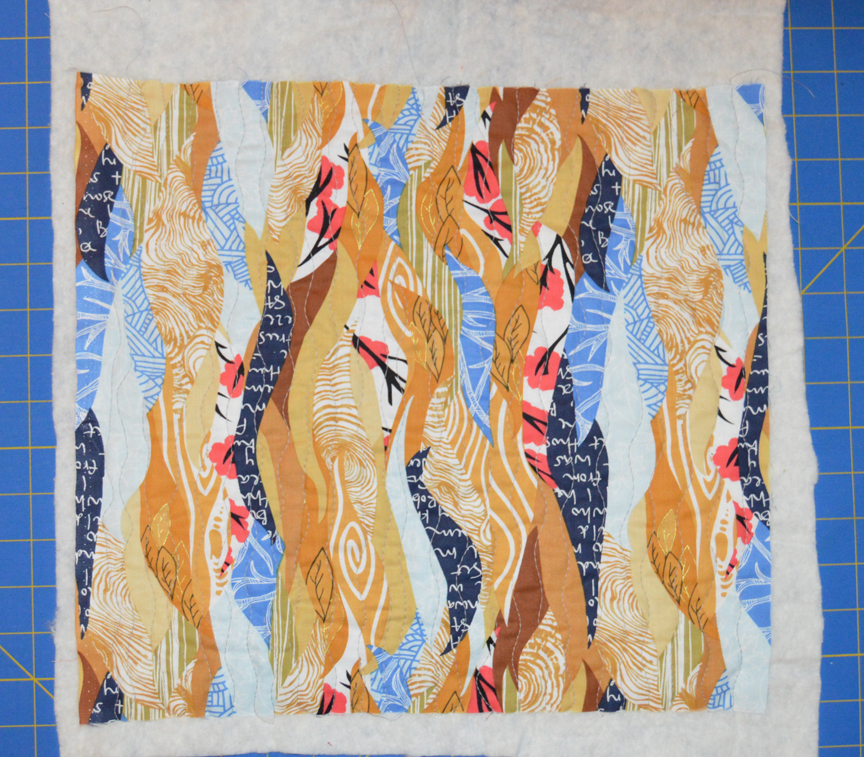
Step 2 To begin the quilt-as-you-go method for the bag front, layer the two middle strips right sides together in the center of a 16" square of batting and pin in place. 


Step 3 Stitch using a 1/4" seam allowance and press the strips open.


Step 4 Continue adding strips from the center out. 


Step 5 If you like (we did!), quilt some free motion lines on top of the bag front. Trim the bag front to measure 14" wide x 12-1/2" high. 


Step 6 Layer the 15" x 14" gold/blue focal print piece on the second 16" batting square and quilt as desired. Trim to measure 14" x 12-1/2".


Step 7 Sew the bag front and back right sides together along the sides and bottom. Turn right side out. 
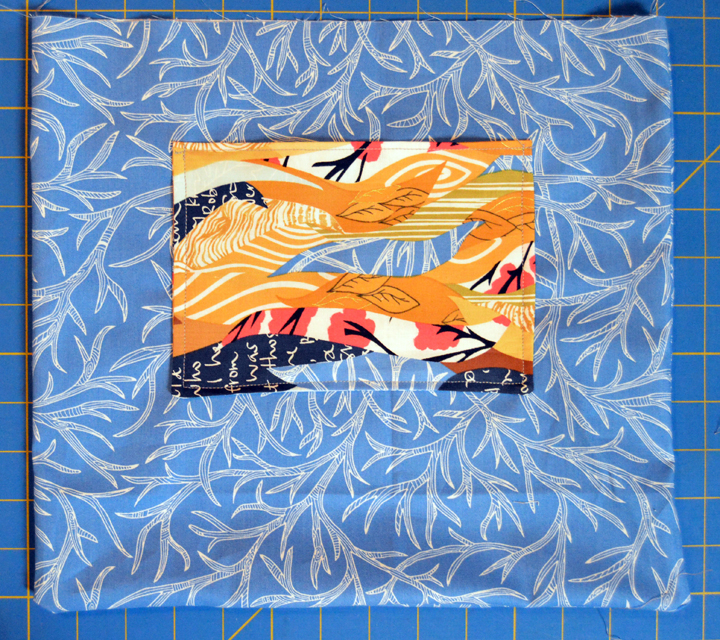
Step 8 Fold the 8" x 11" gold/blue focal print piece in half wrong sides togethers so it measures 8" x 5-1/2". Stitch along the two short sides and the long open edge, leaving an opening for turning. Turn right side out.


Step 9 Topstitch along the top folded edge and press the raw edges from the opening in 1/4". Measure 2-1/2" down from a long edge of the 14" x 12-1/2" blue twig lining piece and position the top stitched edge of the pocket there, centered from left to right. 


Step 10 Topstitch along both sides and the bottom to secure the pocket to the lining piece. Sew the lining pieces right sides together along the sides and bottom, leaving an opening for turning. 


Step 11 To make the handle, sew the remaining blue twig and text print strips right sides together lengthwise. Press the outer long edges in 1/4". Tuck the 1-3/4" x 42" batting strip into one of the strips and fold the 1/4" edge over. 


Step 12 Fold the other strip over the batting and line up the pressed edges. Pin and then topstitch 1/4" from the pressed edges to secure. Topstitch 1/4" from the opposite seam edge as well.


Step 13 Pin a short end of the strap to the bag front 1/2" from the side seam. Making sure the strap isn't twisted, pin the opposite end to the bag back 1/2" from the opposite side seam. (Note: if you prefer two shorter handles, cut the strip in half and pin the short ends of each strip 2" in from the side seams.) 


Step 14 Tuck the outer bag and strap into the bag lining with right sides facing. Pin the raw edges along the top together and then stitch all the way around. 


Step 15 Turn the bag right side out, slipstitch the bag lining closed, and tuck the lining into the bag. Topstitch around the top edge of the bag. You're done!

The bag back:

A peek into the bag (and the pocket!)


Thanks for stopping by for our day on the Dryad blog hop! 


Now for the giveaway!! For a chance to win a bundle of Dryad, sign up to follow our blog.  Leave a comment here letting us know that you are signed up, as well as your favorite print in the Dryad collection. This giveaway is open through 2/12. Winners will be randomly chosen after the blog hop ends. Good luck!

Be sure to follow along with the hop for more chances to win fabric, books, and Aurifil thread!
2/2 Shannon Brinkley @ Shannon Brinkley Studio
2/4 Angela Walters @ Quilting Is My Therapy
2/5 Aurifil
2/8 Casey York @ Studiolo 
2/10 Rebecca Bryan @ Bryan House Quilts
2/11 Stacey Day @ Stacey in Stitches
2/12 Kristi Schroeder @ Initial K Studio

Also, Angela Walters is offering 10% all Dryad prints during the blog hop. Head over to her shop to take advantage of this deal!
p.s. Fabri-Quilt is now on Instagram! Come follow us for more inspiration!