Thursday, May 19, 2016

Garden Rendezvous

Here's a quick look at Ro Gregg's gorgeous Garden Rendezvous collection. Decadent irises, an intricate floral stripe, a panel print, and a soft spring colorway. After Market we'll be sharing Ro's thoughts on this collection, as well as an incredible quilt made using fussy-cut hexies. Stay tuned for more!


The panel, with a lovely lattice border--the perfect entrance to a garden full of irises!


And of course there's a free pattern for using this panel: 
"Garden Rendezvous" quilt by Dawn Stewart
Find the free quilt pattern for this quilt here

This line also includes two different pre-quilted combinations:


Aren't these rich colors so appealing? 

See the entire Garden Rendezvous collection here and ask for it at your local quilt shop.
Find the free quilt pattern here.

Tuesday, May 17, 2016

Opposites Attract

We're on our way to Salt Lake City for Quilt Market, but will be giving you a few sneak peeks of what we'll be showing to quilt shop owners during this industry-only show. (And what we're sharing will be arriving in your local quilt shops soon, so watch for them!)

Last week we showed you Barbara J. Eikmeier's new collection, Vintage 30's Ruby's Treasures. Today we're sharing another new line that we're super excited about--Opposites Attract. These fabrics have so many possibilities! 

Opposites Attract


Like red, black and white together, like in this Opposites Attract quilt designed by Pine Tree Country Quilts? Done. Check out our free quilt pattern below for this cool Log Cabin variation quilt. 
Find the free quilt pattern here.


Prefer just black and white, or just red and white? This collection has plenty of choices! 

See the entire Opposites Attract collection here and ask for it at your local quilt shop. 
Find the free quilt pattern here.

Friday, May 13, 2016

Introducing...Vintage 30's Ruby's Treasures!

We've been talking around it all week, and today's the day to share it! Next week at Quilt Market we'll be debuting Barbara J. Eikmeier's Vintage 30's Ruby's Treasures collection, created in conjunction with McKim Studios. This fabric line pairs popular 30s-style prints with the embroidery designs of Ruby Short McKim. 


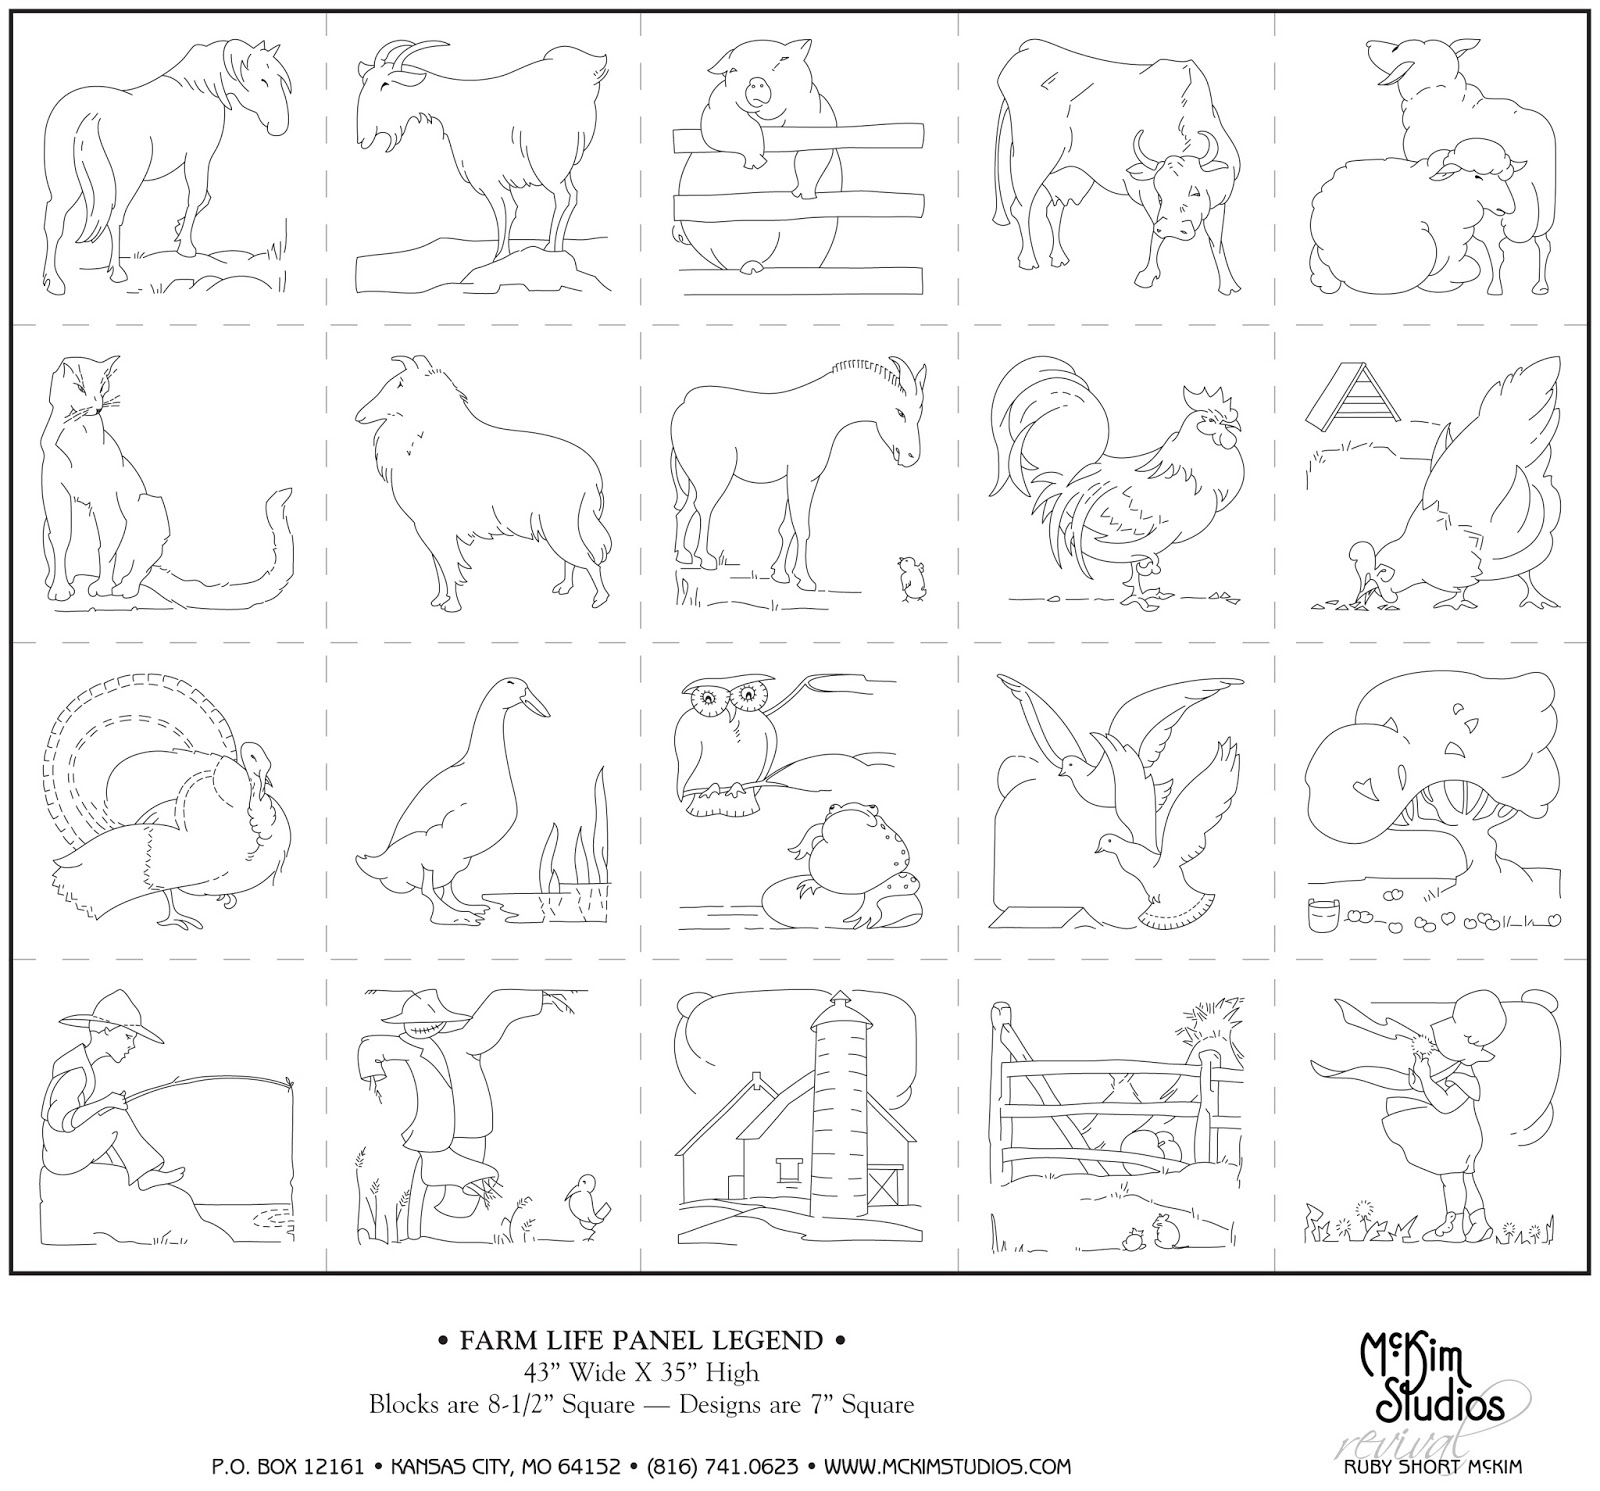
And the panels:


Q. Where did the inspiration for these fabrics come from?
Barb: We started with fabric that was in Ruby’s archives. We found these little kits that had actual fabrics in them and we ended up using three—the pink diagonal plaid with little flowers on it is my favorite. We also used the blue and yellow tulips, and the stripe.


Q. Where else did you find fabric inspiration?
Barb: There are two scattered little dot prints. I have a stuffed Scottie dog my grandmother made me out of 2” squares. The dot print came from the dog.


The little flower sprigs came from Sunbonnet Sue blocks that my 97-year-old friend’s sister had made.

I also “shopped” my friend’s 1930s DWR quilt, and chose a print from there.


The other prints came from 1930s scrap bags that I have bought at estate sales over the years.


Q. Tell us about the embroidery panels.
Barb: Because 2016 is the 100th anniversary of Ruby’s first pattern being published, her granddaughter Merrily wanted to do a big celebration. When we first started talking, I thought it would be nice to include some of the panels. I personally like preprinted panels—don’t have to trace. In the McKim Studio Revival, these two (farm life and flower garden) were the most popular. The blocks are 8-1/2” square between the dotted lines and are printed on a solid antique white. I’m really excited about all the opportunities to use these panels!

Q. And how do the Painter’s Palette Solids fit in?
Barb: We selected nine solids from the Painter’s Palette collection that coordinate beautifully with the 30s prints. You’ll see these solids in upcoming projects featuring Vintage 30’s Ruby’s Treasures.
 
From upper left: 121-005 Bright Yellow, 121-024 Orchid, 121-025 River, 121-032 Waterfall, 121-039 Jade, 121-049 Coral, 121-069 Carnation, 121-078 Bubble Gum, 099 Rice Paper

See the entire Vintage 30's Ruby's Treasures collection here and ask for it at your local quilt shop.

p.s. Don't forget our free pattern! Barb designed the Ruby's Treasures quilt and you can download it from our website. 
Download "Ruby's Treasures" by Barbara J. Eikmeier here.


Thursday, May 12, 2016

Meet Ruby Short McKim

If you're a quilter, you may be familiar with Ruby Short McKim. Under the name McKim Studios, Ruby had a 21-year career as a quilt designer, publishing patterns in the Kansas City Star, through a mailer order business, and in a book, One Hundred and One Patchwork Patterns.

In the February/March 2016 issue of Quilter's Newsletter magazine, Barbara J. Eikmeier authored an article about Ruby and her prolific quilting career. The article is a fantastic preview for what we'll be sharing tomorrow--a peek at Barb's brand-new fabric collection, Vintage 30's Ruby's Treasures, produced in conjunction with McKim Studios. We talked to Barb about her connection to Ruby and her work. 

Q. How did you connect with Ruby's work and studio?
Barb: I heard Ruby's granddaughter, Merrily McKim Touhey, speak at an event about a year ago. 2016 is the 100-year anniversary of the publication of Ruby's first pattern, and the McKim Studios was planning a year-long celebration. Ruby is really well-known in quilt circles, especially in quilt history. 

Q. Tell us a bit about the article you wrote.
Barb: The QNM article celebrates 100 years of Ruby Short McKim. I got information from research papers done about Ruby, as well as her book. Merrily shared information with me, as well as Ruby's archives. The article shows many of Ruby's quilts and embroidery designs, all from the archives as well. 

Q. How did this connection lead to a fabric collection?
Barb: I wanted to do something to commemorate the anniversary. Ruby was from Independence, MO, Paintbrush Studio is a Kansas City company, and the Kansas City Star, which printed Ruby's first pattern, is still in printing. 


Q. Describe your personal connection with Ruby. 
Barb: I feel like I'm kindred spirits with Ruby. We're both quilters; she had so many different things going on, different areas of interest, and I do too. The fabric collection that we're launching is called Vintage 30's Ruby's Treasures, and it's a combination of 30's prints and two panels of Ruby's embroidery designs.  

Come back to learn more about the fabric line (and see it!) tomorrow!

Read the article yourself! Find the February/March 2016 issue of Quilter's Newsletter magazine here.


Tuesday, May 10, 2016

Goose Crossing

Do you love a great two-color quilt?
Make sure you catch Barbara J. Eikmeier's Goose Crossing quilt, featured in the March/April 2016 issue of Love of Quilting! Barb used her Vintage Shirting & Dress Prints collection to create this quilt, inspired by an antique. Keep reading; Barb shared more information about her design below. 

"Goose Crossing" by Barbara J. Eikmeier; machine quilted by Denise Mariano;
featured in Fons & Porter's Love of Quilting March/April 2016

Q. What inspired this quilt?
Barb: An antique quilt that belongs to my friend Lynn and was made by her grandmother. I've borrowed the quilt for my blues talk and wanted to try making it. On the antique version, the colors are reversed. When I drew it, I didn't love it, but then I switched the colors and it became this great quilt.

Barb's version
the antique version

antique version close-up
Q. Tell us why you like two-color quilts. 
Barb: I especially like blue and white, and also red and white. I think they’re striking and kind of timeless. I just don’t get tired of them; they speak to me. When you use fabrics that are really similar like in this quilt, I call it using fabrics that are the same but different. It’s like selecting from a menu—don’t have to really worry about placement. They can be all mixed up. This quilt uses all the blues from my Vintage Shirting collection. 

Q. What do you like best about this quilt?
Barb: I like that it's easy to make--I super sized the blocks--they're 18" square in my version--and the geese go every which way. I made the flying geese units using the Fons & Porter flying geese ruler. I like to cut my triangles to the right size and sew them together, rather than trimming larger pieces. I think it's time saving. It's just a fun quilt to make. 


Q. Tell us some fun facts about this quilt.
Barb: There are multiple ways to assemble this quilt. We featured one in the TV series, and a different method in the magazine. 
Also, I had my first celebrity encounter because of this quilt--my husband and I were out walking the dog and a lady stopped us to tell me how much she liked the quilt in the video. I didn't even know her! 

Q. How did you name this quilt?
Barb: I named it as a tribute to my old neighborhood. There were two ponds on either side of the road, and the geese would walk across the road. They put up a sign for the geese--like a deer crossing sign. 

See the entire Vintage Shirting & Dress Prints collection here and ask for it at your local quilt shop.
Learn more about Barbara and her work here.
Find the kit to make this quilt here.
Find Fons & Porter's Love of Quilting magazine here. (This quilt was also featured on the Love of Quilting” 2700 TV series.)

Friday, May 6, 2016

Paint Chip Mini Quilt Tutorial

We've talked a lot about our new Painter's Palette Solids here on the blog. Why? Because we love them and we know you will too! 

Probably our cutest pre-cut packaging is our Paint Chips--a pack of 2-1/2" squares of all 84 colors. It's a great way to get your hands on all of the colors!

We thought it would be fun to come up with a design that features all 84 of these squares. Today, we're sharing that tutorial, taking you from this: 

To this:

This mini quilt measures 24-1/2" wide x 26" tall and uses a Paint Chip pack plus Smoke solid, Lipstick solid, and backing fabric. 

Here's how to make it:

You'll Need
One paint chip pack (eighty-four 2-1/2" precut solid squares)
7/8 yard Smoke solid (121-090)
1/4 yard Lipstick solid (121-066)*
7/8 yard backing fabric
29" x 30" piece of batting

Cutting
From the Smoke solid:
(20) 2-1/2" squares
(3) 1-1/4" x 42" strips for binding*
(2) 3-1/2" x 24-1/2" strips
(3) 2-1/2" x 24-1/2" strips
(1) 2" x 24-1/2" strip

From the Lipstick solid:
(3) 1-1/2" x 42" strips for binding*

*We used a flange-style two-color binding. If you prefer a traditional binding, cut Smoke strips the way you normally would to finish the quilt. 

Making the Quilt Top
Note that the diagrams don't show the entire row specified; they're intended to provide an example of what part of the row should look like. 
1. Add (4) 2-1/2" Smoke squares to the paint chip pack for a total of (88) squares to use in the pieced rows. The remaining (16) Smoke squares will be used in step 4 to make half-square triangles (HSTs). Select (12) 2-1/2" squares in assorted colors and sew together into a square row. Make (2) rows of (12) squares each. 


2. Select (16) 2-1/2" squares in assorted colors and cut each in half to make 1-1/4" x 2-1/2" rectangles. Sew the (32) rectangles together to make a rectangle row.


3. Select (16) 2-1/2" squares in assorted colors and cut each in half to make 1-1/4" x 2-1/2" rectangles. Sew (2) assorted rectangles together and cut in half to create (2) two-patches. Make a total of (32) two-patches. Sew two-patches together in pairs to create four-patches, and join the (16) four-patches together to make a four-patch row.

4. Draw a diagonal line on the wrong side of the remaining (16) Smoke squares and (8) additional colored squares. Pair each marked square with an unmarked square and stitch 1/4" on either side of the marked line. Cut apart on the line and press HST units open. Trim each to measure 2" square. You'll have 32 Smoke/color HST units and 16 color HST units.

5. Noting orientation, sew together (16) Smoke/color HST units to make a Smoke/color HST row. Make 2 rows.

 6. Noting orientation, sew together (16) color HST units to make a color HST row. 

7. Referring to the quilt image and measurements listed below, sew the pieced rows and Smoke strips together to finish the quilt top.


Finishing
1. Layer the backing right side down, batting and quilt top right side up. Quilt as desired. Trim batting and backing even with quilt top. 
2. We used a flange-style binding to add a pop of color along the edge. Use the (3) 2-1/2" x 42" Lipstick strips and (3) 2-1/4" x 42" Smoke strips and follow this tutorial to bind the mini quilt. If you'd prefer a traditional binding, cut strips and bind your quilt as desired. 

A close-up of the flange binding

We hope you enjoyed our Paint Chip Sampler tutorial! See all 84 Painter's Palette Solids colors here and ask for them (and the Paint Chip pack!) at your local quilt shop.

p.s. If this quilt looks familiar, you might have seen a sneak peek of it on Instagram! Sign up to follow us so you see all of the pics we post! 

Tuesday, May 3, 2016

Feeling the Blues with Vera Cruz

This spring, we've had two quilts made with the lovely florals of Vera Cruz featured in magazines. These quilt patterns have more in common than just the Vera Cruz prints they use--both are perfect for blue lovers! 

In the January/February issue of Love of Quilting, Diane Tomlinson used just four blues and the traditional apple core shape to make a cool curvy quilt. Doesn't it create a fantastic illusion of colors weaving over and under each other?


"Core Connection" by Diane Tomlinson;
featured in Love of Quilting Jan/Feb 2016

Find the Vera Cruz collection here.
Find the kit for this project here
Find Fons & Porter's Love of Quilting here.


Then in the March/April issue of Quilting Quickly, Lisa Swenson Ruble used a snack pack of 2-1/2" wide strips plus plenty of blue floral to sew a variation of the barn raising design. The pieced strips add so much movement to this design! 

"Modern Barn Raising" by Lisa Swenson Ruble and machine quilted by Diane Oakes;
featured in Quilting Quickly March/April 2016

Find the Vera Cruz collection here.
Find the kit for this project here
Find the video tutorial for this project here
Find Fons & Porter's Quilting Quickly here.