Showing posts with label mini quilt. Show all posts

Thursday, June 22, 2017

Patriotic Palette Blog Hop: Day 1


We're continuing to embrace everything red, white and blue! 
We sent 8 designers a bundle of red, white and blue Painter's Palette Solids to play with. 

The colors? White, Claret, Crimson, Tomato, Patriot, French Blue and River.
 Between now and July 4th, we'll be sharing a variety of inspiring fabric art made by them--tutorials, show-and-tell with a peek into the design process, and more! Come back tomorrow for another red, white and blue design!


We've used 7 fat quarters (3 red, 3 blue and 1 white) to create this fun little fireworks mini. Have fun! 

Let's get started!
You'll Need: 
1 fat quarter each: White, Patriot, French Blue, River, Claret, Crimson, and Tomato
Fusible web
1/2 yard backing fabric
12" x 27" piece of batting
How's this for a patriotic bundle?!
(from left: 121-000 White, 121-111 Patriot, 121-131 French Blue, 121-025 River, 121-051 Claret, 121-002 Crimson, and 121-134 Tomato)

Cutting:
From the white:
(3) 7" squares
(4) 2" x 6-1/2" pieces (reserve remaining piece of strip for piecing the long borders)
(2) 2" x 21" strips

From each of the 3 blues and 3 reds:
(1) 2-1/4" x 21" strip for binding
(1) 7" square

From the fusible web:
(6) 7" squares

Make the Quilt: 
Step 1: Adhere a 7" square of fusible web to a 7" Tomato square. Using a thread spool or other small round object, trace a circle slightly off center on the paper side of the fusible web.


Step 2: Using a ruler, draw lines radiating out from the center circle as shown. Note: We marked the rays that would be red with a pencil squiggle to help visualize the negative space the lines will create. Create as many or as few rays as you like, varying widths and angles. 


Step 3: Cut out the negative areas to create a fireworks shape that looks like this: 


Step 4: Repeat with the 7" Patriot square--your center circle and rays will be slightly different from the Tomato shape, and that's good! 

Here's what both your fireworks shapes will look like:


Step 5: Position both fireworks shapes on a 7" white square. Try with both the Patriot and Tomato fireworks shape on top (see photos below), and experiment with rotating one of the shapes until you find the look you like. 


Step 6: When you are satisfied with your block, remove the paper and fuse the fireworks shapes onto the white square. 


Step 7: Trim block to measure 6-1/2" square.


Step 8: In the same way, make 2 additional blocks, pairing the River square with the Claret square and the Crimson square with the French Blue square.

Step 9: Lay out the 3 blocks alternating with (4) 2" x 6-1/2" white pieces. 


Step 10: Sew the blocks and white pieces together. Sew the (2) 2" x 21" white strips and remaining 2" x 14" white strip short ends together into a long strip. Cut (2) 24-1/2" lengths. Sew to the long sides of the quilt. 

Step 11: Layer the backing right side down, batting, and quilt top right side up. Baste layers together and quilt as desired. Use short sections of the (6) 2-1/4" x 21" red and blue strips to bind the quilt. 


Block close-ups: 


Would you like to win a bundle of these seven patriotic solids? Leave a comment below letting us know your favorite kind of fireworks. Giveaway is open through Sunday, June 25th at 11:59 pm CDT.  This giveaway is now closed.


Follow along with all of our Patriotic Palette Hop posts! 
Day 1: Fireworks Mini Quilt
Day 2: Atomic Blooms
Day 3: Red, White and Blue Star
Day 4: A Salute to Red, White and Blue
Day 5: Patriotic Pineapple
Day 6: Patriotic Pinwheel
Day 7: Streamers
Day 8: Modern Flags


See all 168 of our Painter's Palette Solids collection here

Find a list of shops carrying the solids here


Psst....are you following along with our Summer of Sewing Series? Watch for weekly tutorial posts, resuming after the Patriotic Palette Hop. Click here to see all the tutorials so far. 

Wednesday, July 6, 2016

Summer of Sewing: Striped Mini Quilt

Welcome back to our Summer of Sewing tutorials here at Inspired by Fabric! 

We'll be featuring regular tutorials as part of our Summer of Sewing series, all using our newest fabric lines that you can find at your local quilt shop! Our tutorials will include a chance to win a bundle of the fabric line being used, so make sure to enter each time! 

The 4th of July may have passed, but that doesn't mean we can't still love a great red, white and blue combo! It's such a summery palette! This week we've matched up three blues and three reds from our Painter's Palette Solids collection to create a fun mini quilt. This design concept offers plenty of options--while ours is just a 10-1/2" square mini, use this tutorial to create a table runner, a throw pillow, or even a quilt! Scroll down to the bottom of this post to find out how you can win this red, white and blue bundle.


Let's get started!
You'll Need:
1 fat quarter each of three red solids (Crimson, Real Red and Claret) 
1 fat quarter each of three blue solids (Midnight, Royal, and River)
1 fat quarter white solid
Lightweight interfacing or muslin
13" batting
13" square of backing

Cutting:
From each red and blue solid: 
Cut two strips ranging in width from 1" - 2"

From the white solid:
Cut four strips ranging in width from 1" - 2"

From the remaining Midnight:
Three 2-1/4" x 21" strips for binding

From the interfacing or muslin:
Cut four 6" squares

Make the Blocks:
1. Lay a wider white strip diagonally across the muslin square. 


2. Choose another strip to layer on top and stitch along the long edge using a 1/4" seam allowance. 


3. Press open. 


4. Continue sewing various red and white strips to the square until it is completely covered. 


5. Trim the unit to measure 6" square. Make two red stripe units.


6. In the same way, make two blue stripe units. 


7. Cut each unit in half diagonally. Cut one blue unit perpendicular to the stripes and one parallel to the stripes. Do the same with the red units. 


8. Match up each red unit with a blue unit that has the stripes running in the opposite direction. Make four blocks. 


9. Play around with the lay out of these blocks. You can try them like this: 

Or like this: 


10. Sew the blocks into rows and join the rows. Press seams open to decrease bulk. 


11. Layer the backing right side down, batting, and mini quilt top right side up. Quilt as desired. Trim backing and batting even with the quilt top and use the three 2-1/4" x 21" navy strips to bind. 


Click here to see all 84 of the Painter's Palette Solids colors.
For a chance to win a fat quarter bundle of our red, white and blue solids, make sure you follow us on the blog (options are in the right hand sidebar) and leave a comment letting us know you do, as well as telling us what two colors you'd like to see paired together (like we paired red and blue here) . Giveaway is open through Sunday, July 10th at 11:59 pm CST. We'll randomly draw a winner and announce it on the blog next week. Make sure we have a way to get in touch with you if you are selected as the winner!  

Congratulations to the winner of the American Pride bundle: Lee
We'll contact you for your mailing information! 


Friday, May 6, 2016

Paint Chip Mini Quilt Tutorial

We've talked a lot about our new Painter's Palette Solids here on the blog. Why? Because we love them and we know you will too! 

Probably our cutest pre-cut packaging is our Paint Chips--a pack of 2-1/2" squares of all 84 colors. It's a great way to get your hands on all of the colors!

We thought it would be fun to come up with a design that features all 84 of these squares. Today, we're sharing that tutorial, taking you from this: 

To this:

This mini quilt measures 24-1/2" wide x 26" tall and uses a Paint Chip pack plus Smoke solid, Lipstick solid, and backing fabric. 

Here's how to make it:

You'll Need
One paint chip pack (eighty-four 2-1/2" precut solid squares)
7/8 yard Smoke solid (121-090)
1/4 yard Lipstick solid (121-066)*
7/8 yard backing fabric
29" x 30" piece of batting

Cutting
From the Smoke solid:
(20) 2-1/2" squares
(3) 1-1/4" x 42" strips for binding*
(2) 3-1/2" x 24-1/2" strips
(3) 2-1/2" x 24-1/2" strips
(1) 2" x 24-1/2" strip

From the Lipstick solid:
(3) 1-1/2" x 42" strips for binding*

*We used a flange-style two-color binding. If you prefer a traditional binding, cut Smoke strips the way you normally would to finish the quilt. 

Making the Quilt Top
Note that the diagrams don't show the entire row specified; they're intended to provide an example of what part of the row should look like. 
1. Add (4) 2-1/2" Smoke squares to the paint chip pack for a total of (88) squares to use in the pieced rows. The remaining (16) Smoke squares will be used in step 4 to make half-square triangles (HSTs). Select (12) 2-1/2" squares in assorted colors and sew together into a square row. Make (2) rows of (12) squares each. 


2. Select (16) 2-1/2" squares in assorted colors and cut each in half to make 1-1/4" x 2-1/2" rectangles. Sew the (32) rectangles together to make a rectangle row.


3. Select (16) 2-1/2" squares in assorted colors and cut each in half to make 1-1/4" x 2-1/2" rectangles. Sew (2) assorted rectangles together and cut in half to create (2) two-patches. Make a total of (32) two-patches. Sew two-patches together in pairs to create four-patches, and join the (16) four-patches together to make a four-patch row.

4. Draw a diagonal line on the wrong side of the remaining (16) Smoke squares and (8) additional colored squares. Pair each marked square with an unmarked square and stitch 1/4" on either side of the marked line. Cut apart on the line and press HST units open. Trim each to measure 2" square. You'll have 32 Smoke/color HST units and 16 color HST units.

5. Noting orientation, sew together (16) Smoke/color HST units to make a Smoke/color HST row. Make 2 rows.

 6. Noting orientation, sew together (16) color HST units to make a color HST row. 

7. Referring to the quilt image and measurements listed below, sew the pieced rows and Smoke strips together to finish the quilt top.


Finishing
1. Layer the backing right side down, batting and quilt top right side up. Quilt as desired. Trim batting and backing even with quilt top. 
2. We used a flange-style binding to add a pop of color along the edge. Use the (3) 2-1/2" x 42" Lipstick strips and (3) 2-1/4" x 42" Smoke strips and follow this tutorial to bind the mini quilt. If you'd prefer a traditional binding, cut strips and bind your quilt as desired. 

A close-up of the flange binding

We hope you enjoyed our Paint Chip Sampler tutorial! See all 84 Painter's Palette Solids colors here and ask for them (and the Paint Chip pack!) at your local quilt shop.

p.s. If this quilt looks familiar, you might have seen a sneak peek of it on Instagram! Sign up to follow us so you see all of the pics we post! 

Wednesday, July 1, 2015

Tute-Happy Summer: Melon Mini

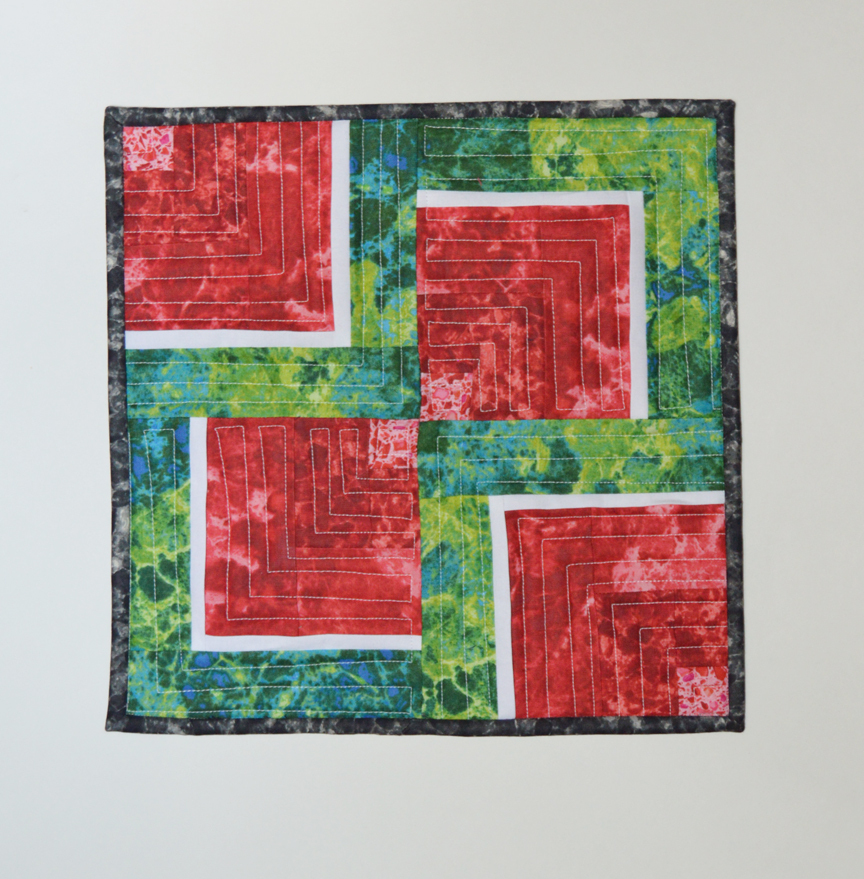
We're continuing our Tute-Happy Summer series today with a tutorial for a watermelon mini quilt! The reds and greens in Ro Gregg's Gemstones, Jewels and Quartz collection reminded us of watermelons, and this fun little 12-1/2" square mini quilt was born. It's super-easy to make--just one Courthouse Steps block cut in quarters and reassembled! Enjoy the tutorial and then find the details at the bottom of this post for a chance to win a bundle of Gemstones, Jewels and Quartz prints to play with!


Materials:
1 fat quarter each 3 red prints, 1 green print, and 1 black print
1 fat eighth white solid
15" square of backing fabric
15" square of batting

Here are the Gemstones, Jewels and Quartz prints we used that inspired this project--don't they just scream, "watermelon!" to you?! 

Cutting:
From the light red:
One 3" square

From the medium red: 
Two 3" x 7" strips and two 3" x 12" strips

From the dark red: 
Two 2-1/2" x 4" strips and two 2-1/2" x 8" strips

From the green:
Two 2-1/2" x 11" strips and two 2-1/2" x 15" strips

From the white: 
Four 1" x 12" strips

From the black:
Three 2-1/4" x 21" strips for binding

Step 1: Sew the two 2-1/2" x 4" dark red strips to opposite sides of the 3" light red square, press open, and trim.

Step 2: Sew the two 2-1/2" x 8" dark red strips to the remaining sides and press open. Trim to measure 6" square, making sure that you center the light red square as you trim. Note: Squaring up after adding each round of strips will create the most accurate Courthouse Steps block. 

Here's what it looks like after the dark red round is added:

Step 3: In the same way, add the 3" x 7" and 3" x 12" medium red strips. Trim the unit to measure 10" square.

Step 4: Press each 1" x 12" white strip in half lengthwise. Pin folded strips to opposite sides of the red unit, matching raw edges, and baste in place with a 1/8" seam allowance. Trim white strips even with the red unit. 

Step 5: Pin folded white strips on the remaining sides and then pin a 2-1/2" x 11" green strip on top, right sides together. Stitch, securing both the green strip and the white flange to the red unit. 

Step 6: Press the green strip open. The white flange should rest on the red fabric. Repeat on the other side to add the second green strip.

Step 7: Sew the 2-1/2" x 15" green strips to the top and bottom, making sure to stitch inside the basting stitches to cover them up. Press the green strips open and square to measure 13".

Step 8: Cut the block in half in both directions to create four quarter blocks. 

Step 9: Rearrange the blocks into a layout you like and stitch them together. Optional: Use the remaining black print to add watermelon seeds!

Step 10: Layer the quilt top with backing and batting and quilt as desired. Trim the backing and batting even with the quilt top. 

Step 11: Use the three 2-1/4" x 21" black strips to bind the mini quilt. 


Enjoy! 


For a chance to win a bundle of Gemstones, Jewels and Quartz prints, leave us a comment letting us know that you follow us on the blog or on Facebook. Also let us know if you've ever competed in a watermelon seed spitting contest (even in your backyard!). Giveaway is open through Sunday, July 5th at 11:59 pm EST. This giveaway is now closed, but be sure to check out our other tutorials, as we'll be sharing a tutorial and hosting a giveaway each week!


Check out each week of our Summer of Tutes!
Week 1: Sunglasses case  featuring Graphix 3
Week 2: The overnight bag featuring Who's Who
Week 3: Tablet case featuring Jungle Party 
Week 4: Patriotic pennants featuring Tone on Tone 
Week 6: Lunch bag featuring Graphix 3
Week 7: Placemats featuring Marblehead Pleasing Pastels
Week 9: Elegant clutch featuring Jungle Party 
Week 10: Modern table runner featuring Prairie Cloth Solids