Showing posts with label Paint Chips. Show all posts

Friday, March 17, 2017

FourPatch Parade Tutorial

One of our demonstrations at QuiltCon showed how to use the 2-1/2" precut squares (called Paint Chips) from our Painter's Palette Solids to make the Fourpatch Parade tutorial, using wonky four-patches. Today we're sharing the information from the demonstration with you, as a tutorial.

Finished quilt measures 28-1/2" x 37"

The hardest part of this quilt is choosing which colors to use from the Paint Chip pack! Each Paint Chip pack includes 84 different 2-1/2" squares. 


Fourpatch Parade
Note: This tutorial will give specific cutting for the quilt shown. However, we encourage you to use the techniques we demonstrate and choose your own fabric widths, row arrangement, etc. 

Materials:
1 Paint Chip Pack
1 yard each White and Silver
1/3 yard Blush (for binding)
1/3 yard Turquoise (for binding)
1 yard backing fabric
35" x 43" piece of batting


Cutting:
Again, the number and width of strips listed here will make the quilt shown; feel free to experiment with your own number of strips, width of strips, and four-patch placement.

From the White:
One 2-1/2" x 42" strip
Two 2" x 42" strips
Eight 1-3/4" x 42" strips
Two 1-1/2" x 42" strips

From the Silver:
One 3-3/4" x 42" strip
One 2-1/2" x 42" strip
One 2-1/4" x 42" strip
Two 2" x 42" strips
Eight 1-3/4" x 42" strips

From the Blush: 
Four 1-1/2" x 42" strips

From the Turquoise:
Four 1-3/4" x 42" strips

Make the Four-Patches:
1. Choose two four-patches and layer them together. Using a ruler to create a straight line, cut the four-patches approximately in half and slightly on an angle.


2. Pair the left-hand yellow piece with the right-hang purple piece and vice versa.

3. Fold one piece over the other so the cut edges align.

4. Stitch on the cut lines and press the units open. Press the seam allowance on both units toward the same color (this allows them to nest in the next step).

5. Layer the two units together, with colors opposite, so the seams touch. The seam allowances should nest. Lay a ruler on the two pieces and mark a line approximately in the middle, again on a slight angle.

6. Sew 1/4" on either side of the marked line. Note: You can pin these units if you prefer, but the nested seams will help keep the pieces together.

7. Press both units open.

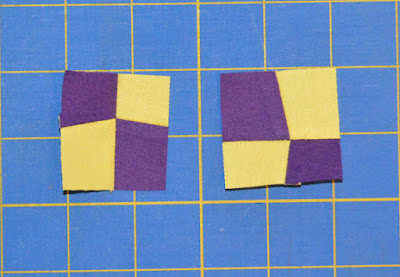
8. Trim wonky four-patch to measure 1-3/4" square. You may need to rotate the ruler slightly to make it fit.

9. Your finished four-patches:


10. Make as many four-patches as you like. Our quilt uses 32.

Make the Quilt:
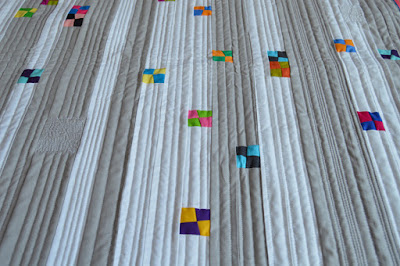
1. Lay out the White and Silver strips as desired and play around with the positioning of the four-patches on the 1-3/4" wide strips. When placing the four-patches, consider spacing along the strip, color placement between strips, and spacing between rows. Solid strips of the same colors positioned around four-patches will create the illusion of floating.

Here's our strip order: White 2-1/4", White 1-3/4", Silver 2", Silver 1-3/4", Silver 1-3/4", White 1-3/4", White 1-1/2", Silver 1-3/4", Silver 1-3/4", White 1-3/4", Silver 1-3/4", Silver 2-1/2", White 1-3/4", Silver 2", White 1-3/4", White 2", White 1-3/4", Silver 1-3/4", Silver 1-3/4", White 1-1/2", White 1-3/4", Silver 3-3/4", White 1-3/4", White 2", Silver 1-3/4", Silver 2-1/4".

2. Once you're happy with the design layout, pick up one 1-3/4" strip at a time, cut it approximately where you'd like to insert the four-patch, and stitch the strip pieces to opposite sides of the four-patch. Replace the pieced strip in your design and repeat with each remaining four-patch strip.

3. Sew the strips together lengthwise. The strip ends will not match up perfectly. That's okay! After the strips have been joined, trim the sides to the desired width (ours measures 28-1/2" wide).

4. Layer the quilt top with backing and batting and quilt as desired. Ours has primarily straight-line quilting, with some fun quilted four-patches (see bottom left in the photo below)

5. Use the Blush and Turquoise strips to create and stitch on a flange binding. (Find a tutorial here.)

You're done! Enjoy!

p.s. Make this quilt in different sizes--this technique would be fun to use for a table runner or even a mug rug.

See all 168 of our Painter's Palette Solids colors here and ask for them (and Paint Chips!) at your local quilt shop!

Monday, March 6, 2017

QuiltCon: Demo Central

Continuing our QuiltCon recap: 
Besides eye candy and shopping, plenty of learning goes on at QuiltCon! 

We were thrilled to have the lovely Amy Barickman of Indygo Junction in our booth, demonstrating how to make her Fabri Flair technique. Find her ornament pattern here and dimensional star pattern here.

We had one of her Dimensional Star samples in the booth, and it generated a lot of attention!

Amy used our Painter's Palette Solids to get started on a new ornament:


 Handstitching edges together: 

Lisa Ruble shared two demonstrations using our Painter's Palette Solids as well. The first was Mod Illusions: The 3Ds of Quilts Made with Solids. 

Lisa's Diamond Drama quilt, made with shades of gray, orange, lime, teal and purple:

More illusion quilts displayed in our booth:

A close-up of the In & Out Log Cabin quilt, demonstrating dimension:

Mod Tumbler--a modern take on the classic tumbling block design:


Lisa's second demo was Making Wonky Mini Four-Patches, using our pre-cut 2-1/2" square Paint Chips. 

Such cute four-patches!

Missed our earlier posts about QuiltCon?
Find part 1 here and part 2 here.

Wednesday, March 1, 2017

QuiltCon: Tour our booth!

We just returned from four days in Savannah, as a sponsor of the Modern Quilt Guild's QuiltCon show. The show was incredibly inspiring, and we were thrilled to meet so many quilters and introduce them to the smooth and silky feel of all 168 colors in our Painter's Palette Solids collection. If you didn't make it to the show, we invite you to take a tour of our QuiltCon booth below. 

The booth, front view: 

The booth, side view:

Samples of all 168 of our Painter's Palette Solids collection:

Kate Colleran with her Lighthouse Steps quilt, made using Painter's Palette Solids. 
Find her pattern here.

The Hashtag quilt, made using our Painter's Palette Solids. We offered the pattern for this quilt as a freebie for attendees who spun our prize wheel. 
Read more about the Hashtag quilt here.

Shannon Brinkley's Kansas City skyline quilt: 

                                      "Shattered" by Maria Pate, using our Batiks:

                           The "Spinning Palette" quilt made by Kylah Kay Jackson 
                                           using all 168 Painter's Palette colors:

Happy by Linda Frost; featuring the Happy collection (and some beautiful appliques!). While not as modern as other quilts, it was a showstopper that attracted plenty of attention! 


Our prize wheel! Attendees walked away with a the Hashtag quilt pattern, packs of 2-1/2" square Paint Chips, tote bags, buttons, and more! We loved getting to talk to all of the show attendees and introducing them to the smooth and silky Painter's Palette Solids!

And finally, our art wall. Jacquie Gering, who is Kansas City based like we are, chose 18 different solids to create this machine quilting art wall. Each piece was stitched with a walking foot. 

Jacquie's newest book, "Walk." Find it, and more about Jacquie, here.

Jacquie signed books in the booth--what a line of fans waiting for her! 


Saturday, February 25, 2017

Paint Chip Mini Quilt

We shared this mini quilt in a presentation at QuiltCon and promised attendees that they could find the tutorial on the blog. We first posted it about a year ago; here's the re-post:

Probably our cutest pre-cut packaging of our 
Painter's Palette Solids is our Paint Chips--a pack of 2-1/2" squares of 84 colors. It's a great way to get your hands on a large number of the colors!

We thought it would be fun to come up with a design that features all 84 of these squares. Today, we're sharing that tutorial, taking you from this: 

To this:

This mini quilt measures 24-1/2" wide x 26" tall and uses a Paint Chip pack plus Smoke solid, Lipstick solid, and backing fabric. 

Here's how to make it:

You'll Need
One paint chip pack (eighty-four 2-1/2" precut solid squares)
7/8 yard Smoke solid (121-090)
1/4 yard Lipstick solid (121-066)*
7/8 yard backing fabric
29" x 30" piece of batting

Cutting
From the Smoke solid:
(20) 2-1/2" squares
(3) 1-1/4" x 42" strips for binding*
(2) 3-1/2" x 24-1/2" strips
(3) 2-1/2" x 24-1/2" strips
(1) 2" x 24-1/2" strip

From the Lipstick solid:
(3) 1-1/2" x 42" strips for binding*

*We used a flange-style two-color binding. If you prefer a traditional binding, cut Smoke strips the way you normally would to finish the quilt. 

Making the Quilt Top
Note that the diagrams don't show the entire row specified; they're intended to provide an example of what part of the row should look like. 
1. Add (4) 2-1/2" Smoke squares to the paint chip pack for a total of (88) squares to use in the pieced rows. The remaining (16) Smoke squares will be used in step 4 to make half-square triangles (HSTs). Select (12) 2-1/2" squares in assorted colors and sew together into a square row. Make (2) rows of (12) squares each. 


2. Select (16) 2-1/2" squares in assorted colors and cut each in half to make 1-1/4" x 2-1/2" rectangles. Sew the (32) rectangles together to make a rectangle row.


3. Select (16) 2-1/2" squares in assorted colors and cut each in half to make 1-1/4" x 2-1/2" rectangles. Sew (2) assorted rectangles together and cut in half to create (2) two-patches. Make a total of (32) two-patches. Sew two-patches together in pairs to create four-patches, and join the (16) four-patches together to make a four-patch row.

4. Draw a diagonal line on the wrong side of the remaining (16) Smoke squares and (8) additional colored squares. Pair each marked square with an unmarked square and stitch 1/4" on either side of the marked line. Cut apart on the line and press HST units open. Trim each to measure 2" square. You'll have 32 Smoke/color HST units and 16 color HST units.

5. Noting orientation, sew together (16) Smoke/color HST units to make a Smoke/color HST row. Make 2 rows.

 6. Noting orientation, sew together (16) color HST units to make a color HST row. 

7. Referring to the quilt image and measurements listed below, sew the pieced rows and Smoke strips together to finish the quilt top.


Finishing
1. Layer the backing right side down, batting and quilt top right side up. Quilt as desired. Trim batting and backing even with quilt top. 
2. We used a flange-style binding to add a pop of color along the edge. Use the (3) 2-1/2" x 42" Lipstick strips and (3) 2-1/4" x 42" Smoke strips and follow this tutorial to bind the mini quilt. If you'd prefer a traditional binding, cut strips and bind your quilt as desired. 

A close-up of the flange binding

We hope you enjoyed our Paint Chip Sampler tutorial! See all 168 Painter's Palette Solids colors here and ask for them (and the Paint Chip packs!) at your local quilt shop.

p.s. Are you following us on Instagram? Sign up to follow us so you see all of the pics we post! 

Friday, October 7, 2016

Painter's Palette Solids in a Box!

Do you love getting mail? It's always fun to find a surprise in your mailbox! We are part of a fantastic mailbox surprise--the recently shipped September Quilter's Stash Box from the Quilter's Bug Shop


What's inside, you ask? Subscribers have received their boxes, so we can share what's inside (and a limited number of September boxes are still available if you're not yet a subscriber).

Here's a look at the box contents:

The box includes a sampling of our Painter's Palette Solids blues and a gray, plus a stack of Paint Chips (eighty-four different color 2-1/2" squares!). There's also the "Blue Star" pattern by Luke Haynes, using the solids, a second pattern for a mini quilt using the Paint Chips, a ruler for making Luke's quilt, two coordinating spools or thread, and a Sew Sassy button. 
Shown here: 1/4 yard cuts of Sky, Waterfall, River, Lapis, and Midnight.
(The box also includes plus 2 yards of Gray, not pictured)
Thanks, Quilter's Stash Box, for including us in your September box! 

Read more about our company on the Quilter's Stash Box blog.

Find out how to subscribe (limited quantities of the September box featuring our solids still available!) here.
See all of our Painter's Palette Solids colors here and ask for them at your local quilt shop.