Showing posts with label snack pack. Show all posts

Tuesday, September 13, 2016

Painter's Palette Solids in action: Lighthouse Steps

We've been adding to our Painter's Palette Solids collection! Later this week we'll be announcing the new colors here on the blog, but today we wanted to share a new pattern by designer Kate Colleran of Seams Like a Dream. The pattern uses our Bayshore Snack Pack, a carefully curated selection of Painter's Palette Solids colors. 


"Lighthouse Steps" by Kate Colleran
Fun, isn't it?!

Our "Bayshore" Snack Pack of Painter's Palette Solids

We asked Kate to tell us about her Lighthouse Steps pattern.

Q. What appealed to you about the colors in the Bayshore palette?
KC: What I really liked about the Bayshore Snack Pack was the feel the entire group of strips gave me. The name was so appropriate- it reminded me of the beaches back in New England. I thought of the coast of Maine, the shore on the Cape…

Q. Why do you like working with precut strips?
KC: I love putting fabrics together. But for many people, it can hard and stressful. So what I really like about precuts is that someone has done the hard work of putting colors and fabrics together. And the fabric is already cut into useable pieces. Though of course, in this quilt, we cut those strips up!

Q. How did this design idea come about?
KC: Most of my designs evolve. Usually the first few aren’t all that great. But as I play, they change and get better! This was a design I had started without a specific fabric line in mind. But I always knew it was going to use strips. I was just playing around with the strips, using different size pieces. Originally the strips were going to be more random in each row but as I played, I realized the strength in the columns of color.

Q. What prompted you to add the navy section to the quilt?
KC: The quilt would have been fine with just the gradation of colors. And I love white backgrounds. They are just so fresh and clean feeling. But I realized that if I wanted to use some of the lighter strips, I needed a different background. So that section of light strips with the cadet blue background does three things: it breaks up the long line of the quilt, it gives the eye a place to rest and it allows us to use, and see, some of the lighter strips.

Q. What do you like best about this quilt?
KC: The overall movement. I love the straight lines of the design in contrast to the wavy lines of the quilting. Gives a feeling of movement. Waves. The quilting almost makes the quilt look like it is not straight!

Q. Where did the quilt name come from?
KC: The name came from, again, the beach. I sense a theme! I was standing back, looking at the design as a whole and I could see the outline of a lighthouse. Obviously, not a literal outline, but it reminded me of one. And the blue section made me think of the part of a lighthouse just before the top. And I thought about all the steps to the top and each color became a step up the lighthouse. Of course, had I used the other strip pack, New England, with it’s fall colors, I think I might have thought it looked more like a totem pole!

Q.  Is there anything else you’d like our blog readers to know about the quilt?
KC: I pieced this quilt in rows; one color at a time. It worked best for me that way. It helped me to be able to keep all the pieces straight. But it could also be done in sections. Whatever works for you. Play around with the the piecing, play around with the colors, just have fun with it.


Thanks Kate! 

You can purchase the Lighthouse Steps pattern from Kate's website.
Find the Lighthouse Steps pattern here.

Find the entire collection of Painter's Palette Solids (including our new colors, which we'll officially announce here later this week!) here and ask for them at your local quilt shop. 

Wednesday, July 27, 2016

Summer of Sewing: Sew Many Strips Quilt Back

Welcome back to our Summer of Sewing tutorials here at Inspired by Fabric! 

We'll be featuring regular tutorials as part of our Summer of Sewing series, all using our newest fabric lines that you can find at your local quilt shop! Our tutorials will include a chance to win a bundle of the fabric line being used, so make sure to enter each time!


Last week we shared how to make Log Cabin-style triangle blocks for a modern quilt front; this week we're showing how to make a pieced back, 1600-style, using yardage plus the remaining strips from the Dryad Snack Pack. Of course, this design could be used for a quilt front, too! 


A Snack Pack of the Dryad collection by Shannon Brinkley

If you're unfamiliar with the concept of a 1600 quilt, the name comes from the fact that you use (roughly) 1600" of fabric--a full Snack Pack. It's easy sewing, and the quilt will look different every time based on how the strips are joined. In the basic 1600 quilt, you sew all the 2-1/2" strips short ends together into a long strip. Then you fold the strip in half, align the short ends, and sew the two strip halves together to make a strip half as long and twice as wide. You continue doing that until it's quilt shaped. Variations include cutting strips into shorter pieces to make it scrappier, adding squares of an alternate fabric between strips, and using diagonal seams (like for piecing a binding, for example). We're borrowing from that concept today to add some excitement to a quilt back as well as use up our Snack Pack strips. 

Let's get started!
You'll Need:
The remaining strips from your Dryad Snack Pack (shorter pieces plus full-length strips)
3-3/4 yards of white text print


Make the Quilt Back:
1. Begin by sewing partial strips to other partial strips or two full strips using a diagonal seam.  Trim and press open each join. Vary the fabrics and the strip lengths to create the most interest. 

2. Here's a look at some of our partial strips (leftover from the triangle blocks last week) sewn together. 


3. Sew all partial strips, pieced strips, and full strips together to make one long strip. Our strip is about 26 yards long, which is plenty to create the quilt as you see it here.
4. Align the short ends of the long strip, right sides together. Begin sewing down the long edges of the strip to make a pieced strip that is two strips wide (2x-wide) and half as long. Tip: If you're comfortable with the speed, now is the perfect time to adjust your sewing machine to the highest speed--lots of long, straight sewing stitches! When you get near the end, you'll need to cut the strip into two pieces to finish sewing. Here's what a portion of the 2x-wide strip will look like: 


5. Fold the 2x-wide strip over on itself, right sides together, so the short ends meet. Sew down the length again. You'll need to cut the strip near the end.  


6. Your pieced strip is now 4x-wide:

7. Fold the pieced strip over again and repeat to make a unit that is 8x wide. 

8. Follow the diagram below to cut the pieces for the background. Note that this fabric is directional, and the cutting takes that into account. Cut one 88" long piece for the right side of the quilt. Cut the remaining section into two 21"-wide pieces. These will become the left side. 

9. Sew the 21" pieces short ends together. You'll need to trim this strip to measure 88" as well. Here are the background pieces of your quilt back. Stitch the pieced section between them. 


Here's a look at the entire quilt back. because it is a backing, it is sized larger than the quilt front from last week. The extra will be trimmed off after you quilt it. 

A close-up of the quilt back. Love that text fabric with the splash of color in the middle, plus the interest created from the strips running vertically contrasting with the horizontal text! 

If you missed the tutorial for making the quilt front from Dryad Snack Pack strips, find it here!

 See the entire Dryad collection here and ask for it at your local quilt shop.

For a chance to win a Snack Pack of Dryad, make sure you follow us on the blog (options are in the right hand sidebar) and leave a comment letting us know you do, as well as telling us if you've ever made a quilt with a pieced back. Giveaway is open through Sunday, 31st at 11:59 pm CST. We'll randomly draw a winner and announce it on the blog next week. Make sure we have a way to get in touch with you if you are selected as the winner!  

Congratulations to the winner of last week's Dryad snack pack: PK Sews
We'll contact you for your mailing information! 

Wednesday, July 20, 2016

Summer of Sewing: Triangle Block Quilt

Welcome back to our Summer of Sewing tutorials here at Inspired by Fabric! 

We'll be featuring regular tutorials as part of our Summer of Sewing series, all using our newest fabric lines that you can find at your local quilt shop! Our tutorials will include a chance to win a bundle of the fabric line being used, so make sure to enter each time!


This week and next, we'll be sharing tutorials to make a lap-sized quilt top using a Dryad strip set plus additional yardage. This week we'll demonstrate how to make these triangle strip blocks (a variation on a Log Cabin block) for the quilt front, and next week we'll show you how to make a pieced back using additional strips.  This is definitely a quilt with modern appeal--we think you'll like it! 


A Snack Pack of the Dryad collection by Shannon Brinkley

Let's get started!
You'll Need (to make the quilt top only):
1 Dryad snack pack (we'll use the leftovers next week)
3-5/8 yards blue branch print
Ruler with a 60-degree angle line on it

Cutting:
From the blue branch print:
Cut one 5" x 42" strip
(See diagram for quilt background cutting in step 8)


Make the Triangle Blocks:
1. Align your ruler as shown in the photo with the 60-degree line parallel to the strip edge. Cut to create one side of the triangle. 

2. Flip over the strip and the ruler and align the 60-degree line along the left triangle edge. Cut to create the triangle. Cut a total of eight triangles. 

3. Select a 2-1/2" wide strip from the Snack Pack. Sew to one side of the triangle, making sure to leave at least 2" of strip on both sides of the triangle. 

4. Use your ruler to trim the strip edges even with the triangle. This is why you need the extra 2" on either side!

5. Choose another strip and sew to an adjoining side, again making sure you have 2" of extra strip on both sides of the triangle. 

6. Trim the second strip and work your way around the triangle, adding and trimming strips until all sides have two strips on them. This is your block. It should measure approximately 20" from point to point and 17" tall. Make a total of eight triangle blocks. 

7. Lay out the eight triangle blocks in row, alternating triangles pointing up with triangles pointing down, and join them together. Trim both ends of the triangle row 1/4" past the last triangle's point, as shown. Your row should measure approximately 50-1/2". Trim long edges if needed to ensure your row is straight, but try not to cut off triangle points. 

8. Referring to the Cutting Diagram below, cut the three pieces needed from the blue branch yardage to create the background. Note that cutting like this will only work with a non-directional fabric. 

9. Referring to the diagram below, sew the two 50-1/2" pieces together to make the quilt background top. The remaining piece is for the quilt background bottom.


10. Sew the triangle row between the quilt background top and bottom pieces. You may need to trim the sides slightly after all three pieces are added together. Your quilt top is done! 

Love these triangle blocks! You could make a whole quilt of them!

Be sure to come back next week for the tutorial on making the pieced backing using additional Dryad Snack Pack strips!

 See the entire Dryad collection here and ask for it at your local quilt shop.

For a chance to win a Snack Pack of Dryad, make sure you follow us on the blog (options are in the right hand sidebar) and leave a comment letting us know you do, as well as telling us if you've ever made a project using pre-cut 2-1/2" strips. Giveaway is open through Sunday, July 24th at 11:59 pm CST. We'll randomly draw a winner and announce it on the blog next week. Make sure we have a way to get in touch with you if you are selected as the winner!  

Congratulations to the winner of the Fun in the Sun bundle: Amanda Best
We'll contact you for your mailing information! 

Thursday, October 15, 2015

Vintage Shirtings in Action

While you're considering the Vintage Sampler BOM, here are a few more ideas for using Barbara J. Eikmeier's Vintage Shirting & Dress Prints collection:


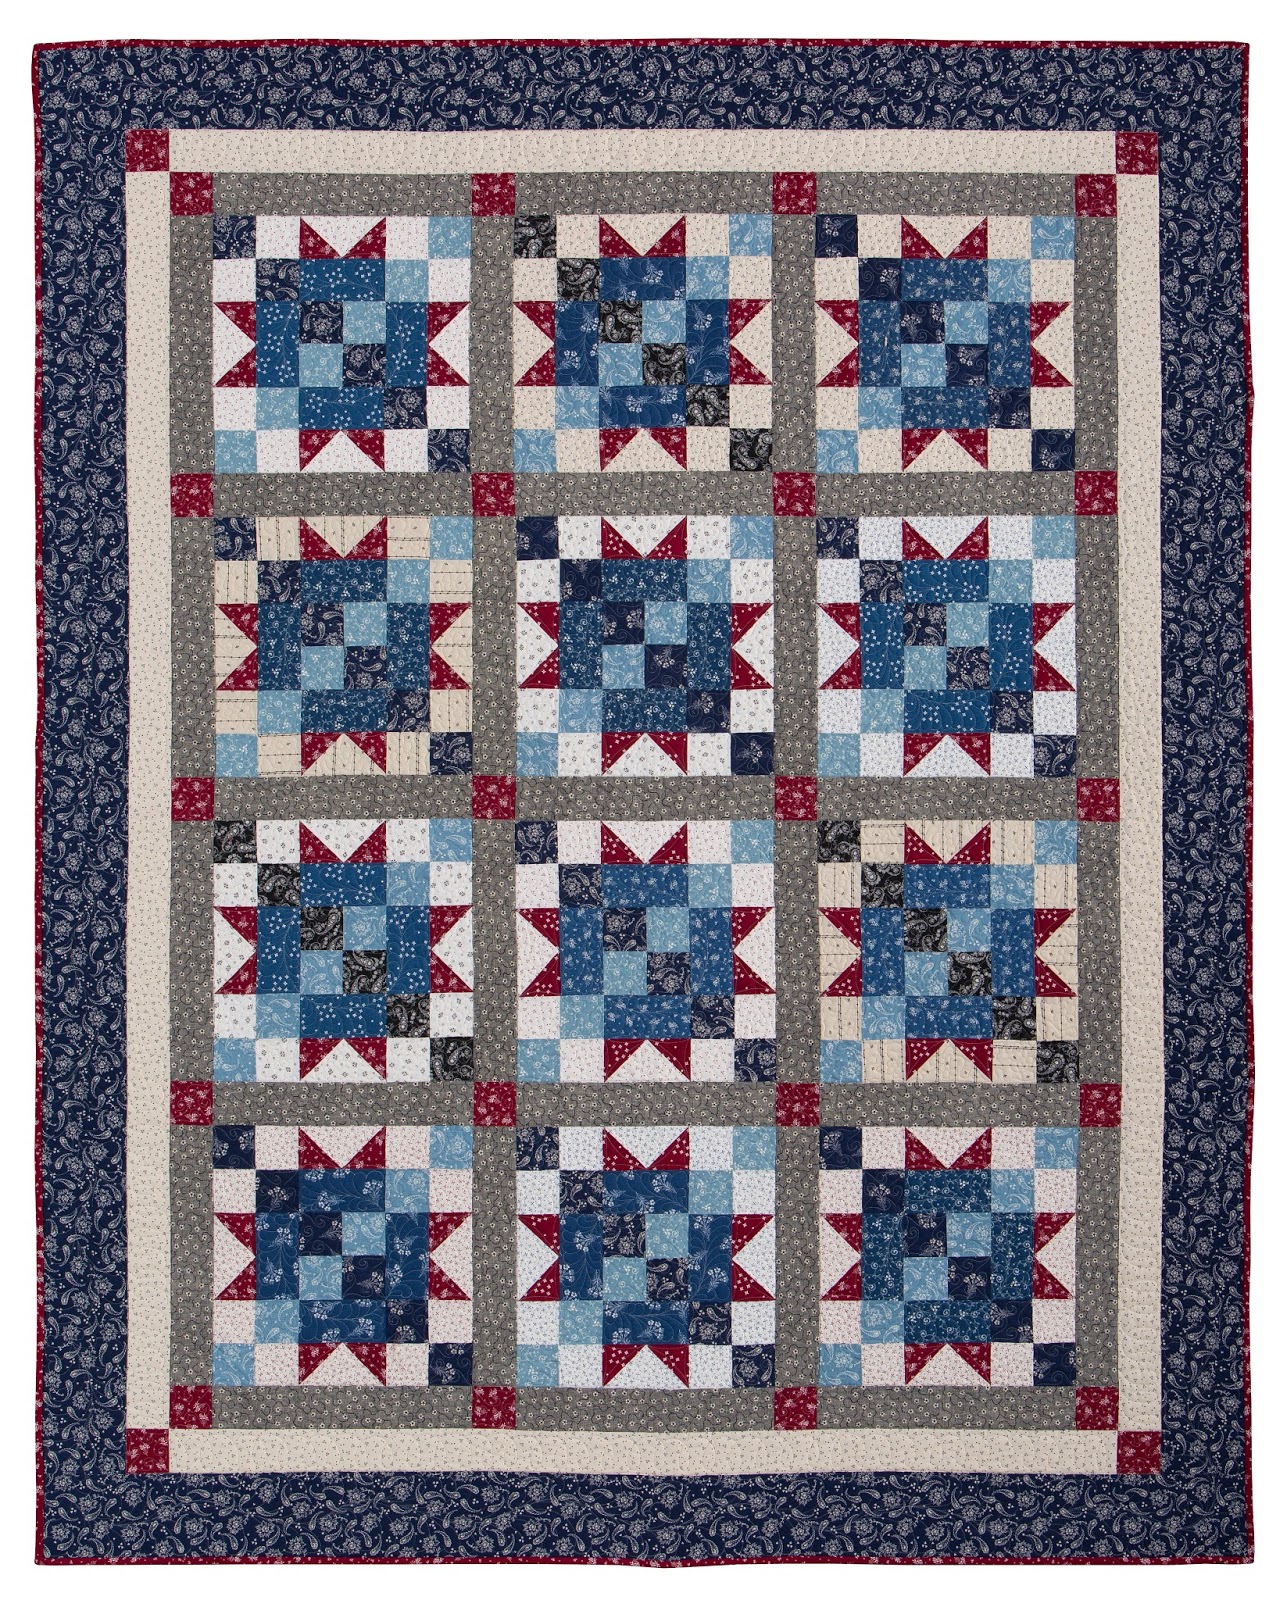
Vintage Stars by Barbara J. Eikmeier; made using a Vintage Shirtings Snack Pack
Find the free pattern here.

The Vintage Shirting Snack Pack: 42 pre-cut strips, ready to be sewn into the Vintage Stars quilt or your favorite pre-cut strip pattern


Barb Eikmeier also designed the bonus projects below to accompany the Vintage Sampler BOM quilt. These patterns will be available from shops participating in the BOM program.

American Flag (44" x 31")


Featherweight Sewing Cover


Table runner (12" x 58")

If you missed the Vintage Sampler BOM quilt, click here to find the post and giveaway.
See the entire Vintage Shirting & Dress Prints collection here.

Tuesday, June 23, 2015

Feeling Patriotic? Our Top 10

With the 4th of July right around the corner, it's the perfect time to share our favorite red, white and blue fabrics, ready for your next patriotic-themed project! Check out our top ten (shhh...it's actually 11!) and visit your local quilt shop to get started! 

1. "Old Glory" by Pine Tree Country Quilts featuring the Tone on Tone snack pack
Find the free quilt pattern here


2. Cool nature-inspired reds and blues from Marblehead Gemstones, Jewels & Quartz by Ro Gregg


3. A touch of Americana with Vintage Shirting and Dress Prints collection by Barb J. Eikmeier

4. "Freedom Squares" quilt by Jean Nolte; featured in Quilting Quickly Winter 2014 using the Tone on Tone snack pack
Find the Quilting Quickly issue or purchase the individual digital pattern here


5. Waving flags all ready to use in the Headgear collection!


6. Go geometric with the reds and blues from Graphix 3


7. Keep it classic with textured tonals in reds and blues from Marblehead by Ro Gregg


8. Another free snack pack quilt pattern: "Vintage Stars" by Barb J. Eikmeier featuring her Vintage Shirting and Dress Prints collection
Watch for this free pattern soon here on our blog!


9. Small-print coordinates take center stage in the reds and blues from Classique


10. Feeling leafy? Darks and lights play well together in the reds and blues from Shadows


11. And a bonus, because we couldn't narrow it down to 10! A third free quilt pattern featuring a snack pack--this time the Bella Casa snack pack in the "Flags Forever" quilt by Airborne Heirlooms
Download the free quilt pattern here