Showing posts with label medallion quilt. Show all posts

Wednesday, December 27, 2017

Everything You Need to Know for A Snow Family Christmas Medallion Quilt

If you've been following along with our Medallion Quilt, we've compiled the information you need to make the quilt here in one handy post! 


Required Yardage and Cutting:
Fat Quarter Navy allover snowman print:
(1) 12-1/2” square

3/4 yard Stripe:
(4) 6-1/2“ x 12-1/2” fussy cut strips

1/2 yard green holly:
(4) 3-1/2” x 24-1/2” strips
(4) 4-1/2” squares
(8) holly leaves

3/4 yard red check:
(8) 1-1/2” x 4-1/2” strips
(8) 1-1/2” x 6-1/2” strips
(4) 3-1/2” squares
(8) 2-1/2” x 8-1/2” strips
(8) 2-1/2” x 12-1/2” strips
(12) berries

7/8 yard white solid:
(4) 6-1/2” x 30-1/2” strips

1/2 yard red text:
(32) 2-1/2” squares
(12) ornaments

1/4 yard navy check:
(8) ornaments

1/4 yard green check:
(8) ornaments

1/2 yard gray check:
(16) 2-1/2” x 4-1/2” pieces
(16) 2-1/2” squares
(1) 3-1/2” x 13” piece for cutting fusible ornament stems

1 yard blue text print:
(4) 6-1/2" x 30-1/2" lengthwise strips

1/2 yard binding (red check)

(6) 2-1/2” x 42” strips for binding

Make the quilt here: 
The links below will guide you through the assembly process for the quilt.
See the entire A Snow Family Christmas collection here and ask for it at your local quilt shop.

Friday, December 22, 2017

A Snow Family Christmas Medallion Quilt - Day 6

It wouldn't be the holiday season without a quilting project! 
Follow along as we use Judy Hansen's A Snow Family Christmas collection to make a medallion quilt perfect for winter! We'll start with a center square and add easy borders to create a 54" square quilt. Follow along as work toward the final quilt reveal.

Woo hoo! It's time to finish the quilt! This is quick and easy because you've already constructed the sections to do so! 

Cutting:
From the navy text print:
(4) 6-1/2" x 30-1/2" lengthwise strips

Assemble the Quilt:
Step 1: Sew each ornament applique row to a 6-1/2" x 30-1/2" navy text print strip.

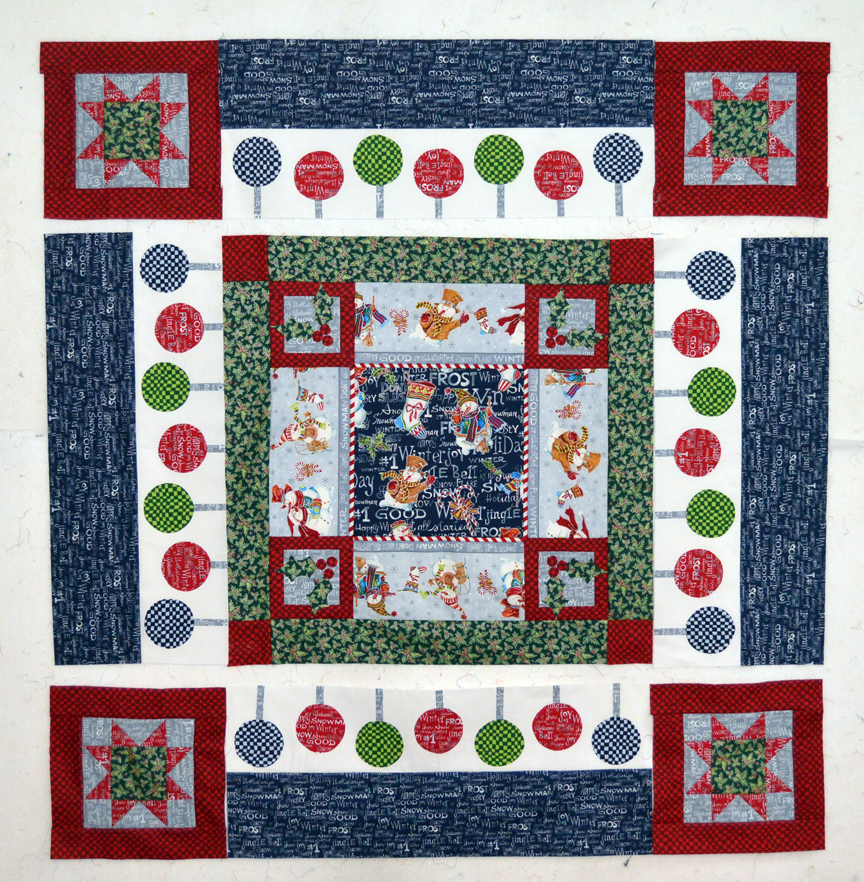
Step 2: On your design wall, lay out the quilt center, the four outer border rows, and the four star corner blocks as shown. Sew outer border rows to opposite sides of the quilt center. Sew star corner blocks to both ends of the remaining outer border rows. 

Step 3: Add the top and bottom border rows to complete the quilt!
We wish there was snow to make this photo a little more seasonally festive...ignore the brown leaves! 
Step 4: Layer backing fabric, batting, and quilt top right side up. Baste the layers together and quilt as desired. Use (6) 2-1/4" x 42" red check strips to bind the quilt. Enjoy!


Follow along as we make our Medallion quilt!
See the entire A Snow Family Christmas collection here and ask for it at your local quilt shop.

Wednesday, December 20, 2017

A Snow Family Christmas Medallion Quilt - Day 5

It wouldn't be the holiday season without a quilting project! 
Follow along as we use Judy Hansen's A Snow Family Christmas collection to make a medallion quilt perfect for winter! We'll start with a center square and add easy borders to create a 54" square quilt. Follow along as work toward the final quilt reveal.


Today we're making the corner blocks for the outer border. They're star blocks, made with flying geese units for the points. These classic blocks look extra festive in red, green and gray holiday prints!

Cutting:
From the green holly:
(4) 4-1/2" squares

From the gray text print:
(16) 2-1/2" x 4-1/2" pieces
(16) 2-1/2" squares

From the red text print:
 (32) 2-1/2" squares

From the red check:
(8) 2-1/2" x 12-1/2" strips
(8) 2-1/2" x 8-1/2" strips

Step 1: Draw a diagonal line on the wrong side of the 2-1/2" red text squares. If you prefer the text to be facing the same direction on both the red and gray prints in the finished flying geese unit, you'll need to draw the line on (16) of the squares as shown on the left (with top of the text print facing to the right) and the opposite on the remaining (16) squares (with top of the text print facing to the left). This is how you'll position the marked squares on each gray piece to stitch as well. 

Step 2: Matching raw edges, position the left side triangle on (1) 2-1/2" x 4-1/2" gray text piece. Stitch on the drawn line, trim seam allowance to 1/4", and press open. 
Step 3: Position the second marked square on the right edge and repeat. 

Step 4: Here's your finished flying geese unit. Notice how the text print pieces are all facing the same way. Repeat to make a total of (16) flying geese units.

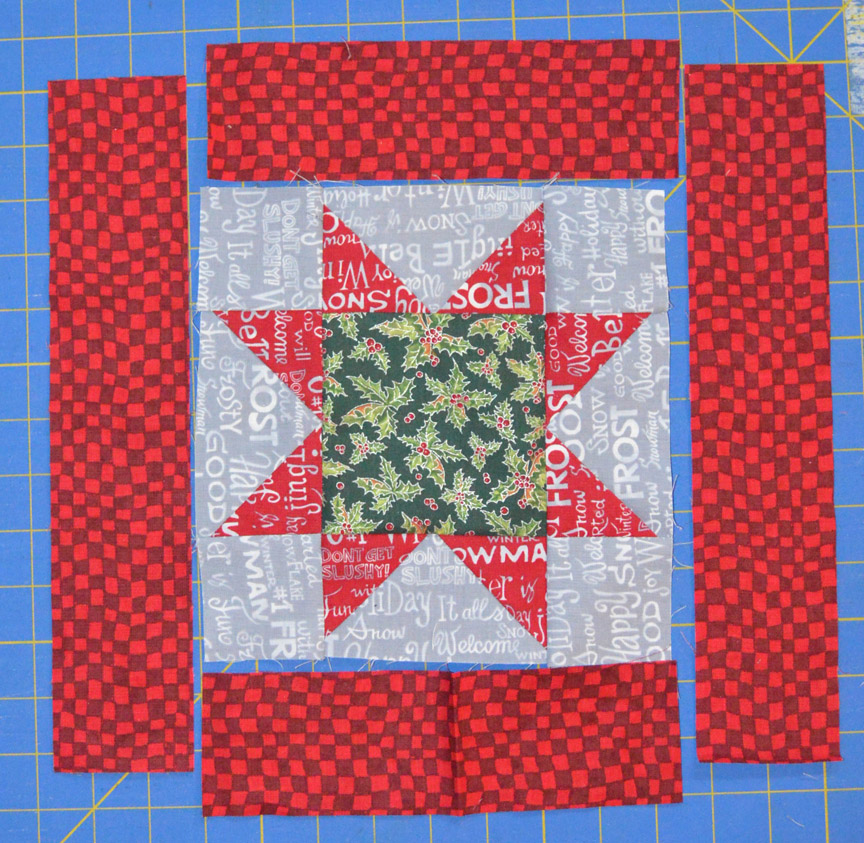
Step 5: Lay out (1) 4-1/2" green holly square, (4) flying geese units, and (4) 2-1/2" gray text print squares into (3) rows as shown. 

Step 6: Sew the pieces into rows and join the rows to complete the star unit. Make (4) star units. 

Step 7: Sew 2-1/2" x 8-1/2" red check pieces to opposite sides of the star unit. Sew 2-1/2" x 12-1/2" red check pieces to the remaining sides to complete the block. Make a total of (4) star blocks. 

Here's your finished block! 


Follow along as we make our Medallion quilt!

See the entire A Snow Family Christmas collection here and ask for it at your local quilt shop.

Thursday, December 14, 2017

A Snow Family Christmas Medallion Quilt - Day 4

It wouldn't be the holiday season without a quilting project! 
Follow along as we use Judy Hansen's A Snow Family Christmas collection to make a medallion quilt perfect for winter! We'll start with a center square and add easy borders to create a 54" square quilt. Follow along as work toward the final quilt reveal.

Ready for a lot of applique? 
Today we're creating rows of ornaments that will go around the quilt center. 


Cutting: 
From the white solid:
(4) 6-1/2" x 30-1/2" strips

From the gray text print:
(1) 3-1/2" x 14" piece

From the red text print: 
(12) ornaments*

From each of the green check and navy check:
(8) ornaments*

*Follow the step-by-steps below to create the fused ornament shapes. 

Note: Download the ornament shape here.

Today's fabrics:

Step 1: Trace (28) of the template shape onto the paper side of fusible web.  

Step 2: Fuse (12) of the shapes onto the wrong side of the red text fabric and (8) each onto the wrong side of the green check and navy check fabrics. Cut out each shape on the drawn line and remove paper. 

Step 3: Fuse a 3" x 13" piece of fusible to the wrong side of the 3-1/2" x 14" gray text piece. Trim piece to measure 3" x 13". Cut (16) 1/2" x 3" long pieces from the strip. Tip: if you remove the paper backing before cutting, you won't have to peel the paper off each individual piece. But the fusible web will stick slightly to your board, so be aware.

Step 4: Cut the remaining fused strip in half, lengthwise, to make (2) 1-1/2" wide strips. From those strips, cut (12) short  pieces.

Step 5: Here are all your fused pieces for today's rows. Remove paper backings and head over to your ironing board with them and your (4) 6-1/2" x 30-1/2" white strips. 

Step 6: Find the center of the first white strip and position a short gray piece and a red ornament on that center point. The gray piece should touch the top edge of the strip, and the opposite end should be tucked just under the edge of the ornament. Fuse in place. 

Step 7: Position a ruler along the bottom edge of the white strip, approximately 5/8" from the edge. Use it to align the bottom edges of the green and blue ornaments. Lay out all ornaments and eyeball the space between them. Make sure to leave at least 1/2" off space on both short ends. 

Step 8: Add short and long gray pieces to the ornaments, tucking edges under the ornament. Fuse all pieces in place. 


Here's your finished row! Use a decorative stitch to secure appliques in place, or wait until you quilt the finished quilt and secure then. 

Step 9: Make a total of (4) rows. 


Follow along as we make our Medallion quilt!

See the entire A Snow Family Christmas collection here and ask for it at your local quilt shop.
Tuesday, December 12, 2017

A Snow Family Christmas Medallion Quilt - Day 3

It wouldn't be the holiday season without a quilting project! 
Follow along as we use Judy Hansen's A Snow Family Christmas collection to make a medallion quilt perfect for winter! We'll start with a center square and add easy borders to create a 54" square quilt. Follow along as work toward the final quilt reveal.


Today's addition to the quilt is super easy. It might just be because the second post this week is a lot more involved, so this quick border helps to even things out. 


Cutting:
From the green holly print: 
(4) 3-1/2" x 28-1/2" strips

From the red check:
(4) 3-1/2" squares

Add the second border:
Step 1: Sew 3-1/2" x 28-1/2" green holly strips to opposite sides of the quilt center. 
Step 2: Sew 3-1/2" red check squares to both ends of the remaining green holly strips. 


Step 3: Sew these pieced strips to the top and bottom of the quilt. 


That's it! You're done for today. The next border includes a lot of applique, so get ready! 


Follow along as we make our Medallion quilt!

See the entire A Snow Family Christmas collection here and ask for it at your local quilt shop.


Friday, December 8, 2017

A Snow Family Christmas Medallion Quilt - Day 2

It wouldn't be the holiday season without a quilting project! 
Follow along as we use Judy Hansen's A Snow Family Christmas collection to make a medallion quilt perfect for winter! We'll start with a center square and add easy borders to create a 54" square quilt. Follow along as work toward the final quilt reveal.


Today we'll be fussy cutting the fun stripe in this collection to use as the first border, and then we'll be assembling the first border around the quilt's center square. 

Cutting:
From the stripe:
(4) 6-1/2" x 12-1/2" fussy-cut pieces (see photos below)

From the navy allover snowman print:
(1) 12-1/2" square (you can fussy-cut it to center snowman if you prefer)

Here's a look at the stripe. You can fussy cut whichever section you'd like; we chose the larger snowman section with the candy cane strips at the bottom. 

Position a ruler on the stripe, adjusting fabric as needed so stripes on fabric align with the ruler edge. Remember that 1/4" on each side of the stripe will be lost in the seam allowance, so plan accordingly. In the fussy cut stripe pieces below, the solid red will be the seam allowance and the candy cane stripe will create a great "extra" border along the center square.


Add the First Border:
Step 1: Lay out the 12-1/2" navy allover snowman square, (4) 6-1/2" x 12-1/2" stripe pieces, and the (4) holly blocks from yesterday, orienting the holly berries as shown. 


Step 2: Sew the fussy-cut stripe pieces to the sides of the square. Tip: As you stitch, keep the fussy cut piece on top. This allows you to "steer" the stitching slightly so that the red solid doesn't show.

Step 3: Here's the quilt center with the side border pieces added. Isn't that candy cane stripe great?!

Step 4: Sew the holly blocks to opposite ends of both fussy-cut strips as shown, noting orientation of the blocks. 

Step 5: Sew the pieced borders to the top and bottom of the center square. Border #1 is complete! 

Follow along as we make our Medallion quilt!

See the entire A Snow Family Christmas collection here and ask for it at your local quilt shop.

Wednesday, December 6, 2017

A Snow Family Christmas Medallion Quilt - Day 1

It wouldn't be the holiday season without a quilting project! 
Follow along as we use Judy Hansen's A Snow Family Christmas collection to make a medallion quilt perfect for winter! We'll start with a center square and add easy borders to create a 54" square quilt. Follow along as work toward the final quilt reveal.


Here are the prints we'll be using:


Cutting:
From the gray text:
Four 4-1/2" squares

From the red check:
Eight 1-1/2" x 6-1/2" pieces
Eight 1-1/2" x 4-1/2" pieces
Twelve berries from template*

From the green holly:
Eight holly leaves from template*

*See Step 1

Note: Download the template for the holly leaves and berries here

Step 1: Trace the indicated number of leaves and berries onto the paper side of fusible web. Adhere to the correct fabric, and cut out each shape on the drawn line. Set aside.

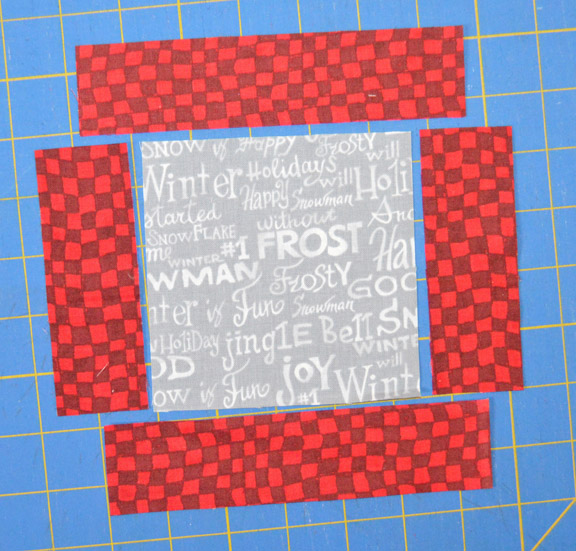
Step 2: Lay out a 4-1/2" gray square with two 1-1/2" x 4-1/2" red check pieces and two 1-1/2" x 6-1/2" red check pieces. 

Step 3: Sew 1-1/2" x 4-1/2" red check pieces to opposite sides of a 4-1/2" gray text square. 

Step 4: Sew 1-1/2" x 6-1/2" red check pieces to the top and bottom to complete the pieced square.

Step 5: Position two holly leaves and three berries on the block as shown. Fuse in place. 

Step 6: Repeat to make a total of four blocks. note the placement of the holly leaves and berries on each block; these will be corner blocks in the first border, so be sure text print is oriented correctly before you fuse.


An elf on the shelf has joined our studio for December (see him more often on Instagram). We've been lucky that he hasn't caused much mischief yet--he even offered to hold up today's quilt block for a photo!

Follow along as we make our Medallion quilt!

See the entire A Snow Family Christmas collection here and ask for it at your local quilt shop.