One of our demonstrations at QuiltCon showed how to use the 2-1/2" precut squares (called Paint Chips) from our Painter's Palette Solids to make the Fourpatch Parade tutorial, using wonky four-patches. Today we're sharing the information from the demonstration with you, as a tutorial.
 |
| Finished quilt measures 28-1/2" x 37" |
The hardest part of this quilt is choosing which colors to use from the Paint Chip pack! Each Paint Chip pack includes 84 different 2-1/2" squares.
Fourpatch Parade
Note: This tutorial will give specific cutting for the quilt shown. However, we encourage you to use the techniques we demonstrate and choose your own fabric widths, row arrangement, etc.
Materials:
1 Paint Chip Pack
1 yard each White and Silver
1/3 yard Blush (for binding)
1/3 yard Turquoise (for binding)
1 yard backing fabric
35" x 43" piece of batting
Cutting:
Again, the number and width of strips listed here will make the quilt shown; feel free to experiment with your own number of strips, width of strips, and four-patch placement.
From the White:
One 2-1/2" x 42" strip
Two 2" x 42" strips
Eight 1-3/4" x 42" strips
Two 1-1/2" x 42" strips
From the Silver:
One 3-3/4" x 42" strip
One 2-1/2" x 42" strip
One 2-1/4" x 42" strip
Two 2" x 42" strips
Eight 1-3/4" x 42" strips
From the Blush:
Four 1-1/2" x 42" strips
From the Turquoise:
Four 1-3/4" x 42" strips
Make the Four-Patches:
1. Choose two four-patches and layer them together. Using a ruler to create a straight line, cut the four-patches approximately in half and slightly on an angle.
2. Pair the left-hand yellow piece with the right-hang purple piece and vice versa.
3. Fold one piece over the other so the cut edges align.
4. Stitch on the cut lines and press the units open. Press the seam allowance on both units toward the same color (this allows them to nest in the next step).
5. Layer the two units together, with colors opposite, so the seams touch. The seam allowances should nest. Lay a ruler on the two pieces and mark a line approximately in the middle, again on a slight angle.
6. Sew 1/4" on either side of the marked line. Note: You can pin these units if you prefer, but the nested seams will help keep the pieces together.
7. Press both units open.
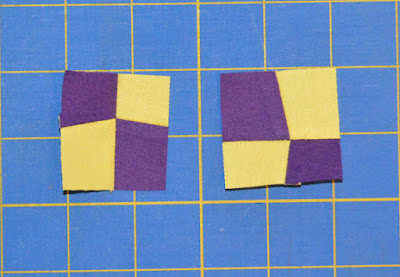
8. Trim wonky four-patch to measure 1-3/4" square. You may need to rotate the ruler slightly to make it fit.
9. Your finished four-patches:
10. Make as many four-patches as you like. Our quilt uses 32.
Make the Quilt:
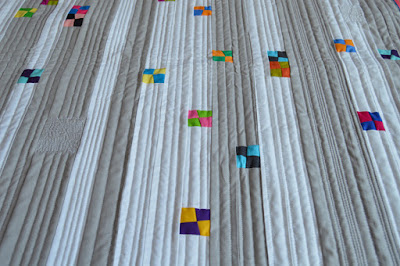
1. Lay out the White and Silver strips as desired and play around with the positioning of the four-patches on the 1-3/4" wide strips. When placing the four-patches, consider spacing along the strip, color placement between strips, and spacing between rows. Solid strips of the same colors positioned around four-patches will create the illusion of floating.
Here's our strip order: White 2-1/4", White 1-3/4", Silver 2", Silver 1-3/4", Silver 1-3/4", White 1-3/4", White 1-1/2", Silver 1-3/4", Silver 1-3/4", White 1-3/4", Silver 1-3/4", Silver 2-1/2", White 1-3/4", Silver 2", White 1-3/4", White 2", White 1-3/4", Silver 1-3/4", Silver 1-3/4", White 1-1/2", White 1-3/4", Silver 3-3/4", White 1-3/4", White 2", Silver 1-3/4", Silver 2-1/4".
2. Once you're happy with the design layout, pick up one 1-3/4" strip at a time, cut it approximately where you'd like to insert the four-patch, and stitch the strip pieces to opposite sides of the four-patch. Replace the pieced strip in your design and repeat with each remaining four-patch strip.
3. Sew the strips together lengthwise. The strip ends will not match up perfectly. That's okay! After the strips have been joined, trim the sides to the desired width (ours measures 28-1/2" wide).
4. Layer the quilt top with backing and batting and quilt as desired. Ours has primarily straight-line quilting, with some fun quilted four-patches (see bottom left in the photo below)
5. Use the Blush and Turquoise strips to create and stitch on a flange binding. (Find a tutorial here.)
You're done! Enjoy!
p.s. Make this quilt in different sizes--this technique would be fun to use for a table runner or even a mug rug.
See all 168 of our Painter's Palette Solids colors here and ask for them (and Paint Chips!) at your local quilt shop!


Clever idea for using the Paintchips. Thanks for sharing the tutorial, especially for those of us who were not able to attend Quilt Con this year!
ReplyDeleteLooks fun.
ReplyDeleteStunning!
ReplyDeleteVery fun--great technique and great quilt!
ReplyDelete