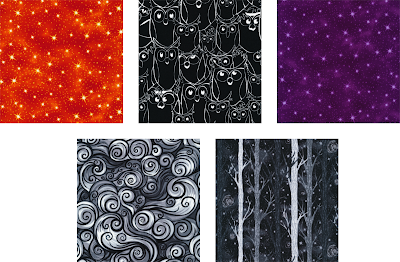
Who's ready for a little fall fun with some cute owls? We have several blogging designers working with Judy Hansen's Nite Owls line and we're excited to share their projects! Enjoy today's tutorial, Halloween-inspired placemats by Yvonne at Quilting Jetgirl, and then find out how you can win a fat quarter bundle of Nite Owls to play with yourself! Be sure to stop back this week for more Nite Owls tutorials!
Here's Yvonne!
When I saw the Nite Owl fabric line, I was really drawn to the darker prints in the line. I pulled together a Halloween inspired grouping, and I created a fun placemat tutorial that I am pleased to share with you today.
When I saw the Nite Owl fabric line, I was really drawn to the darker prints in the line. I pulled together a Halloween inspired grouping, and I created a fun placemat tutorial that I am pleased to share with you today.
Nite Owl Halloween Placemat Tutorial
Materials
Fabric Selection (120-7071, 120-7083, 120-7072, 120-7113,
and 120-7102)
Focal Print (Owls) – ½ yard
Background Print 1 (Orange) – ½ yard
Background Print 2 (Purple) – ½ yard
Backing Fabric (Swirls) – 1 yard
Binding Fabric (Trees) – ½ yard
Cutting
Instructions
Focal Print (Owls)
·
Cut (3) 4 ½ʺ x Width of Fabric (WOF) strips
o
Subcut (24) 4 ½ʺ x 4 ½ʺ squares
Background Print 1 (Orange)
·
Cut (2) 4 ½ʺ x WOF strips
o
Subcut (12) 4 ½ʺ x 4 ½ʺ squares
·
Cut (5) 1 ½ʺ x WOF strips
o
Subcut (24) 1 ½ʺ x 3 ½ʺ rectangles
o
Subcut (24) 1 ½ʺ x 4 ½ʺ rectangles
Background Print 1 (Purple)
·
Cut (2) 4 ½ʺ x WOF strips
o
Subcut (12) 4 ½ʺ x 4 ½ʺ squares
·
Cut (5) 1 ½ʺ x WOF strips
o
Subcut (24) 1 ½ʺ x 3 ½ʺ rectangles
o
Subcut (24) 1 ½ʺ x 4 ½ʺ rectangles
Piecing
Instructions
Half-Square Triangle (HST)
Blocks
Using (12) focal print 4
½ʺ x 4 ½ʺ squares and (12) background print 4 ½ʺ x 4 ½ʺ squares, make (24) 3 ½ʺ
x 3 ½ʺ squares. Place one focal print 4 ½ʺ x 4 ½ʺ square and one background
print 4 ½ʺ x 4 ½ʺ square right sides together. Mark a diagonal line from corner
to corner on the wrong side of the background fabric and sew a ¼ʺ seam
allowance on either side of the marked diagonal line. Note that to keep the
focal print “right side up” during piecing, half of the diagonal lines should
go from the upper left to the lower right, and half of the drawn diagonal lines
should go from the lower left to the upper right as shown in the image below.
Cut along the marked
diagonal line to form two HSTs, pressing the seams open.
Trim to 3 ½ʺ x 3 ½ʺ square,
noting that the HSTs are generously sized to allow you to frame the focal print
in the HST to your best advantage.
To complete one 4 ½ʺ x 4
½ʺ block, orient your HST with the focal print right side up. Sew a 1 ½ʺ x 3 ½ʺ
rectangle to the side of the focal print. Press seam open. Sew a 1 ½ʺ x 4 ½ʺ
rectangle to the remaining exposed side of the focal print. Press seam open.
The image below shows how each HST orientation is pieced into a 4 ½ʺ x 4 ½ʺ block.
Block Piecing Diagram
Layout (12) 4 ½ʺ x
4 ½ʺ blocks into (3) rows and (4)
columns. Sew rows together into rows, pressing seams open. Sew rows together,
pressing seams open. The placemat top should finish at 12 ½ʺ x 16 ½ʺ.
Use whatever layout pleases you, or follow the layouts shown in the pieced
placemats below.
Suggested Placemat Layouts
Repeat with remaining blocks to piece (4) placemat tops.
Finishing the Placemats
Cut placemat backing to be
at least 14ʺ x 18ʺ. Layer backing (wrong side up), batting, and quilt top. Baste
the layers together using your preferred method. Machine quilt as desired.
From your binding fabric,
cut (6) 2 ½ʺ x WOF strips. Cut (2) strips in half and join (1) full WOF and (1)
half WOF strip together to create (4) double folded 60ʺ binding roll.
Trim placemats square,
leaving 3/8ʺ beyond each triangle point (see image above) and bind using your
favorite binding technique.
I hope you enjoy the Nite Owl Halloween Placemat
tutorial!
Thanks Yvonne! Love the floating triangles in these! Head over to Yvonne's blog to find out how you can win a fat quarter bundle of Nite Owls for yourself!
And be sure to visit the blog again tomorrow for another Nite Owls tutorial.
Day 3: Look Whoooo's Here Door Banner
Catch all the days of our hop!
Day 2: Throw pillow by Connie at Freemotion by the RiverDay 3: Look Whoooo's Here Door Banner


Always love Yvonne's tutorials!
ReplyDeleteThanks for the great tutorial, and I just love that adorable fabric!
ReplyDeleteThanks for the great tutorial, and I just love that adorable fabric!
ReplyDeleteGreat tutorial!!! Thanks for sharing! I know 4 little ones that these would be perfect for!!
ReplyDeleteHI THANKS FOR NEAT TUTORIAL !!!
ReplyDeletemsstitcher1214@gmail.com
Thanks for the tutorial for the cute placemats.
ReplyDeleteThanks for the tutorial.
ReplyDeleteThank you for the tutorials!
ReplyDeleteLove the pillow! Thanks for the tutorial,
ReplyDeleteGreat pillow! Just what is needed for Halloween!
ReplyDeleteThese are adorable, thanks for the tutorail
ReplyDeleteLove the fabric!
ReplyDeletecork@pa.rr.com
Love the floating triangles. And the straight line quilting!
ReplyDeleteLove the placemats in those beautiful fabrics.
ReplyDeletegoogle 995
ReplyDeletegoogle 996
google 997
google 998
google 999
google 1000
google 1001
google 1002