Friday, February 14, 2014

Irresistible Valentine Ideas

Somehow, Valentine's Day always sneaks up. So even if you don't have time to make a last-minute treat to celebrate cupid's holiday, we hope these ideas from our Pinterest board will put you in a chocolate-and-hearts frame of mind! 

(See our entire Valentine's Day Pinterest board here.)

Don't these cuties remind you of the feathered friends in Judy Hansen's Nite Owl fabrics?!
Source

Pink hot chocolate?!?!
Source


Here's an easy one you can still do for dinner tonight:
Source


Mmm...can't go wrong with bacon!
Source


Almost too pretty to eat. Almost.
Source


This will make you laugh!
Source

Don't forget...follow us on Pinterest to see the rest of our Valentine pins and more!
Check out our post of great Valentine's Day project ideas here, and a tutorial for quick and easy cards here.
And...
 Happy Valentine's Day!

Thursday, February 13, 2014

Quick & Easy Valentine's Day Cards

Can you believe how much store-bought greeting cards cost these days? Who needs 'em when you can make your own?

Grab some cardstock (or a package of plain cards and envelopes from your local craft shop) and follow these easy steps to make a simple Valentine card for someone special.

Materials:

  • Cardstock or pre-folded card (ours measure 4.25" x 5.5", so the heart templates are sized accordingly)
  • Fabric scraps (we used Marblehead!)
  • Glue stick

Download the pdf of heart templates here.

Don't these Valentine-colored Marblehead prints just put you in a hearts-and-chocolate kind of mood?!

To make the 3-heart card:

Step 1: Cut out the paper heart shapes. Choose your desired fabrics, and pin a heart shape to each fabric.

Step 2: Cut out each heart shape. Position them on the card front in an arrangement you like.

Step 3: Remove the hearts from the card front and apply the glue stick to the card approximately where the first heart will go. Smooth the fabric heart down over the glue.

Step 4: Stitch the heart to the card (tip: don't forget to open the card before stitching!) close to the outer edge of the heart. 

Step 5: Repeat with the second and third hearts.

You're done!

To make the patchwork heart card:
Step 1: Cut three 1" x 5" red strips and three 1" x 5" pink strips. Sew them together, alternating colors, to make a pieced unit.

Step 2: Position the cut out heart template on top, pin in place, and cut the shape out.


Step 3: Apply the glue stick to the card front approximately where the heart will go. Smooth the heart into place. Stitch around the outer edge of the heart using a straight stitch, zig zag, or buttonhole stitch (we used a buttonhole here).

You're done!

Write a message on the inside of your card and deliver to your Valentine! 

Happy Valentine's Day!


Tuesday, February 11, 2014

Even at the Olympics!

Are you watching the Olympics in Sochi?

It's been fun to see quilting play a role in this year's games, starting with the Olympic patchwork quilt, developed by the creative department of Bosco, a leading Russian sportswear company, and given to the Sochi 2014 Organising Committee. Their reason for choosing a quilt?
..."we settled on something familiar, warm and welcoming: the patchwork quilt."

Cool!


Source
The pattern appears on jackets the Russian volunteers are wearing at the Games, among other places.


The fabrics used in this quilt represent patterns and motifs from crafts in each of Russia's 89 regions. you can see swatches here.

See some of the traditional crafts these fabrics are based on here.

And don't forget the U.S. snowboarding team jackets, designed by Burton, and based on a quilt:

Where else have you seen quilt-inspired designs?

Thursday, February 6, 2014

Making a Heartfelt Holiday

With Valentine's Day just around the corner, we wanted to share a few heart-themed patterns that have caught our eye. Some are free downloads; some are available for purchase; we think you'll {heart} them all! 

Heart's Desire pillow by Jen Kingwell 
featured in American Patchwork & Quilting magazine, February 2014
Find it here


Puzzle Hearts
originally featured in Quilter's World magazine, February 2011
Now available at Annie's e-Patterns Central


Have a Heart quilt by Nina Lise;
Free download available here


Valentine Throw Pillow by Amy Smart from Diary of a Quilter
Tutorial can be found here


Valentine Hearts from Bunny Hill Designs
Free download available here


Scrappy Sweethearts by Susan Mayer
Available through Quiltwoman.com


Roses are Red by Sue Harvey and Sandy Boobar
Free download available here

Hope you're feeling inspired by more than just chocolate as February 14 approaches! 
And, if you're looking for some fun red, pink or white print fabrics for a valentine project, we can help with that too!

Batiks 

Roses Are Red

Wednesday, February 5, 2014

Transform a bedroom...easy as 1, 2, 3!

As quilters, we're often asked "just how many bed quilts do you have?" It's fun to make a variety of bed quilts, and fun to have a variety of looks to change up a room. 

But what if there was an easier way? What about a bed runner? Less work, less storage space, all the impact! Terry Albers of Hedgehog Quilts designed this beautiful bed runner using the Summer Breeze  collection for Easy Quilts magazine.

Blue on Blue by Terry Albers; machine quilted by Sandy Schilawski;featured in Easy Quilts Spring 2014 


Q. What makes bed runners so great?
Terry: A bed runner can make a quick change for your room.  It lets you dress up
your bed without the time, expense and storage issues of a big quilt.

Q. What attracted you to the Summer Breeze fabric collection?
Terry: Color...it's always about the color for me. I'm a fan of watercolors and
that's the feeling I got when I saw this fabric. The unexpected hint of
purple really makes the line pop. It's subtle but makes an impression.

Q. Love the coordinating pillows! What can you tell us about them? 
Terry: I love the way the throw pillows accent and enhance the runner. They help
give the room a more pulled-together feel.  I used 20" pillow forms and make
all my "coordinating" pillow covers the same size. Quick change without
storage issues. When I want to change out the room, I just pull off the
pillow covers and keep them with the runner.

Q. Can you talk about how you came up with the design?
Terry: I knew I wanted to make a bed runner for my guest room. I played with some
of my favorite table runner designs, enlarged the blocks and tweaked the
borders.

Q. Favorite fabric in the collection?
Terry: My favorite fabric is the large floral on the light background...it looks so
airy.


Q.  What are the challenge/benefits of working with a fairly monochromatic collection?
Terry: While this line is fairly monochromatic, working within the group helps me
make sure the tints and values complement each other. The challenge lies in
arranging the design elements with enough contrast (in color and scale) to
keep the fabrics from mushing together. Also, the light purple accent draws
out the color differently in each fabric, helping the eye separate the
elements.

Q. Your bed runner seems wider than most traditional ones. How come? 
Terry: This bed runner is definitely wider than most.  It has a bigger presence on
the bed than a runner just at the foot. I love the layered look I get by
starting with the off-white matelasse bedspread, the turned back sheets and the
regular pillow cases in the same off-white and then the wide runner with the
accent pillows. It all looks luxurious and welcoming.

Q. Can you talk about the machine quilting?
Terry:I brought the runner and the pillow tops to Sandy Schilawski so that she could use the


same quilt design on everything. We chose an all-over design for the runner
and then enlarged the same design for the pillow covers. It wasn't so much
about matching the design as it was about keeping the flow smooth from the
runner to the pillows. I was looking for a peaceful feel to the whole
project.


See the entire Summer Breeze collection here.
Learn more about Terry and her work here.
Find Easy Quilts magazine here.
Find the kit for the Blue on Blue runner here.

Monday, February 3, 2014

2-1/2" Strip Tutorial!

Hello! My name is Connie Kresin Campbell and I blog at Freemotion by the River. I'm excited to share  a tutorial here at Inspired by Fabric using these beautiful Marblehead Pleasing Pastel fabrics.

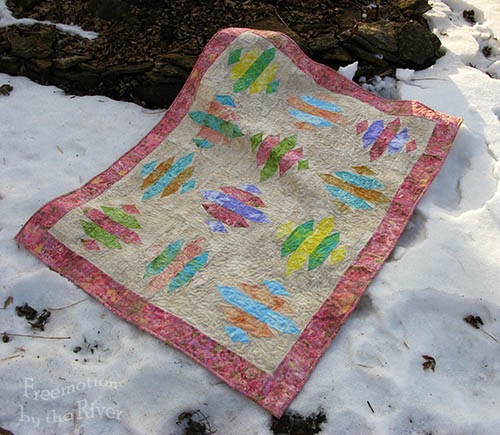
I always enjoy taking my quilts outside if the weather and wind cooperate. I live right along the Mississippi River in Iowa and haven't lost a quilt yet.

I put the quilt up on a window before I quilted it and it looks like stained glass.
The block has quite a few pieces but is very easy to put together. I used my Tri Rec rulers, if you don't have them the AccuQuilt die Triangles in Square 2" will work, or you can download my templates here.

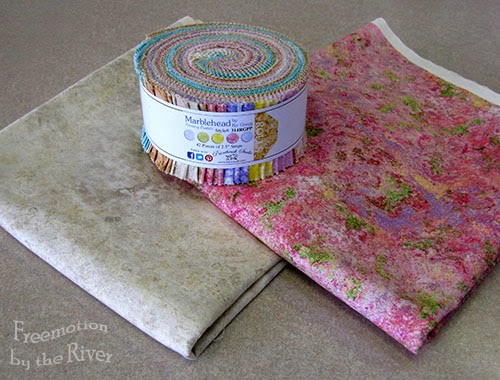
I used a bundle of 2-1/2" pre-cut strips plus some additional yardage of Marblehead Pleasing Pastels by Ro Gregg.
Marblehead Pleasing Pastels from Fabri-Quilt 
Fabric requirements for this 42" x 54" quilt:
Each block is 12-1/2" square unfinished
Quilt uses 12 blocks
  • 1 jelly roll of Marblehead Pleasing Pastels
  • 1-5/8 yd of #120-42924 Creme
  • 1-1/4 yd of #120-42921 Pink
  • 1-3/4 yd Backing piece, I used muslin
  • Batting, I used Warm & Natural

You will use two 2-1/2" strips in colors of your choice to make your block. You can get 2 blocks out of these 2 strips if you use the cutting info below for one and then switch the colors for the next.
For example this block shows a pink center, cut all the pieces and then cut another, reversing the colors to a teal center. If you want more variety there are enough strips to make blocks by just choosing 2 colors.


For each block cut the following: I am going to use pink and teal as an example.
  •  Pink - one 2-1/2" x 8-1/2"  and 6 - triangles
  • Teal - two 2-1/2" x 4-1/2" and 4 - triangles
  • Creme - four 2-1/2" squares, four 2-1/2" x 4-1/2", two 1-1/2" x 12-1/2" and 20 side triangles
Cut your triangles with the Tri-Rec tools at the 2 1/2 inch line or use my templates.
cutting the triangles
When you cut the side triangles, be sure and keep the strip doubled with wrong sides together so you will get mirrored images....one for each side of the pink triangle. Use the 2-1/2" line on the template.

If you use the Tri-Rec be sure and cut the little corner piece, it will help you match your pieces.
cut corner when using the Tri Rec tools

Here is a photo to show you how to line up the side triangle pieces.
lining up your pieces

I like to make all the pieces using the triangles and side triangles first. I used a 1/4" seam allowance while making the entire quilt.
Making the triangle pieces

Here are all the triangle pieces for one block.
Triangles all pieced

Start sewing your sections of the block together.
Sewing the block together
sewing block

Add a 1-1/2" x 12" strip to 2 sides of the block as shown.
block strips

Here is a diagram showing the sizes of the pieces in each section.
sewing diagram

Here is your block all pieced! Now just make 11 more for your quilt.
Block all pieced

Here are my blocks all pieced together.
Quilt layout

Follow the diagram below to put your blocks in rows.
I used the pink for a 3" border and the binding, which I cut 2-1/2" wide.

You can really see on this diagram where I reversed the order of the color of fabrics....for example see the green/yellow block? One has the yellow in the center and the other has the green in the center.
diagram of setting the blocks at Freemotion by the River
I hope you enjoyed the tutorial! Now, how about a giveaway?!?

One lucky person will receive this beautiful strip set of Marblehead Pleasing Pastels by Ro Gregg that Fabri-Quilt is giving away. Head over to Connie's blog to help her name her quilt and see how you can enter to win the bundle!


Marblehead by Ro Gregg giveaway