During our Summer of Sewing series, we'll be featuring weekly tutorials using our new fabric collections (and giveaways, too!). Join us each week, sit back, relax, and then start sewing!
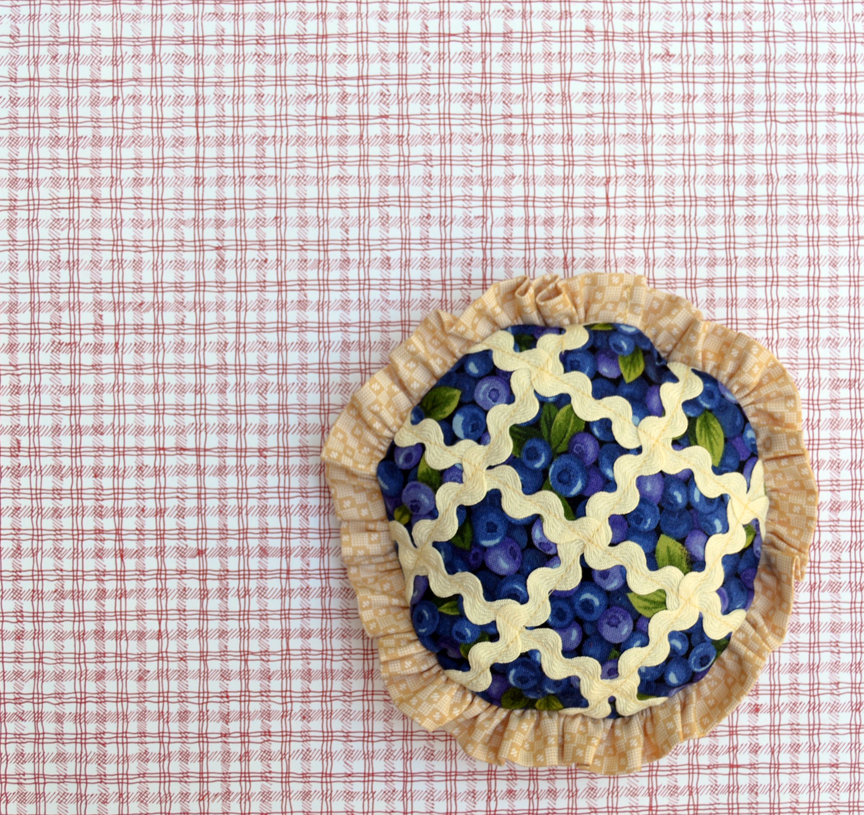
This week's project features fruit prints from Farmer John's Garden Party, as well as a beige print from the Essentials 2 collection. We've made Pie Pincushions in two different sizes, and using two different crust options. These prints are mouth-wateringly delicious, and these pies are calorie-free!
We chose to make pies using the blueberry and cherry prints, but the peach and strawberry prints would be cute too! You'll also need cream or beige rick rack.
Let's get started!
You'll Need: (for either pincushion)
(1) 6" square of a fruit print
1/4 yard beige print
6" x 12" piece of muslin
1 roll of cream or beige rick rack
(2) 6" squares of fusible batting
Crushed walnut shells or preferred pincushion filler
Straw or similar narrow tube and shish kebab stick or dowel that fits inside
Cutting (for either pincushion)
From the beige print:
(1) 1-1/4" x 42" strip (for shirred edge on cherry pie)
OR
(1) 2" x 42" strip (for ruffled edge on blueberry pie)
(1) 6" square
Click here to download the two circle templates (or find a bowl or roll of tape or other circle you can trace). The smaller template (for the cherry pin cushion) measures 4-1/2" in diameter; the larger template (for the blueberry pie pincushion) measures 5-1/2" in diameter.
The Cherry Pie Pincushion measures 4" in diameter.
Make the Cherry Pie Pincushion:
Step 1: Print the small template circle onto paper and cut it out.
Step 2: Fuse (1) square batting piece onto the wrong side of the cherry square. Position the template on top, trace, and cut out.
Step 3: Cut (6) 6" lengths of rick rack. Position (1) length across the center of the circle. Position (3) lengths perpendicular to the first, with one laid over the top of first strip and the remaining two tucked underneath. Pin if desired.
Step 4: Stitch down the length of the original length of rick rack. Weave two more lengths of rick rack, alternating under and over the other lengths. Stitch down the middle of each length to secure. This creates the criss-cross appearance for the top of the pie.
Step 5: Trim the rick rack ends even with the cherry circle.
Step 6: Fuse the second batting square to the wrong side of the beige square. Mark the same circle shape on top and cut out.
Step 7: Layer the cherry top right side up and crust right side down, aligning edges. Pin around the edges to secure and then sew, using a 1/4" seam allowance and leaving an opening for turning.
Step 8: Cut wedges in the seam allowance (be careful not to cut through your stitched line!) to ease turning.
Step 9: Turn pincushion right side out and press.
Step 10: Fold the 6" x 12" muslin piece in half and trace the circle shape onto it. Keep the fabric folded and stitch a generous 1/4" inside the drawn line. Leave a small opening (1"). Use pinking shears to cut 1/4" past the stitch line. Use a funnel to fill the muslin pocket with crushed walnut shells and stitch the opening closed. Fill firmly but do not overfill.
Step 11: Tuck the filled pocket inside the pie pincushion and slipstitch the opening closed.
Step 12: Fold the 1-1/4" x 42" beige strip wrong sides together and stitch the long edge and one short edge. Use a straw or tube and narrow stick (like a shish kebab skewer) to turn right side out. If you haven't tried this technique, find out more here--it works great!
Step 13: Use a safety pin to work the elastic through the tube. Secure the elastic at each end with a pin. Tuck the raw edges in one end and stitch, securing the elastic.
Step 14: Hand stitch the shirred strip to the edge of the pie pincushion, positioning it over the seam. As you get close to the starting point, determine how much more elastic and shirred fabric you need, stitch to secure the elastic at that point, and then trim elastic to 1/4" past the seam and fabric tube to 1/2". Fold the extra fabric in to create a finished edge and tuck the other end in. Continue stitching the "crust edge" in place.
Your finished pie!
The Blueberry Pie Pincushion measures 5" in diameter (plus ruffled edge).
Make the Blueberry Pie Pincushion
Step 1: Follow steps 1-6 for the cherry pie, using the larger circle template.
Step 2: Fold the 2" x 42" beige strip wrong sides together and press. Stitch the long edge using a long basting stitch. Pull on the basting stitch to create a ruffle approximately the same length as the diameter of the blueberry pie top.
Step 3: Fold one short raw edge under and stitch to create a finished edge. Pin the raw edges of the ruffle to the top of the blueberry pie as shown, adjusting the ruffle as you go so it's uniform. As you approach the starting point, estimate how much more ruffle you need, trim 1/4" past that point, and fold and stitch the short end to create a finished edge. Continue pinning, slightly overlapping the two short ends.
Step 4: Stitch the ruffle to the pie top to secure.
Step 5: Repeat steps 7-11 for the cherry pie pincushion to finish this version.
Your finished pie!
Would you like to win a bundle of Farmer John's Garden Party? Leave a comment below (or on IG) telling us which is your favorite fabric in this collection. Giveaway is open through Sunday, June11th at 11:59 PM CDT.
Find the entire Farmer John's Garden Party collection here and ask for it at your local quilt shop.
Download our free quilt pattern to make a lap-size fruit and veggie quilt here.
Follow along with our Summer of Sewing Series!
Click here to see all the tutorials.