Monday, December 30, 2013

Turning over a new leaf

2014 is almost upon us...are you making any resolutions? 
A new you?
Or maybe just some new fabric?! 


We've turned over a new leaf:

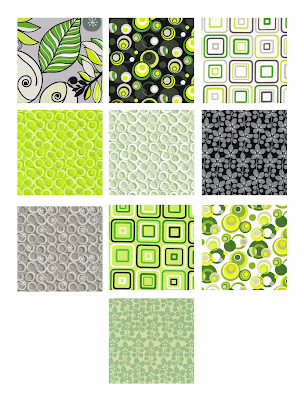
We think you'll love Cosmopolitan, a fabric line with a new, modern look.


Contemporary designs featuring squares:

And rings:

And dots:

Watch for Cosmopolitan in your local quilt shop and head over to our website to download the free pattern to make this Circles & Squares quilt, designed by Airborne Heirlooms:


Monday, December 23, 2013

Season's Greetings!

...It's both the sentiment for this time of year and the name of one of our Christmas collections. 
We're in the holiday mood, so we thought we'd share two easy Christmas-themed blocks today, both using the Season's Greetings collection.
You know, since you're no doubt sitting back relaxed, all ready for the holidays. Not out buying last-minute presents, cruising the grocery store aisles, or frantically searching for another roll of tape to finish wrapping the gifts. :)

Ornament Block


Stripe:
Cut (1) 2-1/2'' x 8-1/2'' strip

Blue:
Cut (2) 1-1/2'' x 8-1/2'' strips
Cut (1) 1'' x 2-1/2'' piece

Red:
Cut (2) 2-1/2'' x 8-1/2'' strips

Cream:
Cut (4) 2-1/2'' squares
Cut (2) 2-1/2'' x 8-1/2'' strips
Cut (1) 2-1/2'' x 12-1/2'' strip
Cut (2) 2-1/2'' x 6-1/4'' strips


Make the Ornament Block
1. Sew the 1-1/2'' x 8-1/2'' blue strips lengthwise to opposite sides of the 2-1/2'' x 8-1/2'' stripe strip.
2. Draw a diagonal line on the wrong side of the (4) 2-1/2'' cream squares. Lay a marked square right sides together on a corner of a 2-1/2'' x 8-1/2'' red strip. Sew on the drawn line and trim ½'' past the line. Press open. Repeat on opposite corner. Add cream squares to the second red strip in the same way.
3. Sew the pieced red strips lengthwise to the blue pieces from step 1.
4. Sew the  2-1/2'' x 6-1/4'' cream strips to opposite sides of the 1'' x 2-1/2'' blue piece.
5. Sew the 2-1/2'' x 8-1/2'' cream strips to the sides of the ornament. Sew the 2-1/2'' x 12-1/2'' cream strip to the bottom, and the pieced cream strip from step 4 to the top. 


Tree Block


Black print:
Cut (1) 2-1/2'' square

Green #1:
Cut (1) 2-1/2'' x 12-1/2'' strip
Cut (1) 2-1/2'' x 4-1/2'' piece

Green #2:
Cut (1) 2-1/2'' x 10-1/2'' strip

Green #3:
Cut (1) 2-1/2'' x 8-1/2'' strip

Green  #4:
Cut (1) 2-1/2'' x 6-1/2'' strip

Cream:
Cut (2) 2-1/2'' x 5-1/2'' strips
Cut (2) 2-1/2'' x 4-1/2'' strips
Cut (2) 2-1/2'' x 3-1/2'' pieces
Cut (12) 2-1/2'' squares
Cut (2) 1-1/2'' x 2-1/2'' pieces

Make the Tree Block
1. Draw a diagonal line on the wrong side of (10) 2-1/2'' cream squares. Lay 2 marked squares on the short ends of each green strip, sew on the drawn line and trim ¼'' past the line. Press open.
2. Sew the (2) 1-1/2'' x 2-1/2'' cream pieces to the ends of the second longest green row. Sew the remaining (2) cream squares to the ends of the third green row. Sew the (2) 2-1/2'' x 3-1/2'' cream pieces to the ends of the fourth green row. Sew the (2) 2-1/2'' x 4-1/2'' cream pieces to the ends of the top green row.
3. Sew the (2) 2-1/2'' x 5-1/2'' cream pieces to opposite sides of the 2-1/2'' black print square to make the trunk row.
4. Sew the trunk row and 5 green rows together to complete the tree block. 

The Season's Greetings line features a whopping 44 prints--something for everyone! We're showing a few favorites below, but you can see the entire collection here.


p.s. Cat Lady is our winner from the Garland tutorial giveaway. Congratulations, Cat Lady! Please email us at fabriquiltblog (at) gmail.com with your address. 


***Also, Candy Soehren, we are still waiting to hear from you to get your mailing address for the 
Christmas in the Woods giveaway bundle. 
Please email us at fabriquiltblog (at) gmail.com with your mailing address.


Thursday, December 19, 2013

Get your garland on! (tutorial)

Hi, it's Nancy here today with a tutorial from some sweet holiday garland. These simple shapes sew up quickly, allowing you to add a festive flair to your mantel in just a couple hours! And it uses a couple of my favorite holiday symbols!

When I saw the texture of Marblehead, I thought it looked just like a gingerbread cookie. Add in some refreshing peppermint candies, and this garland is ready to go letting you decorate with some of the season's favorite flavors!


Materials:
1/4 yard gingerbread-colored Marblehead
1/4 yard red Marblehead
1/4 yard white solid
Batting
Machine quilting safety pins
Fabric marking pen
Fusible web
White rick rack
16 black buttons
3 white buttons
Black and white embroidery floss and large needle
Miniature clothespins
Red/white braided twine

Click to download the pdf of the gingerbread and peppermint template pieces. 

Cut the gingerbread Marblehead into two 9" x 21" pieces. Cut a 9" x 21" piece of batting. Layer one gingerbread Marblehead right side down, the batting, and the second gingerbread Marblehead right side up. Pin layers together. 

Print out the gingerbread man template (find it here) and cut out. Trace four gingerbread shapes onto the quilt sandwich.


Stitch on the drawn gingerbread man lines.

Cut out each gingerbread man approximately 1/4" past the stitched line.

Lay the white rick rack along the gingerbread arm and stitch down the middle with matching thread. Trim past the edge of the arm. Repeat on the other arm and both legs.

Trim rick rack pieces so they follow the shape of the gingerbread limbs.

Using 3 strands of embroidery floss, stitch on buttons for the eyes and two buttons on the belly. Pass needle through button, through gingerbread man, back through gingerbread man, and back through button. Then tie a double knot and trim the ends. Make four gingerbread men.

Find the peppermint candy templates here. Cut out the red swirl shape and trace 18 onto the paper side of fusible web. Fuse to the wrong side of the red fabric and cut out each swirl on the drawn line. 

Cut out six 6" squares from the white solid and three 6" batting squares. Trace the circle shape onto solid white square using a fabric marking pen. Mark the center of the circle as well. Peel the paper off the back of the red swirls and position six on the white circle, spread out equally with the points touching the center mark. (Don't worry if the points don't match up exactly; they'll be covered by a button!) Press to fuse. 

Sandwich a batting square between a candy square and a solid white square; pin to baste. Stitch approximately 1/4" inside the marked circle line.

Cut out on the marked line (this is different than for the gingerbread men!). Using 3 strands of white embroidery floss, add a white button to the center of the peppermint candy piece. Make 3 candy pieces.

Use tiny clothespins to hang four gingerbread men alternating with three peppermint candies along a length of red/white braided twine. Hang on your mantel!

Thanks Nancy! To go along with Nancy's tutorial, we're giving away a bundle of Marblehead fat quarters. Leave a comment below telling us your favorite flavor of Christmas for a chance to win! This giveaway is open through Sunday, December 22nd at 11:59 EST.

Wednesday, December 18, 2013

Christmas in the Woods Winners

Did you catch Nancy's gift bag tutorial using Christmas in the Woods fabric last week? 
See the tutorial here.

We've used random number generator to select two winners from the comments to receive a kit to make their own gift bags.

Congratulations to:


Shawn and Candy, please email us at fabriquiltblog (at) gmail.com with your mailing addresses.
Thank you!


Monday, December 16, 2013

What's black and white...


What's black and white and red/read all over?
Yeah, old riddle...a newspaper. Or a sunburned zebra. 

But if you change the question just slightly: What's black and white and beautiful?
You get a very different answer. 
The "Junctures" quilt by Tony Jacobson:
"Junctures" by Tony Jacobson;
featured in Easy Quilts Winter 2013
 Tony used the Black & White collection and a simple quarter log cabin block to make this eye-catching contemporary quilt. And the best part? It was featured as a Web Bonus project in Easy Quilts so you can download the free pattern here! (The pattern also includes yardage and cutting options for different sizes, crib through queen.)

We asked Tony a few questions about his design and decision-making process. Check out his answers below:

Q. What are the challenges in working with a monochromatic palette?
Tony: You need to make sure that you work with prints with varying patterns,
values, and sizes. You want to have texture and movement in the quilt.

Q. Why did you choose the Black & White collection?
Tony: I've always found black and white quilts to be very striking. They can be neutral and work in a lot of different interiors. I design most of my quilts in black and white first to make sure that the design works well even without color. So working with black and white fabrics actually takes out a step.

Q. Why did you choose the quarter Log Cabin design? What made you put a
different color square in the outer frame corner?
Tony: I wanted to work with a single block design and see what would happen if you just twisted the block around. Adding the square in the outer frame solved a problem of how to handle the stripe pieces coming together and also provided a secondary block pattern when the block was twisted around.

Q. Can you talk about how you oriented the stripe fabric in the block?
Tony: The stripes needed to go the long way so that the movement would flow through the entire quilt. I think having them the short direction would have caused design to stop at the edge of the block and would stop the overall flow from one block to the next.

Q. Did you consider adding color to the quilt?
Tony: I did consider it and actually had one design that had several additional colors in it, but decided that I liked the texture and movement I was getting with the selection of fabrics from the Black & White collection without the additional colors.

Q. Did you try other layouts?
Tony: I actually did three different designs using this collection. In the end this was the design that was chosen bythe editorial group for use in the magazine. I'm still thinking that Iwill make at least one of the alternate designs to see how it looks in real life. My mother-in-law really likes my black-and-white quilts, so I'm sure she won't mind if I have an extra one to give to her.

Find the Black & White collection here.
Find Easy Quilts and download the free pattern for this quilt here.
Find the kit for Junctures here.

Friday, December 13, 2013

Feeling rejuvenated with Lagoon

On dreary December days, it's so refreshing to introduce a splash of color! Come visit Lagoon, a new fabric collection in cool hues.

Here's a closer look at some of our favorite prints from the collection. If you like texture, you'll love Lagoon, because these prints are all about texture!


This last swatch is a color that has been in the news lately...
Radiant Orchid, the 2014 Pantone Color of the Year!

You find the press release announcing Radiant Orchid's selection here.


And as a side note, if you're looking to start wearing Pantone's Radiant Orchid hue, Huffington Post compiled some suggestions on how to do so stylishly without looking too much like a certain purple dinosaur (ahem...Barney). See the post here.

See the entire Lagoon collection here and ask for it in your local quilt shop. 

Wednesday, December 11, 2013

Holiday tip: Gift wrap shortcut!

It's that time of year when many people seem to be in a gift wrap frenzy! We've got a solution for you to minimize your gift wrapping AND maximize your time at your sewing machine. (Win-win, right?!?!) 

A while back, we invited readers to email us with ideas for tutorials--we wanted to see what YOU would make with our fabric. Today we're sharing Nancy's tutorial, which uses one easy strip set to make a fabric gift bag and matching wine bottle bag. See? No fighting with the wrinkles and rips of wrapping paper, the bags are reusable for next year, and you have an excuse to spend some time sewing! Here's Nancy:

Hi all! I'm excited to be here today sharing my first tutorial. Thanks to Fabri-Quilt for the fabric and the help on putting this together. I love the snowflake and star prints in the Christmas in the Woods collection, and I used them with two Marblehead prints (green and cream) to make some festive gift bags. 

Materials:
1/4 yard each green snowflake, red snowflake, green star and red star prints
1 yard green Marblehead
3/8 yard cream Marblehead

Cutting:
Red and green snowflake:
Cut one 4" x 42" strip from each

Red and green star:
Cut one 2-1/2" x 42" strip from each

Green: 
Cut two 15" x 20" pieces
Cut one 11" x 19" piece
Cut one 5" x 42" strip

Cream:
Cut four 1-1/2" x 42" strips
Cut one 4" x 42" strip
Cut one 1" x 20" strip with a pinking shears


Sew the strips together in the order shown in the photo (or rearrange them as you like, but keep the green at one end, as it will be the bottom). To make your strip set as straight as possible, do not press any of the seams until all the strips have been attached. This prevents warping on the skinnier strips.

From the strip set, cut two 15" x 20" sections. Reserve the remainder for making the wine bag. (Isn't it great to use an entire strip set for something? I never know what to do with the leftovers!)

Sew the two 15" x 20" pieced sections right sides together, leaving the top (green star) open. Backstitch at both ends.

Cut out the bottom corners on both sides. I lined my ruler up so the 2-1/2" marks aligned with the stitched seams.

On one bottom corner, bring the side and bottom seams together so they meet. Pin the raw edges along the seams and then stitch to box the corner. Repeat on the opposite corner. 

Sew the two 15" x 20" green pieces right sides together, leaving one short end open and leaving a 5" opening in the opposite short end (circled in the photo below). Box the corners in the same way as for the outer bag.

Turn the outer bag right side out and stuff inside the lining with right sides facing. Pin the raw edges along the top, making sure the side seams match. Sew around the top with a 1/4" seam allowance. 

Turn the bag right side out through the opening. Slipstitch the opening closed. Stuff the lining in the outer bag and press the top edge. Topstitch around the top edge. 

To make the tie strap, fold the 4" x 42" cream strip in half the long way, wrong sides facing. Fold each half in to the center fold. Press. Also press each short end in 1/4" to hide raw edges.

Refold and topstitch down both long sides of the strap.

Find the center of the strap and find the center from left to right on one side of the bag. You can decide how far down the bag you want your strap. i chose to put it in the red snowflake section. Pin the center of the strap to the center of the bag and stitch with a box and an X to secure (see in the yellow circle below).

Your bag is done! Fill with a gift and enjoy giving it! No scotch tape or ribbon hassles!


Now, to use that leftover piece to make a wine bag. Square up the edges so it measures 11" wide. 

Trim 1" off the green end. Fold it in half the long way and sew the green bottom edge and up the side to create a tube with one closed end. Do the same with the 11" x 19" green piece, only leave an opening on the short end for turning. Finish using the directions for the gift bag. Instead of sewing a strap onto this, I used pinking shears to cut a strip of fabric for the tie. You can also leave it without a tie and just fold the cuff over, like in the photo on the left below.

There you have it! Two gift bags from one strip set. And you're one step closer to the holidays.


Thanks Nancy! 

To go along with Nancy's tutorial, we'll be giving away two "kits" with the fabric needed to make your gift bag duo. For a chance to win, sign up to follow our blog (through a blog reader like Bloglovin' in the righthand sidebar or by email) and then let us know you've done so. Gain a second entry by liking us on Facebook and letting us know you've done so. If you've already done either/both those things, great! Just let us know in your comment. For fun, in your comment, also let us know what's one thing you're still hoping to get finished before the holidays (could be a gift you're making, cookies you're baking, cleaning the house...). The giveaway will be open through Monday, December 16th at 11:59 EST and we'll use random number generator to select two winners.