Friday, November 2, 2018

Missing Us? We've moved!

If you've been missing those Inspired by Fabric emails in your inbox, we can help! 

We've moved the blog over to the Paintbrush Studio website. Click on the "Create with Us" tab and select Blog -Inspired by Fabric.


What have we been posting about? 
Jacquie's Favorites, Manzanita Grove, the new Dianthus collection, candy corn, and so much more! We hope you'll join us.

Read all the blog posts here.

Tuesday, October 2, 2018

We've moved!

Our blog has moved over to the "Create with Us" tab on our website.


Find us there and bookmark us!


Don't miss our exclusive interview with MJ Kinman about her gorgeous "Between River & Sky" quilt, inspired by Old Pogue Distillery and made from Painter's Palette Solids. 

Read about it here.


Wednesday, September 26, 2018

Holiday Preview

It's not time to pull out the jingle bells or stockings just yet, but you can get a head start on your holiday quilting! We have two seasonal fabric collections available in stores--grab a bundle and finish up your holiday sewing so you can spend December relaxing! (Or making cookies, wrapping presents, and decorating...but hey, it's October now, so you can dream!)

Red + Grey Christmas: 
This wintry collection uses a modern gray, black and red palette for a touch of holiday sophistication. We’ve paired pinstripes, plaids and stars with snowmen and polar bears to create a cozy feel. Choose one of the three panels: blocks, advent calendar, or stockings to whip up a quick project! See the collection here and ask for it at your local quilt shop.


Use the block panel in the Red + Grey Christmas Quilt--a free pattern that is easy to make and perfect for snuggling under during chilly winter evenings. 
Download the FREE quilt pattern here.

Blue Holidays:
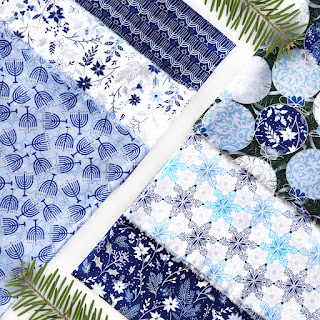
These frosty prints bring a breath of fresh air to holiday style. Cool blues and silvers sparkle in elegant prints—swirls, snowflakes, ornaments, menorahs, and more. Stocking and advent calendar panels also available. See the collection here and ask for it at your local quilt shop.

Watch for our Blue Holiday Quilt Along on the blog later this fall!

Monday, September 24, 2018

Mad for Solids - What did they make?

Do you have a fabric bundle that you admire daily, but can't quite decide what to do with it? We checked in with some of our Mad for Solids designers to see what they've used their curated Painter's Palette Solids bundles to make. After seeing these projects, we're itching to start sewing...what about you? 


Spring Fling

Cheryl says, "With my bundle of solids, I made a mini quilt using little flower applique shapes and then added some straight line quilting to give the mini texture and hold down the flowers.  I gave the mini to my co-worker who's husband is battling cancer." Read more about it here.


Heirloom Opal

Shelley used her cool color palette to create the Heirloom Opal quilt. Love that rich purple background!


Re-Set
Simone @simone.g.b

Simone's bold colors pop on the navy background in this graphic yet simple design.


Mid Century Mod
Tania @iamgingerq

Tania says, "I love to play around with old blocks as see how I can tweak them just a bit.  My favourite block is the shoofly. I changed the centre square to a rectangle, altered the hsts to be one large and one small and tada...my mid mod shoofly. I believe that modern quilters have a link back to traditional quilters, it is part of our creative history."

Love this little scissors mini she made too! 


Prosecco & Cream by the Sea

Jayne says, "I’ve been waiting for the perfect design to use my Mad for Solids bundle! I recently went through a Mondrian Art phase that inspired my latest design ‘Modern Geometry.’ While I’m not a math person, the idea of fitting shapes together was intriguing and a puzzle I was determined to figure out. And the icing on the cake has to be the colors!"


See the sixteen Mad for Solids bundles here.
Inspired? Grab a bundle and start sewing. The Final Four bundles are available here (plus color cards!).
Find all 168 Painter's Palette Solids here.

Tuesday, September 11, 2018

A Quilt of Wonder

We love Yvonne Fuchs' aptly named "Wonder" quilt, featured in Issue #65 of Love Patchwork & Quilting magazine. The soothing turquoises, graphic design and detailed quilting combine to create a true work of art inspired by the ocean. Keep reading to learn more about Yvonne's quilt, made using our Painter's Palette Solids.
"Wonder" designed, pieced and quilted by Yvonne Fuchs;
featured in Issue #65 of Love, Patchwork & Quilting
(photo courtesy of LP&Q)


Q. Can you talk about your inspiration for the quilt? 
YF: Wonder is a design sketch I made while sitting on a beach, listening to the waves lap against the shore, looking out at the turquoise colors deepening as the water depth increased off shore. I don’t think I’m the only one that looks out at the horizon across an ocean and is filled with a sense of wonder…

Q. How did you choose the fabrics you used? 
YF: I like to use color cards when selecting my fabrics, as getting to see the fabric with my own eyes and not on a computer screen can make a very big difference. I have a Painter's Palette Solids color card, and Azure, Aruba, Pale Aqua, and Gulf Stream captured the turquoise colors and tones that I remember from sitting on the beach looking out across the shallow waters on a bright, summer day.

Q. What do you like about the Painter’s Palette Solids? 
YF: I like the weight and tight weave of the Painter's Palette Solids. They press easily and beautifully. They have very little to no fraying, which is something I paid a lot of attention to with the Wonder quilt because I used a lighter color for the predominant background, so I was pleased when I didn't need to spend a lot of time clipping stray threads prior to basting the quilt for quilting.

Q. Tell us about your design.
YF: My goal with the design was to achieve an ebb and flow feeling and combine it with a deepening turquoise color gradient. I specifically really like the push/pull feeling that is created by having different colors in the stripes touching the dark Gulf Stream squares.

Q. Can you talk about how you quilted it and why you made the decisions you did in each color? 
YF: I knew that I wanted the Gulf Stream squares to be focal points for the quilt, but I wanted them to also have a sense of motion that kept your eye moving around the quilt, so I selected the square spiral straight line quilting motif to draw the eye in and add depth and motion. I wanted the focus on the rest of the piecing to be more about a push/pull tension than about the quilting, so I hoped to achieve that by keeping things simple with vertical back and forth lines in the stripes and horizontal lines in the background. I also wanted the quilted straight lines to evoke the sense of the lines of waves stretching out across an ocean.
(photo courtesy of LP&Q)


Q. What do you like best about this quilt? 
YF: My favorite parts of the quilt are the dark Gulf Stream areas and the quilting within them. I love how they are anchors in the design as your eye moves across the quilt.

Q. Any other ideas for this design? 
YF: I personally think that this would would be stunning remade in red, gold, and blue for anyone who is a Wonder Woman fan!


Learn more about Yvonne's quilt here and follow her: @quiltingjetgirl
See all 168 Painter's Palette Solids colors here.
Find Love Patchwork & Quilting here (you can purchase a downloadable issue!).


Friday, September 7, 2018

Five Friday Faves

Happy Friday! Here's a little eye candy to start of your weekend on a quilty note! 


1. Check out MJ Kinman's Between River & Sky quilt from her Bourbon Diamonds series. Absolute perfection!
Find out more here.


2. New collection sneak peek: Jump Ride Spin by Tracey Wirth. These whimsical prints are so much fun! 
See the entire collection here.


3. Jacquie's Favorites - We're so excited about this collaboration! Take a look at the 18 Painter's Palette Solids colors in this collection curated by Jacquie Gering herself. Use them to make her Whirlygig pattern!
See all 18 colors here.


4. Bold florals, cool geometrics and perfectly coordinated small prints - Meet our Dianthus collection! Available in two colorways.
See the entire collection here.


5. Get ready for a Quilt Along! We'll be making the Dear Friends Suitcase Quilt here on the blog and invite you to sew along with us. Kit information and dates coming soon.
Find the pattern here.


Wednesday, September 5, 2018

Start a NEW Block of the Month Quilt!

Fall is right around the corner, and quilting season is just getting started. It's the perfect time to sign up for a Block of the Month project, and we have three that we think you'll love!


Hopscotch & Butterflies 
Designed by Quilted Memories featuring the On Your Mark collection by Simone Bradford
Cut and piece this cheery quilt with the bright, modern On Your Mark prints! Quilt measures 67" x 90".


Sign up for this FREE block of the month program here. Contact Quilted Memories for kits. This 12-week BOM begins the week of September 3rd; anyone joining later will receive the links for earlier blocks at that time.
 See the entire On Your Mark collection here

___________________________________________________________________


Manzanita Grove Sampler
Designed by Barbara J. Eikmeier featuring her Manzanita Grove collection
This 10-month BOM album quilt sampler features 41 different blocks inspired by antique quilts; the blocks float in cream sashing with a red mini print background. Quilt measures 80" square.

Sign up for the Manzanita Grove Sampler program here.
Read more about the Manzanita Grove Sampler here.
See the entire Manzanita Grove collection here

___________________________________________________________________


Freeform
Designed by Jean Nolte featuring the Freeform collection
This 6-month medallion-style BOM is made in cool green and purple prints from our Freeform collection. Quilt measures 90" square. BOM participants have access to free videos showing techniques and tips for making the blocks. 

Sign up for the Freeform BOM program here
See the entire Freeform collection here.

Which one do you want to make?

Friday, August 31, 2018

Back to School: Window Zipper Pouches

Happy Friday! We're finishing up our back to school series today with one more school-themed project featuring Hoodie Crescent's Ring Ring collection. 


These Window Zipper Pouches are made using the 3-Ring Binder Pouch tutorial from Caroline @sewcanshe. We love the clear vinyl window feature so you can see what's inside, and it's easier to do than you think! This design works well with and without binder holes--your choice! 

Caroline's assembly method covers all the raw edges and keeps your iron far away from the very melt-able vinyl. :) We made one version with the pink dots, following Caroline's tutorial but adding grommets to the bottom edge rather than fabric loops. 


We made a second version using two different fabrics for contrast:


Our Back to School Series:
Find our pencil case tutorial here.
Find the fabric boxes tutorial here.
Find the drawstring tote tutorial here.
Find the notebook cover tutorial here.
See the entire Ring Ring collection here and ask for it at your local quilt shop. 

..............................................................................................................................

Looking for more Ring Ring ideas?
Check out Hoodie on Instagram: @fabalacarte

Download our FREE Ring Ring quilt pattern, Linked Up, here:


 Purchase the Star Crossing quilt pattern here:


Thursday, August 30, 2018

Back to School: Notebook Covers

We're celebrating back to school, we're sharing some projects and tutorials featuring Hoodie Crescent's Ring Ring collection. See the links to all our projects at the bottom of this post.

One of the best parts of back to school is the composition notebook...a blank slate of opportunity, just waiting for ideas, notes, sketches... Today we're using this Journal Cover tutorial from Rachel @stitchedincolor, and of course, Hoodie's school supply-themed prints! 


A combination of two prints make a graphic cover.

Look at that notebook page, ready to use!


We used the orange pencil selvedge on this cover.

The diagonal pieced cover; keep scrolling and we'll show you how to make this!

You'll need:
(1) 2" x 42" strip each pink, orange, green, blue and gray dot
1/2 yard gray pencil print
(1) 9" x 17" piece of muslin

Cutting:
From the gray pencil print:
(2) 3" x 15-1/2" lengthwise pieces (with pencils running the short way)
(2) 7-1/2" x 12" pieces (with pencils running the long way)

Step 1 Mark the width of the pieced area--7" so you can see what needs to be covered as you add strips. Draw a 45" degree line on the muslin as a guide for laying out strips. 
Step 2 Lay a 2" dot strip along hte diagonal line, right side up. Make sure the ends extend beyond the horizontal lines and then trim strip.


Step 3 Position a second strip on top, right sides together. The strips will need to be offset to cover the horizontal lines. Sew using a 1/4" seam allowance and press open. 


Step 4 Continue adding strips until your muslin is covered. Trim pieced area to measure 15-1/2" long by 7" tall.


Step 5 Sew 3" x 15-1/2" gray pencil strips to the top and bottom. Topstitch 1/8" from the seam to secure.


Step 6 Sew 7-1/2" x 12" gray pencil pieces to opposite ends as shown. 


Step 7 Continue following Rachel's tutorial to assemble the notebook cover. 


Which one would you make? 


Find our pencil case tutorial here.
Find the fabric boxes tutorial here.
Find the drawstring tote tutorial here.
See the entire Ring Ring collection here and ask for it at your local quilt shop. 

Wednesday, August 29, 2018

Back to School: Drawstring Tote Tutorial

We're celebrating back to school, we're sharing some projects and tutorials featuring Hoodie Crescent's Ring Ring collection. See the links to all our projects at the bottom of this post.

Today we're featuring a drawstring tote made with the telephone print fabrics--sew fun and not just for the kids! You'll want one of these for yourself!


Drawstring Tote

You'll Need:
1 fat quarter each of green, pink, blue and orange telephone prints
1 yard black phone book print
1/2 yard green phone book print for lining
1/2 yard muslin

Cutting:
From each telephone print: 
(1) 4" x 15" piece

From the black phone book print: 
(3) 3" x 42" strips for drawstrings
(1) 14-1/2" x 18-1/2" directional piece
(2) 3" x 15" directional pieces

From the green phone book print:
(2) 14-1/2" x 18-1/2" pieces for lining


From the muslin:
(1) 15" x 19" piece

Make the Tote:
Step 1 Lay out the (4) 4" x 15" telephone print pieces and add 3" x 15" black phone book pieces to the top and bottom. Sew the pieces together lengthwise. 


Step 2 Layer the pieced front on the 15" x 19" muslin piece. Topstitch 1/4" from each seam line. Trim piece to measure 14-1/2" x 18-1/2".


Step 3 Layer the pieced front right sides together with the 14-1/2" x 18-1/2" black phone book piece and pin. Sew down each side (not the bottom!) with a 1/2" seam allowance, leaving a 1" opening that is 1/2" from each top edge as shown. Backstitch on both sides of the opening. 


Step 4 Layer the (2) 14-1/2" x 18-1/2" green phone book pieces right sides together. Stitch around the sides and bottom with a 1/2" seam allowance, leaving a 6" opening on the bottom edge. 


Step 5 Turn the outer bag right side out. Tuck it inside the lining so right sides are facing. Align side seams and pin the top raw edges together. 


Step 6 Turn the bag right side out and tuck the lining inside. Press the top edge of the bag. Stitch around the edge of the bag, 1-1/2" from the top, to create a casing for the drawstrings. Make sure that you're only sewing through the outer bag and the lining, and not accidentally sewing the other side of the bag as well. 


Step 7 Sew the (3) 3" x 42" black phone book strips short ends together. Press the long strip wrong sides together lengthwise. Unfold and press each long edge to the center fold. Refold on the original line. Topstitch 1/4" from both edges to create a drawstring strap. Cut in half to make (2) straps. 


Step 8 Attach a safety pin to the end of a strap. Pass it through the front casing from the left side, through the back casing, and out the same hole you started at as shown below. Repeat with the opposite strap, starting and ending on the right side. 


Step 9 Adjust the strap on the left so the ends are even. Note: If you want to shorten the strap lengths, cinch the straps at this point and try it on. Trim straps as needed. Pin the ends 1" in from the side seam as shown. Baste in place. Repeat with the second strap on the other end. 


Step 10 Turn the back wrong side out, align the front and back bottom edges, and pin. Stitch the bottom edge of the outer tote using a 1/2" seam allowance. Turn bag right side out. 
Step 11 Stitch the opening in the lining closed and tuck into the bag. 

Drawstring tote in action:


See the entire Ring Ring collection here and ask for it at your local quilt shop. 

Find our pencil case tutorial here.
Find the fabric boxes tutorial here.
Find the notebook cover tutorial here.