Pages

Friday, August 31, 2018

Back to School: Window Zipper Pouches

Happy Friday! We're finishing up our back to school series today with one more school-themed project featuring Hoodie Crescent's Ring Ring collection. 


These Window Zipper Pouches are made using the 3-Ring Binder Pouch tutorial from Caroline @sewcanshe. We love the clear vinyl window feature so you can see what's inside, and it's easier to do than you think! This design works well with and without binder holes--your choice! 

Caroline's assembly method covers all the raw edges and keeps your iron far away from the very melt-able vinyl. :) We made one version with the pink dots, following Caroline's tutorial but adding grommets to the bottom edge rather than fabric loops. 


We made a second version using two different fabrics for contrast:


Our Back to School Series:
Find our pencil case tutorial here.
Find the fabric boxes tutorial here.
Find the drawstring tote tutorial here.
Find the notebook cover tutorial here.
See the entire Ring Ring collection here and ask for it at your local quilt shop. 

..............................................................................................................................

Looking for more Ring Ring ideas?
Check out Hoodie on Instagram: @fabalacarte

Download our FREE Ring Ring quilt pattern, Linked Up, here:


 Purchase the Star Crossing quilt pattern here:


Thursday, August 30, 2018

Back to School: Notebook Covers

We're celebrating back to school, we're sharing some projects and tutorials featuring Hoodie Crescent's Ring Ring collection. See the links to all our projects at the bottom of this post.

One of the best parts of back to school is the composition notebook...a blank slate of opportunity, just waiting for ideas, notes, sketches... Today we're using this Journal Cover tutorial from Rachel @stitchedincolor, and of course, Hoodie's school supply-themed prints! 


A combination of two prints make a graphic cover.

Look at that notebook page, ready to use!


We used the orange pencil selvedge on this cover.

The diagonal pieced cover; keep scrolling and we'll show you how to make this!

You'll need:
(1) 2" x 42" strip each pink, orange, green, blue and gray dot
1/2 yard gray pencil print
(1) 9" x 17" piece of muslin

Cutting:
From the gray pencil print:
(2) 3" x 15-1/2" lengthwise pieces (with pencils running the short way)
(2) 7-1/2" x 12" pieces (with pencils running the long way)

Step 1 Mark the width of the pieced area--7" so you can see what needs to be covered as you add strips. Draw a 45" degree line on the muslin as a guide for laying out strips. 
Step 2 Lay a 2" dot strip along hte diagonal line, right side up. Make sure the ends extend beyond the horizontal lines and then trim strip.


Step 3 Position a second strip on top, right sides together. The strips will need to be offset to cover the horizontal lines. Sew using a 1/4" seam allowance and press open. 


Step 4 Continue adding strips until your muslin is covered. Trim pieced area to measure 15-1/2" long by 7" tall.


Step 5 Sew 3" x 15-1/2" gray pencil strips to the top and bottom. Topstitch 1/8" from the seam to secure.


Step 6 Sew 7-1/2" x 12" gray pencil pieces to opposite ends as shown. 


Step 7 Continue following Rachel's tutorial to assemble the notebook cover. 


Which one would you make? 


Find our pencil case tutorial here.
Find the fabric boxes tutorial here.
Find the drawstring tote tutorial here.
See the entire Ring Ring collection here and ask for it at your local quilt shop. 

Wednesday, August 29, 2018

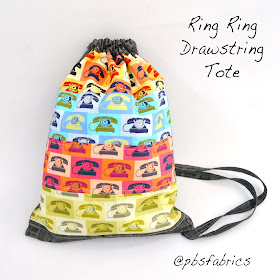
Back to School: Drawstring Tote Tutorial

We're celebrating back to school, we're sharing some projects and tutorials featuring Hoodie Crescent's Ring Ring collection. See the links to all our projects at the bottom of this post.

Today we're featuring a drawstring tote made with the telephone print fabrics--sew fun and not just for the kids! You'll want one of these for yourself!


Drawstring Tote

You'll Need:
1 fat quarter each of green, pink, blue and orange telephone prints
1 yard black phone book print
1/2 yard green phone book print for lining
1/2 yard muslin

Cutting:
From each telephone print: 
(1) 4" x 15" piece

From the black phone book print: 
(3) 3" x 42" strips for drawstrings
(1) 14-1/2" x 18-1/2" directional piece
(2) 3" x 15" directional pieces

From the green phone book print:
(2) 14-1/2" x 18-1/2" pieces for lining


From the muslin:
(1) 15" x 19" piece

Make the Tote:
Step 1 Lay out the (4) 4" x 15" telephone print pieces and add 3" x 15" black phone book pieces to the top and bottom. Sew the pieces together lengthwise. 


Step 2 Layer the pieced front on the 15" x 19" muslin piece. Topstitch 1/4" from each seam line. Trim piece to measure 14-1/2" x 18-1/2".


Step 3 Layer the pieced front right sides together with the 14-1/2" x 18-1/2" black phone book piece and pin. Sew down each side (not the bottom!) with a 1/2" seam allowance, leaving a 1" opening that is 1/2" from each top edge as shown. Backstitch on both sides of the opening. 


Step 4 Layer the (2) 14-1/2" x 18-1/2" green phone book pieces right sides together. Stitch around the sides and bottom with a 1/2" seam allowance, leaving a 6" opening on the bottom edge. 


Step 5 Turn the outer bag right side out. Tuck it inside the lining so right sides are facing. Align side seams and pin the top raw edges together. 


Step 6 Turn the bag right side out and tuck the lining inside. Press the top edge of the bag. Stitch around the edge of the bag, 1-1/2" from the top, to create a casing for the drawstrings. Make sure that you're only sewing through the outer bag and the lining, and not accidentally sewing the other side of the bag as well. 


Step 7 Sew the (3) 3" x 42" black phone book strips short ends together. Press the long strip wrong sides together lengthwise. Unfold and press each long edge to the center fold. Refold on the original line. Topstitch 1/4" from both edges to create a drawstring strap. Cut in half to make (2) straps. 


Step 8 Attach a safety pin to the end of a strap. Pass it through the front casing from the left side, through the back casing, and out the same hole you started at as shown below. Repeat with the opposite strap, starting and ending on the right side. 


Step 9 Adjust the strap on the left so the ends are even. Note: If you want to shorten the strap lengths, cinch the straps at this point and try it on. Trim straps as needed. Pin the ends 1" in from the side seam as shown. Baste in place. Repeat with the second strap on the other end. 


Step 10 Turn the back wrong side out, align the front and back bottom edges, and pin. Stitch the bottom edge of the outer tote using a 1/2" seam allowance. Turn bag right side out. 
Step 11 Stitch the opening in the lining closed and tuck into the bag. 

Drawstring tote in action:


See the entire Ring Ring collection here and ask for it at your local quilt shop. 

Find our pencil case tutorial here.
Find the fabric boxes tutorial here.
Find the notebook cover tutorial here.

Tuesday, August 28, 2018

Back to School: Fabric Boxes

Nothing says "back to school" like organization! As part of our week sharing projects and tutorials featuring Hoodie Crescent's Ring Ring collection, today we're using the ink pen, dot, phone and phone book prints to make some must-have organizing pieces. 

We used the Fabric Scrap Basket tutorial from Christina @sometimescraftr to whip up a few boxes in a couple of Hoodie's prints. Christina made these to hold her fabric scraps, but they're perfect for desktops and crafting supplies as well! You can make one using just two fat quarters. Find her tutorial here.


Pink dots and ink pens:

Gray ink pens with a phone book liner:

We got fancy here--we pieced the outer box piece so we could showcase a strip of the phone print. We'll show you how below. 


Making the Pieced Box Variation
Cutting:
From the gray dot:
(4) 2" x 6-1/2" pieces
(4) 1-1/2" x 6-1/2" pieces
(1) 6-1/2" square

From the pink phone print:
(4) 2" x 6-1/2" fussy cut pieces (to center a strip of phones)

Step 1 Sew together (1) 1-1/2" x 6-1/2" gray dot piece, (1) 2" x 6-1/2" pink phone piece, and (1) 2" x 6-1/2" gray dot piece. Make (4) pieced sections. Press the seams up on (2) sections and down on the remaining (2) sections to aid in nesting when you assemble the box. 


Step 2 Noting orientation, sew (2) up-pressed sections to opposite sides of the 6-1/2" gray dot square, starting and stopping 1/4" from the end. Sew (2) down-pressed sections to the remaining sides. 


Step 3 Cut the 15" square of interfacing as directed in the tutorial, and then cut 4-1/2" squares from each corner. Fuse to the back of your pieced unit and trim fabric to align with interfacing as needed. (Note: You'll also need to trim the exposed 1/4" off the top of each interfacing "arm"--this creates the pink edge you see on our box.)

Step 4 Assemble the box as directed. When you turn the box right side out and tuck the lining in, you'll have a contrasting edge along the outer box. Topstitch on this contrasting edge. 


See the entire Ring Ring collection here and ask for it at your local quilt shop. 

Find our pencil case tutorial here.
Find the drawstring tote tutorial here.
Find the notebook cover tutorial here.


Monday, August 27, 2018

Back to School: Pencil Case Tute

In honor of back to school, we're sharing some projects and tutorials featuring Hoodie Crescent's Ring Ring collection. Her pencils, ink pens, phones, and dots are the perfect prints for pencil cases, organizing boxes, notebook covers, and more! 

This pencil case measures 5-1/2" x 9"--perfect for holding newly sharpened #2s!
Follow the tutorial below to make your own. 


Ring Ring Pencil Case

You'll Need:
1 fat quarter each of (4) pencil prints and (1) blue dot print
(1) 12" zipper in a coordinating color
(1) 10-1/2" square of fusible batting


Cutting:
From each pencil print:
(1) 3-1/2" x 10-1/2" piece

From the blue dot:
(1) 10-1/2" square
(2) 1-1/2" x 3" pieces

Make the Pencil Case:
Step 1 Sew the (4) 3" x 10-1/2" pencil pieces together lengthwise.


Step 2 Fuse the 10-1/2" batting square to the back and quilt as desired. We stitched 1/4" on each side of the seams.


Step 3 Press in 1/4" on both short ends of the 1-1/2" x 3" blue dot pieces as shown. Fold and press the piece in half. 


Step 4 Tuck the zipper pull end of the zipper into the center fold of a blue dot piece. Stitch across the zipper to secure both sides of the blue dot piece to the zipper as shown. Align the zipper with the pieced bag square and trim the opposite zipper end 1/8" in from the end. Be careful not to pull the zipper apart! 


Step 5 Tuck the raw end of the zipper into the second folded blue dot piece and stitch to secure. Your zipper with tabs should be the same length as the pieced bag square.


Step 6 Trim the blue dot tabs even with the zipper width. 


Step 7 Lay the zipper right side down on the pieced bag square as shown and pin into place.


Step 8 Layer the 10-1/2" blue dot square right sides together on the zipper. Pin into place and stitch, using a zipper foot. 
Step 9 Press the pieced bag square and blue dot square away from the zipper. Topstitch 1/4" from the edge of the zipper. 


Step 10 Align the opposite end of the pieced square with the other side of the zipper, right sides together, and pin. 


Step 11 Fold the blue dot lining square back onto itself and align with the zipper. Pin in place and stitch using a zipper foot. 


Step 12 Turn the case right side out. Topstitch along the second zipper edge is a little trickier. You'll need to manipulate the case so the zipper edge where you're stitching is in the zipper opening, and ensure that the rest of the case doesn't get in the way. 


Step 13 At this point, your case should look like this.  Press it flat so the zipper is centered.


Step 14 Turn the case wrong side out. Make sure the zipper is open! Stitch along each end using a 1/4" seam allowance. Use a zig zag stitch to finish off the raw edges. 


Step 15 Turn the case right side out and fill with pencils. 


The pencil print is an obvious choice for this case, but we love this monochromatic version as well. Grab your own blue, gray or pink fat quarter bundle here


See the entire Ring Ring collection here and ask for it at your local quilt shop. 

Find the fabric boxes tutorial here.
Find the drawstring tote tutorial here.
Find the notebook cover tutorial here.
See the entire Ring Ring collection here and ask for it at your local quilt shop.